Quantcast
Channel: My Teams Lab
Viewing all 63 articles
Browse latest View live

Lync 2013 Centralised Logging Deep Dive

$
0
0

Overview


Lync 2013 brings with it a new form of logging that differs greatly from the logging tools previously supplied in Lync 2010. In Lync 2010 the Lync Logging Tool offered the ability to log directly on a single server in a pool. As a result, in Lync 2010 logging across a pool of ten servers requires running the logging tool on multiple servers at once, which can be a cumbersome undertaking.   

Lync 2013 has new capability called the Centralised Logging Service. The new logging service consists of two main components, a Logging Controller, and a Logging Agent. The Logging Agent runs on each of the Lync Front End servers, under the service name “Lync Server Centralised Logging Service Agent”.


The service runs the ClsAgent.exe executable and listens for commands on the following ports: TCP 50001TCP 50002, and TCP 50003. This can be seen using netstat:


When the agent receives a command, it sends messages to the defined components for tracing, and writes the trace logs to disk. It also reads the trace logs for its computer and sends the trace data back to the controller when requested.

The Second component used for centralised logging is the Centralised Logging Controller. The Centralised Logging Controller sends Start, Stop, Flush, and Search commands to the ClsAgents on all the servers in a specified pool. The Lync 2013 Preview release contained a command line tool called ‘ClsController.exe’ (which still exists in the RTM release) that could be used to control the Centralised Logging Agents on the Lync Front End servers. The release of Lync 2013 RTM has taken this a step forward offering Powershell commands that send commands through a Dynamic Link Library called “ClsControllerLib.dll”.

When search commands are sent, the resulting logs are returned to the ClsControllerLib.dll and aggregated. The controller is responsible for sending commands to the agent, receiving the status of those commands and managing the search log file data as it is returned from the agents, and aggregating the log data into a meaningful and ordered output set.

Here is a diagram of the relationship between the two Controller and Agents:


The documentation now available on TechNet states that two scenarios can be run on a given computer at any one point in time. What this actually means in practice is that you can run one default or custom scenario, in addition to AlwaysOn logging. Even if you have AlwaysOn logging turned off, you can’t run multiple other scenarios at once. If you are in a situation where you need to run multiple default scenarios at once, then you can create your own custom scenario that includes all of the logging providers used by the default scenarios you are trying to emulate (see the Custom Scenarios section of this post).


How Does Centralised Logging compare to Lync 2010 Logging Tool?

So, what are all these weird scenario names and how do they relate to my favourite Lync Logging Tool filters (SIPStack, S4, etc)? I’m glad you asked, and I made this table to help you understand what the new Scenarios are doing in the background. The following table shows the default scenario names used for centralised logging, and the components that are logged for each of these scenarios.
Lync 2010 Logging Tool
The third column in this table relates to the Components from the old Lync Logging Tool (which is incidentally still available for download for Lync 2013 in the Debugging tools install). The components list can be seen on the left hand side of the tool.

Logging Comparison Table


The table explains which components get used for each default logging scenario in Lync 2013 centralised logging.

Description
Centralised Logging Tool Scenario
Lync 2010 Logging Tool Components
AlwaysOn is a special scenario that can be enabled to log all the time. The AlwaysOn scenatio can run in conjunction with one other scenario.


AlwaysOn
AsMcu
AcpMcu
AVMCU
AVMP
BICommon
BICOSMOS
BIDATACOLLECTOR
CAAServer
Collaboration
DataMCU
DataMcuRuntime
ExumRouting
IMMCU
InboundRouting
InterClusterRouting
McuInfra
MediationServer
OutboundRouting
Routing_Data_Sync_Agent
S4
ServerTransportAdaptor
Sipstack
LDM
AppShareOoty
RDPApiTrace
RDPEncComTrace
RdpApiTrace
UserServices
UDCAgent
PNCHService
TenantAdminUI
HostedMigration
Powershell
UCWA
ChatCommon
ChatEndpoint
ChatServer
ChatCompliance
ChatWebService
XmppTGW
XmppCommonLibrary
XmppListener
XmppRouting
XmppTGWProxy
Lyss
StoreWeb
TranslationApplication
RgsClientsLib
RgsCommonLibrary
RgsDatastores
RgsDiagnostics
RgsHostingFramework
RgsMatchMakingService
CpsDiagnostics
CpsHostingFramework
JoinLauncher
WebInfrastructure
Infrastructure
InternalCommon
McxService
UserPinService
CertProvisioning
BackupService
RtcDbSyncAgent
WebRelay
ServerAgent
Media related logging
MediaConnectivity
MediaStack_AUDIO_AGC
MediaStack_AUDIO_DRC
MediaStack_AUDIO_ECHODT
MediaStack_AUDIO_FAXDT
MediaStack_AUDIO_HEALER
MediaStack_AUDIO_NOISEDT
MediaStack_AUDIO_VAD
MediaStack_AUDIO_VSP
MediaStack_AudioCodecs
MediaStack_AudioEngine
MediaStack_COMAPI
MediaStack_COMMON
MediaStack_Crossbar
MediaStack_Crypto
MediaStack_DebugUI
MediaStack_DebugUI_AEC
MediaStack_DEVICE
MediaStack_MassConvertedTraces1
MediaStack_MediaManager
MediaStack_PerFrame
MediaStack_PerPacket
MediaStack_QualityController
MediaStack_RTCP
MediaStack_RTP
MediaStack_StreamingEngine
MediaStack_TLS
MediaStack_Transport
MediaStack_VIDEO
MediaStack_VOICEENHANCE
Application Sharing
ApplicationSharing
AsMcu
AppShareOoty
ServerTransportAdaptor
RDPApiTrace
RDPEncComTrace
MCUInfra
Collaboration
S4
Audio and Video Conferencing Logging
AudioVideoConferencingIssue
AvMcu
AvMP
MCUInfra
Collaboration
S4
Hybrid Cloud voice deployments
HybridVoice
MediationServer
S4
Sipstack
OutboundRouting
TranslationApplication
General Call logging
IncomingAndOutgoingCall
MediationServer
S4
Sipstack
TranslationApplication
OutboundRouting
InboundRouting
UserServices
Voice Mail
VoiceMail
Sipstack
ExumRouting
InboundRouting
IM and Presence Logging
IMAndPresence
Sipstack
UserServices
Address Book service logging
AddressBook
ABCommon
ABServer
ABServerIISModule
Dlx
Device Update service logging
DeviceUpdate
DeviceUpdate
DeviceUpdateHttpHandler
Lync Storage Service and Unified Contact Store logging
LYSSAndUCS
UserServices
Lyss
McuInfra
Centralised Logging Service logging
CLS
CLSAgent
CLSCommon
CLSController
CLSControllerLib
Support Portal logging
SP
SupportPortal
SPHelper
SPModule
SPSearchTool
SPCLSTool
CLSCommon
CLSControllerLib
Web Access Server logging
WAC
DataMCURunTime
DataMCU
LDM
Infrastructure
WebInfrastructure
InternalCommon
User Replicator Service (synchronization between AD DS and Lync Server)
UserReplicator
UserServices
Lync Online Migration
HostedMigration
HostedMigration
Powershell
WebInfrastructure
Monitoring and Archiving logging
MonitoringAndArchiving
UDCAgent
LILRLegacy
LILRLegacy
LogRetention
LegalIntercept
LILRLYSS
LILRLYSS
LogRetention
UDCAgent
Meeting logging
MeetingJoin
Collaboration
S4
UserServices
McuInfra
JoinLauncher
WebInfrastructure
Infrastructure
InternalCommon
UCWA
WebRelay
Response Group Service
RGS
RgsClientsLib
RgsCommonLibrary
RgsDatastores
RgsDeploymentApi
RgsDeploymentLibrary
RgsDiagnostics
RgsHostingFramework
RgsMatchMakingService
UserServices
Collaboration
S4
Sipstack
Call Park Service 
CPS
CpsDiagnostics
CpsHostingFramework
UserServices
Collaboration
S4
Sipstack
XMPP service logging
XMPP
XmppTGW
XmppCommonLibrary
XmppListener
XmppRouting
XmppTGWProxy
Collaboration
S4
Sipstack
Conference Auto Attendant 
CAA
CAAServer
Collaboration
S4
Sipstack
UserServices
Dial in conferencing MCU
ACPMCU
AcpMcu
Collaboration
S4
SipStack
Authentication Logging
Authentication
SipStack
UserServices
WebInfrastructure
UserPinService
CertProvisioning
High Availability
Disaster Recovery
HADR
UserServices
PowerShell
BackupService
RtcDbSyncAgent
Powershell
Powershell
Powershell
FilterApps
FilterApps
IIMFilter
ClientVersionFilter
ServerAgent
SipStack


What is AlwaysOn Logging?


AlwaysOn is a setting that can be made on a pool that forces the pool to be logging all the time. When you run a Show-CsClsLogging on your server you can see that AlwaysOn gets its own separate status shown in the output:

> Show-CsClsLogging
Success Code - 0, Successful on 1 agents

Tracing Status:

2013STDFE001.mylynclab.com (2013STDFE001 v5.0.8308.0) (AlwaysOn=No,Scenario=HostedMigration,Started=
4/6/2013 11:25:47 PM,By=2013STDPC\Administrator,Duration=0.04:00)
    2013STDFE001.mylynclab.com (2013STDFE001 v5.0.8308.0) (Same as pool)

This is because AlwaysOn functions as an everyday log that can be used to troubleshoot issues that might have happened during the day. The AlwaysOn logging scenario logs for all of the components available, at an Infolevel, as shown below:


> Get-CsClsScenario | Where-Object {$_.identity -like "Global/AlwaysOn"} | Select-Object provider | Select-Object -ExpandProperty provider

Name  : AsMcu
Type  : WPP
Level : Info
Flags : TF_COMPONENT,TF_PROTOCOL

Name  : AcpMcu
Type  : WPP
Level : Info
Flags : TF_COMPONENT

Name  : AVMCU
Type  : WPP
Level : Info
Flags : TF_COMPONENT,TF_PROTOCOL

Continued...

So, if you are running AlwaysOn already on a pool, then the only reason you would need to run another scenario at the same time would be to log at a higher level of detail (eg. Debug). Note, only one additional scenario can be logging at the same time as AlwaysOn is running.

If you run a Search-CsClsLogging (with no filters) on a scenario, at the same time as AlwaysOn was logging, you will receive the AlwaysOn logging in the output file as well. As a result, if you need to do very specific logging, you might want to turn off the AlwaysOn logging before you start the specific scenario you want to log for (or remember to use an appropriate filter when running Search-CsClsLogging to remove the unnecessary logs).

Logging Files

Temporary log files are written to the folder on each of the Lync servers with logging enabled. All log files will be placed in the folder specified in the Get-CsClsConfiguration command, as shown below:

> Get-CsClsConfiguration


Identity                      : Global
Scenarios                     : {Name=AlwaysOn, Name=MediaConnectivity, Name=ApplicationSharing, Name=AudioVideoConferencingIssue...}
SearchTerms                   : {Type=Phone;Inserts=ItemE164,ItemURI,ItemSIP,ItemPII, Type=URI;Inserts=ItemURI,ItemSIP,ItemPII, Type=CallId;Inserts=ItemCALLID,ItemURI,ItemSIP,ItemPII,
                                Type=ConfId;Inserts=ItemCONFID,ItemURI,ItemSIP,ItemPII...}
SecurityGroups                : {}
Regions                       : {}
EtlFileFolder                 : %TEMP%\Tracing
EtlFileRolloverSizeMB         : 20
EtlFileRolloverMinutes        : 60
TmfFileSearchPath             :
CacheFileLocalFolders         : %TEMP%\Tracing
CacheFileNetworkFolder        :
CacheFileLocalRetentionPeriod : 14
CacheFileLocalMaxDiskUsage    : 80
ComponentThrottleLimit        : 5000
ComponentThrottleSample       : 3
MinimumClsAgentServiceVersion : 6


Note: If you cut and paste this address into the file browser you will end up in a location like this:

C:\Users\Administrator.DOMAIN\AppData\Local\Temp\2\Tracing

Most likely this location is void of any logging files, which might leave you scratching you head. However, there is good reason for this: you’re logged in as a user on the server and as a result you’re getting taken to the temp folder of the user you’re logged in as.

Meanwhile, the Logging Service is logged in as the NetworkService (as are all Lync services), so when it accesses this address it ends up at the following folder:

C:\Windows\ServiceProfiles\NetworkService\AppData\Local\Temp\Tracing


The logs folder will have three different types of files in it: ETL, HDR and CACHE files. Currently running logging services are streaming to ETL files (eg. CLS_WPP_04-05-2013-13-34-46_1.etl). When the logging is stopped the ETL file content gets converted into an HDR and a CACHE file.

The HDR file contains information about the capture, eg:

AgentVersion=2.0
Starttime=5/04/2013 2:27:11 AM
Endtime=5/04/2013 2:30:26 AM
MostSevereLevel=3
ComponentNames=(Shared),SIPStack,UserServices
CorrelationIds=0,2446939738,2446939785,2899899976,2970877857,1910046407,2765731706,1926842570,947404259,3734898740,3285769719,2895070652,2630969344,1910046457,3397217402,3308872234,2765731776,1484520309,1137574355

The CACHE file is an actual logging file that contains the information that was logged. Sections of this file are in binary, and sections in clear text. The CACHE file cannot be directly opened in Snooper. In order to do this you must run the Search-CsClsLogging command to retrieve the correct format.

 Other Useful Centralised Logging Settings


There are a number of other useful settings within Get-CsClsConfiguration that might be of use to you when it comes to finely tuning your logging solution. Here are some settings that you might consider tweaking:

EtlFileRolloverSizeMB         : 20
EtlFileRolloverMinutes        : 60
TmfFileSearchPath             :
CacheFileLocalFolders         : %TEMP%\Tracing
CacheFileNetworkFolder        :
CacheFileLocalRetentionPeriod : 14
CacheFileLocalMaxDiskUsage    : 80
ComponentThrottleLimit        : 5000
ComponentThrottleSample       : 3

EtlFileRolloverSizeMB: Maximum size (in megabytes) that at event trace log file can reach before a new file is created. The default value is 20.

EtlFileRolloverMinutes: Maximum amount of time (in minutes) that can elapse before a new event log trace file is created. (This new file will be created even if the existing trace file has not reached the specified rollover size.) The default value is 60.

CacheFileLocalRetentionPeriod: Maximum number of days that cache files are retained locally. The default value is 14.

CacheFileLocalMaxDiskUsage: Maximum amount of disk space (percentage) that can be used for the cache files. The default value is 80.

Creating Custom Logging Scenarios


Let me first start by explaining in a little more depth what a scenario actually is. A scenario is basically a collection of one, or many, logging streams (in Microsoft speak; ‘components’). For example, if we were to take AddressBook scenario, which logs things to do with the Address Book Service. From the table earlier we can see that the components being logged for the AddressBook scenario include ABCommon, ABServer, ABServerIISModule, and Dlx. As might be obvious by their names, these services are all directly relating to the Address Book, whereas components likeMediaStack_MediaManager have nothing to do with the AddressBook so we don’t include them in the scenario.
Put in a different way, a Scenario functions as a Pre-Capture filter that determines what is written to disk on the server running the Centralised Logging Agent Service. After this information has been logged to disk on the Agent server, the search-cslcslogging command can be used in conjunction with additional (Post-Capture) filter parameters to determine the logging output that is written to the final log file. Below is a diagram that describes the process:
 
Creating a custom Centralised Logging Scenario is quite simple: it’s a matter of first creating provider(s) and then creating a scenario from the providers:
Create a provider:
$provider=New-CsClsProvider-Name"AvMcu"-Type"WPP"-Level"Info"-Flags"All"


The New-CsClsProviderpage on TechNet currently (April 2013) states that the provider Nameparameter is a “Unique Name”. After reading this and looking at the command, I was left a little confused, because there are no other parameters that tell the provider what components it should be logging for. So, whilst the New-CsClsProvider command will let you create a provider with a Name of “MegaLoggingSuperLogLogger”, this isn’t a component name that means anything to the logging service. If you use this provider (with a unique name) and try and run it on an Agent it will Start successfully:

> Start-CsClsLogging -Scenario CUSTOMSCENARIO -pools 2013ENTFE004.mylynclab.com
Success Code - 0, Successful on 1 agents
Tracing Status:
2013ENTFE004.mylynclab.com (2013ENTFE004 v5.0.8308.0) (AlwaysOn=No,Scenario=CUSTOMSCENARIO,Started=4/04/2013 5:43:07 PM,By=2013ENT\Administrator,Duration=0.04:00)
2013ENTFE004.mylynclab.com (2013ENTFE004 v5.0.8308.0) (Same as pool)

It will say it’s logging when you run the Show command:
> Show-CsClsLogging
Success Code - 0, Successful on 6 agents
Tracing Status:
2013ENTFE004.mylynclab.com (2013ENTFE004 v5.0.8308.0) (AlwaysOn=No,Scenario=CUSTOMSCENARIO,Started=4/04/2013 5:43:07 PM,By=2013ENT\Administrator,Duration=0.04:00)
...

However, it will failwhen you stop correctly run the Stopcommand:
>Stop-CsClsLogging -scenario CUSTOMSCENARIO -pools 2013ENTFE004.mylynclab.com
Failed on 1 agents
Agent - 2013ENTFE004.mylynclab.com, Reason - Error code - 20005, Message - Scenario 'CUSTOMSCENARIO' not currently running.

So choosing a “Unique Name” doesn’t actually appear to be the way to go… The Name parameter should actually be the name of a component. Here is a list of Component names to choose from:

Component Names
ABCommon
InternalCommon
PNCHService
ABServer
JoinLauncher
Powershell
ABServerIISModule
LDM
RdpApiTrace
AcpMcu
LegalIntercept
RDPEncComTrace
AppShareOoty
LogRetention
RgsClientsLib
AsMcu
Lyss
RgsCommonLibrary
AvMcu
McuInfra
RgsDatastores
AVMP
McxService
RgsDeploymentApi
BackupService
MediaStack_AudioCodecs
RgsDeploymentLibrary
BICommon
MediaStack_AudioEngine
RgsDiagnostics
BICOSMOS
MediaStack_AUDIO_AGC
RgsHostingFramework
BIDATACOLLECTOR
MediaStack_AUDIO_DRC
RgsMatchMakingService
CAAServer
MediaStack_AUDIO_ECHODT
Routing_Data_Sync_Agent
CertProvisioning
MediaStack_AUDIO_FAXDT
RtcDbSyncAgent
ChatCommon
MediaStack_AUDIO_HEALER
S4
ChatCompliance
MediaStack_AUDIO_NOISEDT
ServerAgent
ChatEndpoint
MediaStack_AUDIO_VAD
ServerTransportAdaptor
ChatServer
MediaStack_AUDIO_VSP
Sipstack
ChatWebService
MediaStack_COMAPI
SPCLSTool
ClientVersionFilter
MediaStack_COMMON
SPHelper
CLSAgent
MediaStack_Crossbar
SPModule
CLSCommon
MediaStack_Crypto
SPSearchTool
CLSController
MediaStack_DebugUI
StoreWeb
CLSControllerLib
MediaStack_DebugUI_AEC
SupportPortal
Collaboration
MediaStack_DEVICE
TenantAdminUI
CpsDiagnostics
MediaStack_MassConvertedTraces1
TranslationApplication
CpsHostingFramework
MediaStack_MediaManager
UCWA
DataMCU
MediaStack_PerFrame
UDCAgent
DataMCURunTime
MediaStack_PerPacket
UserPinService
DeviceUpdate
MediaStack_QualityController
UserServices
DeviceUpdateHttpHandler
MediaStack_RTCP
WebInfrastructure
Dlx
MediaStack_RTP
WebRelay
ExumRouting
MediaStack_StreamingEngine
XmppCommonLibrary
HostedMigration
MediaStack_TLS
XmppListener
IIMFilter
MediaStack_Transport
XmppRouting
IMMCU
MediaStack_VIDEO
XmppTGW
InboundRouting
MediaStack_VOICEENHANCE
XmppTGWProxy
Infrastructure
MediationServer

InterClusterRouting
OutboundRouting


Now that you’ve created a provider and written it to a variable ($provider), it now needs to be attached to a Scenario. You do this by running New-CsClsScenario and passing it the provider as a parameter.

Attaching the provider to a new custom global scenario:

New-CsClsScenario-Identity"global/CUSTOMSCENARIO"-Provider$provider

If you would like to have a scenario with multiple providers (components) logging at once, then you can do so by passing the New-CsClsLogging command a plist with multiple providers in it.
Scenarios can be created with multiple providers, here’s how:
$LyssProvider =New-CsClsProvider-Name"Lyss"-Type"WPP"-Level"Info"-Flags"All"
$ABServerProvider =New-CsClsProvider-Name"ABSever"-Type"WPP"-Level"Info"-Flags"All"
$SIPStackProvider =New-CsClsProvider-Name"SIPStack"-Type"WPP"-Level"Info"-Flags"All"
New-CsClsScenario-Identity"global/MULTICUSTOMSCENARIO" -Provider @{Add=$LyssProvider, $ABServerProvider,  $SIPStackProvider}

What about if you want to only allow administrators at a specific site to use the logging scenario? Then you can create the scenario with a site scope.

You can attach the provider to a new site specificcustom scenario:

New-CsClsScenario-Identity"site:Melbourne Site/SITECUSTOMSCENARIO"-Provider$provider
Note:After creating a Custom Site based scenario (as shown above), and you try and start any of the Default Global scenarios, you will get an error like the one below telling you that the scenario is “Unknown”:
Start-CsClsLogging : Cannot validate argument on parameter 'Scenario'. Unknown scenario name 'VoiceMail'
At C:\Users\Administrator.2013ENT\Desktop\myCentralisedLoggingUI.ps1:43 char:50
+         [string]$clscmd = Start-CsClsLogging -Scenario $scenariotype -pools $pooltotra ...
+                                                        ~~~~~~~~~~~~~
    + CategoryInfo          : InvalidData: (:) [Start-CsClsLogging], ParameterBindingValidationException
    + FullyQualifiedErrorId : ParameterArgumentValidationError,Microsoft.Rtc.Management.Cls.StartOcsLoggingCmdlet
But hang on a minute, of course the “VoiceMail” scenario is a valid scenario! In fact, it’s one of the default scenarios… So what is going on here?
Well, the reason for this is that when you create a Site based Custom scenario, in the background, Lync will also create a new site based Configuration Identity (eg. In the background it runs New-Cs-ClsConfiguration), for example, if you run a Get-CsClsConfiguration you will see:
Identity                      : Global
Scenarios                     : {Name=AlwaysOn, Name=MediaConnectivity, Name=ApplicationSharing, Name=AudioVideoConferencingIssue...}
SearchTerms                   : {Type=Phone;Inserts=ItemE164,ItemURI,ItemSIP,ItemPII, Type=URI;Inserts=ItemURI,ItemSIP,ItemPII, Type=CallId;Inserts=ItemCALLID,ItemURI,ItemSIP,ItemPII,
                                Type=ConfId;Inserts=ItemCONFID,ItemURI,ItemSIP,ItemPII...}
SecurityGroups                : {}
Regions                       : {}
EtlFileFolder                 : %TEMP%\Tracing
EtlFileRolloverSizeMB         : 20
EtlFileRolloverMinutes        : 60
TmfFileSearchPath             :
CacheFileLocalFolders         : %TEMP%\Tracing
CacheFileNetworkFolder        :
CacheFileLocalRetentionPeriod : 14
CacheFileLocalMaxDiskUsage    : 80
ComponentThrottleLimit        : 5000
ComponentThrottleSample       : 3
MinimumClsAgentServiceVersion : 6

Identity                      : Site:Melbourne Site
Scenarios                     : {Name=SITECUSTOMSCENARIO}
SearchTerms                   : {Type=Phone;Inserts=ItemE164,ItemURI,ItemSIP,ItemPII, Type=URI;Inserts=ItemURI,ItemSIP,ItemPII, Type=CallId;Inserts=ItemCALLID,ItemURI,ItemSIP,ItemPII,
                                Type=ConfId;Inserts=ItemCONFID,ItemURI,ItemSIP,ItemPII...}
SecurityGroups                : {}
Regions                       : {}
EtlFileFolder                 : %TEMP%\Tracing
EtlFileRolloverSizeMB         : 20
EtlFileRolloverMinutes        : 60
TmfFileSearchPath             :
CacheFileLocalFolders         : %TEMP%\Tracing
CacheFileNetworkFolder        :
CacheFileLocalRetentionPeriod : 14
CacheFileLocalMaxDiskUsage    : 80
ComponentThrottleLimit        : 5000
ComponentThrottleSample       : 3
MinimumClsAgentServiceVersion : 6
See the new Site Identity (Site:Melbourne Site) that has appeared out of nowhere... It’s now taking precedence over the top of the Global policy for that pool. Also, notice that the only scenario that is under this Site is the SITECUSTOMSCENARIO, and as a result, this is the only scenario that can now be run from this site.
At this point, you may think that removing the scenario with a “Remove-CsClsScenario”, may fix this, however, this is not the case. To revert back using the Global configuration you need to remove the site configuration with the following command:
Remove-CsClsConfiguration –Identity “Site:Melbourne Site”
Now, you may need to restart the Lync Server Centralised Logging Service Agent in Windows Services so that the configuration is updated. 
The moral of this story is to only use Global policies for Centralised Logging, unless you have a very good reason not to!

Wrap up

This Deep Dive into the Centralised Logging Service has clarified how the service works, and how you can use it to get the information you need out of the system. Hopefully, this will leave you in a position to start debugging using it instead of leaning on the old Lync Logging Tool. As far as Custom Scenarios go, I would suggest you think about the type of information you may be needing out the system to fix common problems and tailoring some custom scenarios ahead of time, because you don’t really want to be messing around when the faults start rolling in. Keep logging, and bye for now.
PS: But what if you don’t like Powershell? Well, have no fear, as my next post will include a new Centralised Logging Tool GUI for your logging pleasure. 


Lync 2013 Centralised Logging Tool

$
0
0
Centralised logging is a very powerful service. However, because it’s only accessible through Powershell commands, it can be a rather daunting alternative to the old Lync Logging Tool, especially when you’re trying to troubleshoot an issue.

So what can be done about this? Well, Randy Wintle over at the UC Made Easy blog had the great idea of making a GUI interface for the Lync 2013 Preview release, which was based on the ‘ClsController.exe’ command line tool. I like this idea a lot, so now that 2013 is released, I decided to give Randy’s tool a major “Backend Lift” (different than that offered by Kim Kardashian’s plastic surgeon…) and add a bunch of new capabilities.

Centralised Logging Tool Features


Centralised Logging Tool features:

  • The tool's backend uses Powershell commands, instead of ClsController.exe commands.
  • The tool has the ability to manage logging on multiple Pools at once. When the tool first loads it will learn the current state of all the Pools. The UI can show the state of each pool as they are clicked on in the Pools listbox and only allow the user to execute functions that are available in that state (eg. Start and Stop buttons will be disabled if the current state of the pool doesn’t allow you to use them).
  • When the tool loads it will query the Lync servers for the status of running logging scenarios, and the tool will display the current state of each pool as it is selected in the pools list. This means that you can use the tool to learn what logging is currently running on each pool.
  • The scenarios list is dynamic, so Custom Scenarios will also be included in the scenarios list along with the default scenarios.
  • All pool types, including Persistent Chat pools are listed. If Mediation server is co-located with the front end server it will not be added to the list, but if it’s on a separate physical server it will be listed.
  • The tool has the ability to have AlwaysOn and Scenario logging enabled at the same time. AlwaysOn logging has its own button and status messages.
  • The components filter list can either show all the components available for logging on the system, or list only the components for the specific scenario that is currently being logged (or just logged) on a pool.
  • The Logging duration time can be specified when you Start logging, and running scenarios can have their Duration updated with the new Update button. By default, logging will run for 4 hours and then automatically stop. So if you want to do a long running log, or a much shorter log you can specify this when you start logging, or you have the option to Change the duration of a log whilst it’s running. The format of Logging duration is as follows: <days.hours:minutes> (eg. “0.04:00”) .
  • You can now select either MatchAll, or MatchAny settings. These settings affect the way multiple filters are applied when Searching/Exporting logs. If MatchAll is used, then the filters execute in a logical ‘AND’ fashion, where all the filters must match to return results. If MatchAny is selected, then the filters apply in a logical ‘OR’, which means if any of the filters match the result will be returned.
  • The Call-Id, IP Address, Phone and URI filters have separate text boxes, so these filters can be used in conjunction with each other (and the MatchAll/MatchAny setting) for more precise filtering.
  • The Components listbox is Multi-Selectable, offering export filtering by one or many component types at once.
  • Start and End time filter is now included as a filter option. By default the Search command will filter through only the last 30 minutes of logs to return a result. If you need to capture more than this then you can used the Start and End time settings. I have made the defaults in these boxes display the range of 1 hour as a starting point. It’s best that you keep the date/time format in the format shown.
  • The logging folder can be selected using a Folder Browse dialog to having to type the location.
  • Analyse Log button allows you to choose a log file to open directly in Snooper, to save you having to manually open Snooper and import the logs.
  • Interface is now written in Australian/British English :)


The Details


The Centralised Logging Tool is Stateful on a per pool basis. By that I mean that it will learn the status of all pools when it loads and it will maintain the state as you Start and Stop services. The process of querying the server (Show-CsClsLogging) for the status of the Centralised Logging Service can take several seconds to execute. This means the Controller has to query all of the Agents and then wait for them to respond before it can report back about the status of the pools. As a result, I tried to minimise the number of times the tool had to re-sync its state with the server. So, it will only request updates on the status of the Agents upon receiving an error response from a command execution (ie. A Start/Stop request). When this happens, it will fully refresh all of the Pools logging status.

I give you the new Centralised Logging Tool UI:
 Update ( 6/5/2015 ) 
1.01 Enhancements:
  • Fixed the format of the Start/Stop export date format (text fields filled when the script loads) to the region setting of the machine. This was previously hardcoded to Australian format in v1.00. Lync expects the date format in the format of the region of the computer (as set in Control Panel) for the Search command. Thanks to John Crouch for reporting this not working in the US in v1.00.
1.02 Enhancements:
  • Added SBA's to the Pool list. They also have the centralised logging service. - Nice pickup by John Crouch.
  • Collocated Persistent Chat servers now don't get added to the pool list.
1.03 Enhancements:
  • Pools listbox now is in alphabetical order.
  • Scenarios listbox is now in alphabetical order.
  • Components listbox is now in alphabetical order.
  • Annoying counting in Powershell window when the script loads has now been removed.
  • Added prerequisite check for Snooper and debugging tools when script loads.
  • Script is now signed.
  • Using UP and DOWN arrow keys on pools listbox now updates GUI correctly.
  • If pool does not have a status then an error ("ERROR: Pool status not found. Check that CLS is running correctly on pool.") will be displayed in the GUI.
  • A status message will now display to indicate to select a Pool when no pool is selected in the Pools listbox.
  • Fixed error that is displayed when Cancel button on browse dialog is clicked.
  • Fixed issue with load files in Snooper that have spaces in them.

1.04 Enhancements:
  • Now supports Skype for Business!
1.05 Enhancements:
  • Now checks for Skype for Business Snooper location.
  • Changed the default trace saving location to C:\Tracing\


DOWNLOAD HERE Version 1.05:


When starting out with the tool you might easily get confused with how the filtering of captures works. As I detailed in my last post about Centralised Logging, logging captures are filtered in the following way:
The scenario filter section shown above will either be a default scenario (capturing only the pre-defined components) that’s are already defined as part of Lync 2013, or you can build your own custom scenarios that log only the components that you are interested in.
The Agent Search filter shown above allows you to run post-capture filters on the data, so you only end up with the log information you want. This is done in the Centralised Logging Tool using the Export filters, and the Export button.
The Centralised Logging Tool has these two sections broken up as follows:


This basically means that the settings outlined in red work in conjunction with the Export button, and the Scenario list works in conjunction with the Start tracing button.


Export Filters


The export filters function as detailed below:

Start and End Times:The Start and End filter will export only items logged between the times specified.

Components Filter:Component filter can be used to select one or more components and the CLS service will export only logs relating to the components specified.

Logging Level: Logging level filters will return all levels up to the level you select; for example ‘Warning’ will retrieve Fatal, Error, and Warning results. The hierarchy is:
  1. Fatal
  2. Error
  3. Warning
  4. Info
  5. Verbose
  6. Debug
  7. All

URI Filter: The URI Filter setting works as long as you use a full SIP URI, for example john.woods@domain.com, or sip:john.woods@domain.com

IP Filter:Doesn’t appear to work. Lync returns no results for IP addresses. Last checked on version 5.0.8308.872.

CallID Filter: Enter a SIP CallID and any SIP message that matches that CallID will be captured by the filter. In addition to this; any messages with Trace-Correlation-Id's that match that of the SIP message will also be exported.

Example Filter: a1ffa6a5ef7949079ae4b34e7c67293f
...
To: <sip:holly.hunt@mylynclab.com>;tag=DB120080
Call-ID: a1ffa6a5ef7949079ae4b34e7c67293f
CSeq: 2 SUBSCRIBE
...


Phone Filter: The Phone Export Filter matches against the TO and the FROM fields of SIP messages. So this filter is useful for finding PSTN routed calls to specific numbers. example:

Example Filter: +61395829999
..
<<<<<<<<<<<<Incoming SipMessage c=[<SipTcpConnection_210F5C0>], 192.168.0.97:5068<-192.168.0.20:43904
INVITE sip:+61395829999@2013ENTFE004.mylynclab.com:5068;user=phone SIP/2.0
FROM: <sip:11300@192.168.0.20:5066;user=phone>;tag=aedb006-a46ce
TO: <sip:+61395829999@2013ENTFE004.mylynclab.com:5068;user=phone>
..

Note:The number doesn’t have to be in E.164 format, it just needs to match the number in the TO or FROM field.


SIP Contents: Enter a piece of text from a SIP or SDP Message and any SIP message that matches contain that text will be captured by the filter. In addition to this; any messages with Trace-Correlation-Id's that match that of the SIP message will also be exported.

Example Filter: rtcp:53115
v=0
o=- 29 1 IN IP4 192.168.0.97
s=session
c=IN IP4 192.168.0.97
b=CT:1000
t=0 0
m=audio 53114 RTP/AVP 8 101 13
c=IN IP4 192.168.0.97
a=rtcp:53115
a=label:Audio
a=sendrecv
a=rtpmap:8 PCMA/8000
a=rtpmap:101 telephone-event/8000
a=fmtp:101 0-16
a=rtpmap:13 CN/8000


Known Issue: Errors when Stopping Logging Service

Whilst testing the tool I’ve had some issues from time to time when calling Stop on a running scenario (both AlwaysOn and other Scenarios). The error received looks like this:

Failed on 1 agents
Agent - 2013ENTFE004.domain.com, Reason - Error code - 20003, Message - Unknown error returned by Wpp native assembly - 1168. Please refer CLS logs for details.

Unfortunately, the CLS log didn’t shine any light on why this is occurring (the logs report the same error as shown above with no additional info). I have made the tool so it’s smart enough to recognise these errors and query the server for the state of the pool again, to re-sync the status of all the pools. I have found that if you wait a few minutes (maybe 5 minutes) and then try to stop the logging scenario again it tends to work (or just keep trying till it does). I should stress that this isn’t a problem with the tool, as the issue happens when using Powershell directly as well. So I assume it’s a bug in the Agent side of the code.

If anyone knows how to avoid this error, let me know!


Notes on 2013 Snooper


Snooper is a tool that was available in Lync 2010, which provides the ability to analyse log files that are generated by the Lync Logging Tool. Snooper 2013 now also provides the ability to analyse Lync Centralised Logging Service log files.

Whilst you can also open these log files in a text editor, Snooper makes reading logs far easier. So, to make life easier I decided to put a button in the Centralised Logging Tool that will launch Snooper directly. Here it is:


When you click this button you will be shown a File Dialog that allows you to select which log file you want to open. Select the file you want to open and Snooper will open the file.

Note: If your Snooper tool is in a non-standard location you can edit a global variable in the script to point to whatever location you like:

$script:snooperLocation = "C:\Program Files\Microsoft Lync Server 2013\Debugging Tools\Snooper.exe"

If you want to change the location that the log files are saved to, edit this global variable:

$script:pathDialog = "C:\Lync2013Tracing\"

Some other good news about Snooper for Lync 2013 is that it has some cool new features, one of which is the Call Diagram button:


When you have messages from a SIP dialog selected in Snooper, and press this button, it will launch a diagrammatic representation of that particular SIP Dialog, as shown here:


Note: You have to be on the Messages tab of Snooper to launch the call flow analyser. If you are on the Trace tab you will receive a “This message is not eligible for callflow” error.

Pretty cool, huh!


Wrap Up

I have spent quite a bit of time working on the tool and tweaking it to work for most functions that I can see people wanting to use it for. If I’ve missed something and you have an awesome idea for additional functionality, let me know. Other than that, happy logging!

Lync Phone Edition Localisation

$
0
0

I was reading a post over at Jeff Schertz’s site the other day regarding getting Lync Phone Editions to use the tone set of your country, rather than the standard US tones.

It said that using Powershell and changing the “co” attribute within Active Directory was enough to set the tones on the phone to your country of choice. Unfortunately, this is not actually the case. Changing the “co” attribute in Powershell will actually not affect the country combo box shown on the Address tab. If you just set the "co" attribute with Powershell you end up with a situation like this:


The “Country/Region” setting in the Address tab when changed actually controls two attributes within Active Directory, the “co” and the “c”. The Lync Phone edition actually honours the “c” attribute, and not the “co” attribute.

As a result, I would recommend that when scripting for tone changes across your Lync users, you run a Powershell command that changes both settings. Here is my example for Australia:

Script to set Australia tones on Lync Phone Edition for all Lync users:

Import-Moduleactivedirectory

$question=Read-Host"Do you want to change the Country Parameter in AD for all lync users? (Y/N)"

if($question -eq "Y" -or $question-eq "y")
{
       Get-ADUser-Filter {msRTCSIP-UserEnabled-eq$true} | Set-ADUser-country"AU"-replace @{co="Australia"}
}


Note: You can edit the country name in the script for your appropriate country.

Hope that helps some of my non-American Lync friends J

Microsoft Lync: The Facts about Fax

$
0
0

I find that fax is often misunderstood, especially when it comes to way it works on VoIP networks. Also, I’ve noticed that there is very little information on the internet about how to deploy fax on Lync. In my years working with VoIP, I have run into many fax issues on many different platforms. So I thought I might write an article that explains exactly how Lync does, and doesn’t, support fax.

This article is not designed to be a walk-through of how to configure fax on your specific gateway, but instead to provide you with information that will help you troubleshoot your own fax problems in the future. After all; "If you give a man a fish you feed him for a day. If you teach a man to fish you feed him for a lifetime."

The best place to start here will be to talk about the Protocols used for fax communications and how they relate to each other. There are loads of protocols when it comes to fax transmissions; however, there are only a few we really need to understand the basics of for this article. Here are the main offenders:  

T.30– Is an ITU recommendation that describes procedures for sending faxes over the PSTN (via modem tones). These include: call establishment and call release; compatibility checking, status and control command; checking and supervision of line conditions; control functions and facsimile operator recall. If you would like to read the spec you can download it here.

V.34 (and other V.x protocols)– The V protocols describe the modulation and demodulation (modem) techniques used to pass data (in our case, fax) over a phone line.

T.38– Is a protocol that describes how to relay T.30 fax messages over a VoIP network. The relaying of fax is done hop by hop through the data network between VoIP gateway devices. The end fax devices are not aware that this relay process is happening (unless it’s a fax gateway that directly supports T.38), and it uses T.30 protocol directly with the Gateway that is closest to it. The gateway terminates the T.30 protocol and converts the stream into a packetised byte stream that it relays to the next hop gateway over an IP network. The Gateway on the other side receiving the T.38 stream will then convert the messaging back into T.30 protocol and pass it to the end fax machine.


CNG Tone: A word that will also come up in this article is “CNG Tone”. CNG tone is basically a tone that the originator of a fax call plays on the line to indicate that it is a fax call, and that it’s ready to start fax handshaking. The CNG signal is simply an 1100 Hz tone that plays for half a second, and then repeats every three seconds.

T.38 Calls on Lync


The T.38 protocol works in conjunction with SIP in a two step process. The first step is to set up a voice stream session. The voice stream is used by the originating fax machine to transmit its CNG tone to the far end fax machine. The far end fax machine then responds with an answer signal (ANSam) over the voice stream. It’s at this point that the gateway can recognise that the call is a fax call, and now move into T.38 transmission processing. To do this a re-invite is sent out by the receiving gateway that includes T.38 settings in the SDP, and the gateways agree upon updating the media session to a T.38 image transmission.

The re-invite message will look like this:

INVITE sip:192.168.0.191:5068;transport=Tcp;maddr=192.168.0.191;ms-opaque=b584fc305c6ad126 SIP/2.0
Call-ID: 5eb671a0-9a63-4701-b186-ed8c87f64b3a
Contact: <sip:1300368999@192.168.0.220;user=phone>
Content-Length: 258
Content-Type: application/sdp
CSeq: 517 INVITE
From: <sip:1300368999@DX001.domain.com;user=phone>;tag=c0a800dc-18ed8
Max-Forwards: 70
To: "Fax Test Device"<sip:0395551111@domain.com;user=phone>;epid=1C2A8F4B3B;tag=3088606813
User-Agent: Quintum/1.0.0 SN/0030E101408B SW/P108-09-21
Via: SIP/2.0/TCP 192.168.0.220;branch=z9hG4bK-tenor-c0a8-00dc-00af

v=0
o=Quintum 131 131 IN IP4 192.168.0.220
s=VoipCall
c=IN IP4 192.168.0.220
t=0 0
m=image 10428 udptl t38
c=IN IP4 192.168.0.220
a=T38FaxVersion:0
a=T38MaxBitRate:14400
a=T38FaxFillBitRemoval:0
a=T38FaxTranscodingMMR:0
a=T38FaxTranscodingJBIG:0

When the Lync server receives this message it tries to parse the SDP of the Invite before it forwards it back to the Analog Gateway (with the fax machine connected to it). When it parses the message it finds the m field equals image (m=image), which it doesn’t support. This results in an Invalid SDP message being sent back to the far end gateway and the call being torn down.

SIP/2.0 488 Invalid SDP: The offer from Gateway during a re-INVITE has changed an existing m-line (Media Name)
FROM: <sip:1300368999@DX001.domain.com;user=phone>;tag=c0a800dc-18ee0
TO: "Fax Test Device"<sip:0395551111@domain.com;user=phone>;epid=1C2A8F4B3B;tag=87d3f0ce82
CSEQ: 522 INVITE
CALL-ID: e2a7db66-3311-44cf-a08a-17befafb3b0f
VIA: SIP/2.0/TCP 192.168.0.220;branch=z9hG4bK-tenor-c0a8-00dc-00b1
CONTENT-LENGTH: 0
SUPPORTED: 100rel
SERVER: RTCC/5.0.0.0 MediationServer

A completed T.38 negotiation process is described in the following diagram:

This concludes the sad fact that Lync (2010 and 2013) does not support T.38 protocol negotiation directly with Analog and PSTN Gateways.


 Lync Fax Settings


If you’ve ever tried to connect a fax machine to Lync before, you will no doubt have seen the only setting on the system that relates to Fax. This setting is in the New/Set-AnalogDevice command, and is a Boolean setting called AnalogFax. The command looks something like this:

New-CsAnalogDevice -LineUri tel:+61399991111 -DisplayName "Name of Fax Machine" -RegistrarPool lyncpool.domain.com -AnalogFax $True -Gateway <IP/FQDN> -OU "ou=LyncUsers,dc=domain,dc=com"

So I would expect that the first thing a good IT professional would do when installing a fax machine is turn this setting on, because it’s a fax machine, right? So I definitely should tell the system that it’s a fax machine, right!? Well, not necessarily. As it turns out, this setting is very specific in its operation, and is what, at best, I would describe as a work around solution for fax.

Basically, if an analog device is marked as being AnalogFax it invokes a special ‘hairpinning’ routing procedure within Lync when the device makes an outbound call. This procedure basically means that Lync bypasses regular routing rules and sends the invite message straight back to the gateway that sent it. The idea of this is that the analog gateway is supposed to send the call out a PSTN line that is also directly connected to it, and in the process avoids sending the fax media stream over the IP network all together.  

So, when AnalogFax is set to true, AND the system is configured with Media Bypass turned on, any outbound call from the analog device with this setting will be automatically routed back to the gateway that sent the call. The call scenario looks like this:

|Time     | 192.168.0.49                          | 192.168.0.191
|         |                                       |                  
|0.000    |         Request: INVITE sip           |SIP/SDP: Request: INVITE sip:130036899
|         |(62301)  ------------------>  (5068)   |
|0.001    |         Status: 100 Trying            |SIP: Status: 100 Trying
|         |(62301)  <------------------  (5068)   |
|0.220    |         Status: 183 Session           |SIP/SDP: Status: 183 Session Progress
|         |(62301)  <------------------  (5068)   |
|0.269    |         Request: PRACK sip:           |SIP: Request: PRACK
|         |(62301)  ------------------>  (5068)   |
|0.270    |         Status: 200 OK                |SIP: Status: 200 OK
|         |(62301)  <------------------  (5068)   |
|0.532    |         Status: 200 OK                |SIP/SDP: Status: 200 OK
|         |(5060)   ------------------>  (61427)  |
|0.845    |         Request: INVITE sip           |SIP/SDP: Request: INVITE sip:+611300368999
|         |(5060)   <------------------  (61429)  |
|0.893    |         Status: 404 Not Fou           |SIP: Status: 404 Not Found
|         |(5060)   ------------------>  (61429)  |
|0.893    |         Request: ACK sip:+6           |SIP: Request: ACK sip:+611300368999
|         |(5060)   <------------------  (61429)  |
Note: My gateway didn’t accept the call, and as a result sent a 404 Not Found back to Lync. After this the call fails.

So, why don’t you just don’t save the money on the gateway and connect the fax machine directly to the network? The only reason is that if you do this, there will be no CDR records output by Lync for calls made from fax machines. So the question is, how much are CDR records worth to you? If the answer is more than the price of an analog VoIP gateway with FXS and FXO ports, then you’ve come to the right place!


What are the options available on Lync for fax?


Option 1 – Bypass Lync Altogether

The first option, as I have already described above, is to connect the fax machine directly to the network and bypass Lync altogether. There are two problems with this method: the first is that it requires individual analog/digital carrier services brought into the premises; the second is that there will be no CDR records reporting in Lync for these calls.


Diagram:

Option 2: Fax Hairpinning

This is the method that Microsoft officially supports for fax calls. On Technet it is described as “hairpinning”. The way it works is that once you enable the AnalogFax setting within the New/GetCsAnalogDevice command, and enable Media Bypass, calls from this device to external numbers will get sent directly back the device by Lync. This actually bypasses all of the regular routing flow within Lync.

Lync configuration:
  • Set-CsAnalogDevice -AnalogFax $true
  • Enable Media Bypass on Lync. (If you do not enable this the hairpinning will not work)
  • Use an analog gateway with FXS, and FXO/ISDN ports. Ensure that calls get routed inbound from SIP to the FXO/ISDN ports. Note that Lync will normalise the number before it's sent back, so you will have to do something with the “+<prefix>” before sending it to the carrier.

Diagram:


Option 3: Connect Fax over G.711 to SIP Carrier

In this scenario the fax tones are sent directly over G.711 out to the SIP network (either direct, or through an SBC). Whilst this may work, it depends heavily on what happens to the G.711 RTP stream over the network. If there is significant network jitter or packet loss whilst the fax is being sent, then the transmission may fail. Microsoft explicitly states that it does not support this scenario. Technet states: “Fax calls are not supported through a SIP trunk.”

Lync configuration:
  • Set-CsAnalogDevice -AnalogFax $false
  • Enable Media Bypass on Lync.
  • Grant a Voice Policy with appropriate PSTN Usages for the Analog Device.
  • Configure your VoIP gateway to use G.711 for fax. This usually involves disabling T.38 settings.


Diagram:


Option 4: Fax over G.711 to PSTN VoIP Gateway

For this scenario the fax stream is sent via G.711 to a local ISDN/Analog gateway and then on to the carrier. This scenario can be achieved as long as you can ensure that there is no network jitter or packet loss issues between the two gateways. So I would not recommend making fax calls from an Analog gateway across a WAN to the PSTN gateway, as you may not be able to guarantee the quality of the voice stream.

Lync configuration:
  • Set-CsAnalogDevice -AnalogFax $false
  • Enable Media Bypass on Lync.
  • Grant a Voice Policy with appropriate PSTN Usages for the Analog Device.
  • Configure your VoIP gateways to use G.711 for fax. This usually involves disabling T.38 settings.

Diagram:


Option 5: Fax via SBC with T.38 to SIP Trunk

This is the most complex scenario on the list, because you have to ensure that internally you are using G.711 between the gateways and externally you are using T.38. Note, this will only work if the Carrier SIP trunk provider supports T.38 protocol. So ensure that you consult with your carrier before attempting this kind of configuration.

Lync and Gateway configuration:

  • Set-CsAnalogDevice -AnalogFax $false
  • Enable Media Bypass on Lync.
  • Grant a Voice Policy with appropriate PSTN Usages for the Analog Device.
  • Configure the fax connected analog gateway to use G.711. This usually involves disabling T.38 settings.
  • On the Lync facing SIP leg of the SBC ensure that fax calls are configured for G.711. This usually involves disabling T.38 settings.
  • Enable T.38 on the external SIP trunk that faces the SIP Carrier.

Diagram:


On a AudioCodes Gateway this would look like this:

Lync Facing Trunk Setting:
Open the 'IP Profile Settings' page for the Lync Trunk (Configuration tab > VoIP menu > Coders And Profiles > IP Profile Settings).


SIP Trunk Facing Trunk setting:
Open the 'IP Profile Settings' page for the SIP Carrier (Configuration tab > VoIP menu > Coders And Profiles > IP Profile Settings).


Call Routing for Analog Devices

Note: Voice Routing, as described below, only works when the AnalogFax setting is set to $false.

I’ve seen different things mentioned around the web for how routing works with Analog Devices. My testing has shown that a Voice Policy must be granted on a Analog Device before you can get it to route externally. If you do not set a VoicePolicy to the Analog Device, then you will receive the following error when dialling an external number:

SIP/2.0 403 Forbidden
FROM: "Fax Test Device"<sip:+61395551111@domain.com;user=phone>;epid=1D3FB4561B;tag=ffa63dd9c5TO: <sip:0407555999;phone-context=Melbourne_Site@domain.com;user=phone>;tag=1A8C27C7FDB2A881C9C77A96575A9CCCCSEQ: 6895 INVITECALL-ID: 4e9c791b-3235-40c0-8c37-47431a1ba82dVIA: SIP/2.0/TLS 192.168.0.191:57505;branch=z9hG4bKbcf5ff8;ms-received-port=57505;ms-received-cid=2CCA00CONTENT-LENGTH: 0SERVER: OutboundRouting/5.0.0.0ms-diagnostics: 12001;reason="User Policy does not contain phone route usage";source="2013ENTFE001.DOMAIN.COM";UserUri="sip:+61395551111@domain.com";appName="OutboundRouting"ms-application-via: ms-udc.cdr%3D09e4c67d9b3eeb2bbdb82e47464ebb80%3A5;ms-pool=melbfepool.domain.com;ms-application=http%3A%2F%2Fwww.microsoft.com%2FLCS%2FUdcAgent;ms-server=2013ENTFE001.domain.com

If you do a Get-CsAnalogDevice on the system you will see the Voice Policies that have been applied to your Analog Devices:

> Get-CsAnalogDevice


Identity           : CN=Fax Test Device,OU=LyncUsers,DC=mylynclab,DC=com
VoicePolicy        :
VoiceRoutingPolicy :
RegistrarPool      : melbfepool.domain.com
Gateway            : AudioCodes.domain.com
AnalogFax          : False
Enabled            : True
SipAddress         : sip:79c6c937-8a6b-40fd-8dd9-aacca43f5f1b@domain.com
LineURI            : tel:+61395551111
DisplayName        : Fax Test Device
DisplayNumber      :
ExUmEnabled        : False
Note: Above there is no VoicePolicy assigned to this user. This will result in external calls failing.

So we need to Grant a Voice Policy to the Analog Device. Here’s an example:

> Grant-CsVoicePolicy -Identity "Fax Test Device" -PolicyName ExecutiveUserPolicy-International

Now the Get-AnalogDevice should show that a Policy has been granted:

> Get-CsAnalogDevice


Identity           : CN=Fax Test Device,OU=LyncUsers,DC=mylynclab,DC=com
VoicePolicy        : ExecutiveUserPolicy-International
VoiceRoutingPolicy :
RegistrarPool      : melbfepool.domain.com
Gateway            : AudioCodes.domain.com
AnalogFax          : False
Enabled            : True
SipAddress         : sip:79c6c937-8a6b-40fd-8dd9-aacca43f5f1b@domain.com
LineURI            : tel:+61395551111
DisplayName        : Fax Test Device
DisplayNumber      :
ExUmEnabled        : False

So now your Analog Device has a Voice Policy, which is great for allowing it to dial out. What if a user was to dial an un-normalised number from an Analog Station though, will it get normalised? Well, this is where things get interesting… The short answer is that it will get Normalised, however, which normalisation rules are used is the bigger issue.

I’ve analysed logs from the server and found that Analog Device function as follows:

If there is no Site based rules configured on the system, then the Analog device gets normalised under the DefaultProfile (which equates to the Global dial plan):

SIP/2.0 101 Progress Report
FROM: <sip:+61395551111@domain.com;user=phone>;epid=1D3FB4561B;tag=bd71af9e4a
TO: <sip:0407555999;phone-context=DefaultProfile@domain.com;user=phone>
CSEQ: 6940 INVITE
CALL-ID: 4c88062c-60d7-459d-96f0-7005702a5f51
VIA: SIP/2.0/TLS 192.168.0.191:58292;branch=z9hG4bK8a8934bc;ms-received-port=58292;ms-received-cid=2D1200
CONTENT-LENGTH: 0
SERVER: TranslationService/5.0.0.0
ms-diagnostics: 14011;reason="Called Number translated";source="2013ENTFE001.DOMAIN.COM";RuleName="Keep All";CalledNumber="0407555999";TranslatedNumber="+0407555999";appName="TranslationService"


If there is a Site based Dial Plan Policy deployed for the Pool that the Analog Device is deployed on, then the Site Policy will be used:

SIP/2.0 101 Progress Report
FROM: <sip:+61395551111@domain.com;user=phone>;epid=1D3FB4561B;tag=ffa63dd9c5
TO: <sip:0407555999;phone-context=Melbourne_Site@domain.com;user=phone>
CSEQ: 6895 INVITE
CALL-ID: 4e9c791b-3235-40c0-8c37-47431a1ba82d
VIA: SIP/2.0/TLS 192.168.0.191:57505;branch=z9hG4bKbcf5ff8;ms-received-port=57505;ms-received-cid=2CCA00
CONTENT-LENGTH: 0
SERVER: TranslationService/5.0.0.0
ms-diagnostics: 14011;reason="Called Number translated";source="2013ENTFE001.DOMAIN.COM";RuleName="AU-Mobile";CalledNumber="0407555999";TranslatedNumber="+61407555999";appName="TranslationService"
Note: the TranslatedNumber is different  in both cases, the first case used my Melbourne Site dial plan and the second used my Global dial plan.

So now you might be wondering what happens if you force a User Policy onto the Analog Device. Well, here’s what happens.

Configure a User Policy onto the Analog Device:

Grant-CsDialPlan -Identity "Fax Test Device" -PolicyName AnalogTest

The above command is accepted by the system. If we run Get-CsAnalogDevice we will see the following:
> Get-CsAnalogDevice


Identity           : CN=Fax Test Device,OU=LyncUsers,DC=domain,DC=com
VoicePolicy        : ExecutiveUserPolicy-International
VoiceRoutingPolicy :
RegistrarPool      : melbfepool.domain.com
Gateway            : AudioCodes.domain.com
AnalogFax          : False
Enabled            : True
SipAddress         : sip:79c6c937-8a6b-40fd-8dd9-aacca43f5f1b@domain.com
LineURI            : tel:+61395551111
DisplayName        : Fax Test Device
DisplayNumber      :
ExUmEnabled        : False

There is no Dial Plan Policy listed in the above get command. So what if you run a full get on the Analog Device:

> Get-CsAnalogDevice |fl *

Gateway                  : AudioCodes.domain.com
AnalogFax                : False
Created                  : True
DisplayName              : Fax Test Device
DisplayNumber            :
ProxyAddresses           : {sip:79c6c937-8a6b-40fd-8dd9-aacca43f5f1b@domain.com}
HomeServer               : CN=Lc Services,CN=Microsoft,CN=1:1,CN=Pools,CN=RTC Service,CN=Services,CN=Configuration,DC=domain,DC=com
TargetServerIfMoving     :
EnabledForFederation     : True
EnabledForInternetAccess : True
PublicNetworkEnabled     : True
EnterpriseVoiceEnabled   : True
EnabledForRichPresence   : True
ExchangeArchivingPolicy  : Uninitialized
LineURI                  : tel:+61395551111
SipAddress               : sip:79c6c937-8a6b-40fd-8dd9-aacca43f5f1b@domain.com
Enabled                  : True
TenantId                 : 00000000-0000-0000-0000-000000000000
UserRoutingGroupId       : 1c864cc6-c83f-5683-b379-0f0d7bdfbb45
TargetRegistrarPool      :
VoicePolicy              : ExecutiveUserPolicy-International
MobilityPolicy           :
ConferencingPolicy       :
PresencePolicy           :
VoiceRoutingPolicy       :
RegistrarPool            : melbfepool.domain.com
DialPlan                 : AnalogTest
LocationPolicy           :
ClientPolicy             : AnalogClientPolicy
ClientVersionPolicy      :
ArchivingPolicy          :
LegalInterceptPolicy     :
PinPolicy                :
ExternalAccessPolicy     :
HostedVoicemailPolicy    :
PersistentChatPolicy     :
UserServicesPolicy       :
ExperiencePolicy         :
HostingProvider          : SRV:
ObjectId                 : 00000000-0000-0000-0000-000000000000
ExUmEnabled              : False
Name                     : Fax Test Device
DistinguishedName        : CN=Fax Test Device,OU=LyncUsers,DC=domain,DC=com
Identity                 : CN=Fax Test Device,OU=LyncUsers,DC=domain,DC=com
Guid                     : 9839f2a2-5206-4d20-942a-2144a69840d8
ObjectCategory           : CN=Person,CN=Schema,CN=Configuration,DC=domain,DC=com
ObjectClass              : {top, person, organizationalPerson, contact}
WhenChanged              : 22/04/2013 2:16:02 PM
WhenCreated              : 12/04/2013 6:01:18 PM
OriginatingServer        : 2013ENTDC001.domain.com
IsByPassValidation       : False
IsValid                  : True
ObjectState              : Unchanged

This list up reveals that the setting was actually applied to the Contact Object within active directory. So now the expectation would be that this would now try and Normalise based on the applied User Policy, right? Actually, unfortunately, this is wrong. The Analog Device still continues to get Normalised via the Site Policy and not the user Policy:

SIP/2.0 101 Progress Report
FROM: <sip:+61395551111@domain.com;user=phone>;epid=1D3FB4561B;tag=ffa63dd9c5
TO: <sip:0407555999;phone-context=Melbourne_Site@domain.com;user=phone>
CSEQ: 6895 INVITE
CALL-ID: 4e9c791b-3235-40c0-8c37-47431a1ba82d
VIA: SIP/2.0/TLS 192.168.0.191:57505;branch=z9hG4bKbcf5ff8;ms-received-port=57505;ms-received-cid=2CCA00
CONTENT-LENGTH: 0
SERVER: TranslationService/5.0.0.0
ms-diagnostics: 14011;reason="Called Number translated";source="2013ENTFE001.DOMAIN.COM";RuleName="AU-Mobile";CalledNumber="0407555999";TranslatedNumber="+61407555999";appName="TranslationService"

It would seem that the fact that Lync doesn't list the DialPlan parameter within Get-CsAnalogDevice is a hint to tell you that it doesn't actually apply this setting on Analog Devices. So why does Lync let you set this value if it’s not used by Lync? My guess is because the Contact Object still contains a msRTCSIP-UserPolicies attribute that it can write to, so it writes to it without giving you an error:


The moral of this long winded story is that you must set a Voice Policy for the Analog Device. When it comes to Dial Plan normalisation you have two choices, either normalise the number on the gateway (using translation rules of the gateway) before sending it to Lync, or use the Global or Site based default rules to normalise the number once it reaches Lync.


Enabling Media Bypass


All of the configurations for fax require that media bypass is enabled on the internal leg of the call. This will avoid any additional jitter and delays that might be caused by sending the stream via the mediation server. Here’s how you do it:

Enable Media Bypass for the Gateway:

>Set-CsTrunkConfiguration -Identity “PstnGateway:DX001.domain.com” -EnableBypass $True –EnableReferSupport $True

Or if Refer is not supported by the gateway:

> Set-CsTrunkConfiguration -Identity "PstnGateway:DX001.domain.com" -EnableBypass $True -RTCPActiveCalls $False -RTCPCallsOnHold $False

>Set-CsTrunkConfiguration -Identity "PstnGateway:DX001.mylynclab.com"–EnableSessionTimer $True
Note: There are some other special requirements that the gateway has to support here

Turn on Media Bypass at a System Level:


If you are not using CAC then you can select “Always Bypass” as the option. In this configuration, both client and trunk subnets are mapped to one and only one bypass ID, which is computed by the system.

- If CAC is enabled then the processing works as follows:
If you enable CAC, you cannot select Always Bypass, and vice-versa, because the two configurations are mutually exclusive. That is, only one of the two will apply to any given PSTN call. First, a check is made to determine if media bypass applies to the call. If it does, then CAC is not used. This makes sense, because if a call is eligible for bypass, it is by definition using a connection where CAC is not needed. If bypass cannot be applied to the call (that is, if the client’s and gateway’s bypass IDs do not match), then CAC is applied to the call.

- CAC not enabled and Media Bypass set to Use Site and Region Information.
Where Use Site and Region Information is enabled, bypass determination works essentially the same way, regardless of whether CAC is enabled or not. That is, for any given PSTN call, the client’s subnet is mapped to a particular site, and the bypass ID for that subnet is extracted. Similarly, the gateway’s subnet is mapped to a particular site, and the bypass ID for that subnet is extracted. Only if the two bypass IDs are identical will bypass happen for the call. If they are not identical, media bypass will not occur. 

Even though CAC is disabled globally, bandwidth policy needs to be defined for each site and link if you want to use site-and-region configuration to control the bypass decision. The actual value of the bandwidth constraint or its modality doesn’t matter. The ultimate goal is to have the system automatically calculate different bypass IDs to associate with different locales that are not well connected. Defining a bandwidth constraint by definition means a link is not well connected.


Other Settings that Affect Fax


Just when you thought you were safe, there are actually more settings that can adversely affect your fax transmissions. In addition to the settings mentioned above for Lync there are other settings that can affect Fax transmission over G.711 connection. You need to be careful of the following: 

  • Faxes don’t like jitter that is caused from variable delays in packetised voice networks. So some gateways will actively try and reduce the amount of jitter by increasing the Jitter Buffers (perhaps to 100ms) for calls that they detect as being fax calls. What this does is reduce the chance of Jitter affecting the media stream, by increasing the overall end to end latency on the call. This trade off works because fax was built to handle fixed latency caused in long distance PSTN calling scenarios back in the good old days of TDM voice networks. This functionality does not usually have explicit settings in a VoIP gateway. However, if there is a fax setting that allows you to choose G.711 (passthrough), then it can often be a built in function of this setting.  
  • Ensure that you turn off Silence Suppression (Voice Activity Detection) on all hops. Silence Suppression means that when the gateway detects that audio is under a certain threshold on the call, in an effort to save bandwidth, it will stop sending RTP on the link. For voice calls, this is fine, but for fax calls this is not a good idea.

Note: this is called different things on different gateways. The other most common name is Voice Activity Detection (VAD).


Quintum Silence Suppression Example

Note on AudioCodes: On AudioCodes Media Pack gateways, I’ve had issues with the silence suppression not working. By this I mean that Voice Activity Detection is still being enforced, and the RTP stream is being suppressed during breaks in fax tone. This unfortunately doesn’t mix well with fax.


When you have “No Fax” set in combination with this setting (with the Silence Suppression bug), the fax tones get treated the same as voice.


If you set “G.711 Transport” as the Fax Signalling Method this bug gets bypassed.

  • When you are using a G.711 codec, ensure that you test your volume levels. In Australia we have a great service offered by Telstra called “FaxStream” (1300368999) that allows you to send a fax to it, and get sent back a return fax that details if the audio levels on the call were acceptable or not. Based on the response on some gateways you can tweak the Tx and Rx levels of the voice stream. An example is on Quintum gateways: this is set under the IP Routing Groups->Advanced Tab.
  • Ensure that configuration on the Analog Gateways that the fax machine is connected to, the PSTN Gateway, the SBC, and the carrier SIP network are all correct. Each hop matters as much as the others, so don't fall into the trap of assuming it's one specific device that's the problem without first checking them all.


Wrap Up

Wow! That was a lot of stuff about fax… Who would have dreamed it could be so complicated? So anyway, I hope this helps some of the IT people out there that don’t necessarily have a background in telecommunications. In keeping with the eastern philosophy from the start of the article, I will now leave you with the great words of Mr Miyagi: “Fax on, Fax off, Daniel-san.”


Lync 2013 Database Mirror Manager Tool

$
0
0
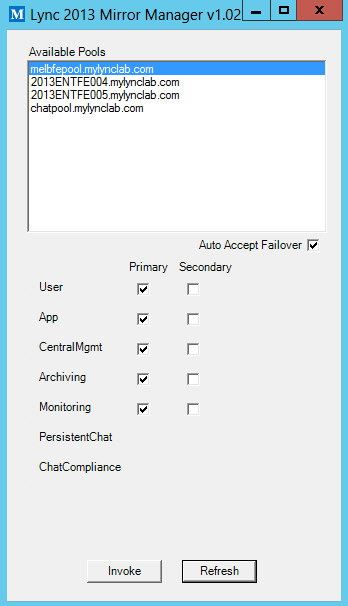
So it seems there has been quite a bit of interest in my Lync Centralised Logging Tool since I released it to the world. So I figured I might work on another tool to help with managing database mirroring within Lync 2013…

Database Mirroring Overview


In Lync 2013 we have been given a new SQL High Availability option for Lync databases to replace the old and more complicated SQL Clustering method from Lync 2010. The Lync 2013 SQL Mirroring method is easy to provision using topology builder, and can be managed using Powershell commands.


Managing Mirrored Databases


The mirror state of the databases can be controlled by Lync Powershell commands (probably best not to go fiddling with the SQL configuration directly). The command used to change the state of databases is shown below:

Invoke-CsDatabaseFailover -DatabaseType <Application | Archiving | Monitoring | User | Provision | CentralAdmin | Lyss | Registrar | Edge | PersistentChat | PersistentChatCompliance | CentralMgmt> -NewPrincipal <Primary | Mirror> -PoolFqdn <Fqdn> [-Confirm [<SwitchParameter>]] [-ExcludeDatabaseList <String[]>] [-Force <SwitchParameter>] [-LocalStore <SwitchParameter>] [-Report <String>] [-WhatIf [<SwitchParameter>]]

The Invoke command is broken down into Database Types. These ‘database types’ do not line up with the actual names of the databases within SQL, but instead, are given function names that relate to their role within Lync. The ‘database types’ can also contain more than one physical database. Here is how the database types are mapped to SQL names:

DatabaseType
Databases
Application
Rgsconfig
Rgsdyn
Cpsdyn

Archiving
Lcslog

Monitoring
Lcscdr
Qoemetrics

User
Rtcab
Rtcxds
Rtcshared

CentralMgmt
Xds
Lis

PersistentChat
Mgc

PersistentChatCompliance
Mgccomp

Provision

Not Implemented
CentralAdmin

Not Implemented
Lyss

Not Implemented
Registrar

Not Implemented

Note: When you Invoke a changeover on the Archiving or Monitoring database, Lync will ask you if you want to accept the action to perform changeover on the target "Registrar". Kind of weird that it refers to these databases in that way... At any rate, you can't actually call the invoke command on a 'database type' of "Registrar" so don't try it.
Edge

Not Implemented
Cls
Not Implemented
Note: The Not Implemented database types above are listed on Technet as being database types. However, you can’t actually call the Invoke command on these 'database types' in Powershell.  I’m assuming this is a documentation error…

You can see the physical databases within SQL. Here’s what they look like:


What you might notice in the picture above is that some of the physical databases that are grouped together within the Powershell database type categories are actually in different database states. For example, cpsdyn and rgsdyn are in mirrored state, whilst rgsconfig is in Principal state. This is because SQL manages these databases mirrored state per physical database, and not in the groupings that Microsoft chose to build the Invoke changeover command.

By running a Get-CsDatabaseMirrorState command, we can see that these databases are not in the same state:

PS > Get-CsDatabaseMirrorState

cmdlet Get-CsDatabaseMirrorState at command pipeline position 1
Supply values for the following parameters:
PoolFqdn: pool.domain.com


DatabaseName             : rtcab
StateOnPrimary           : Mirror
StateOnMirror            : Principal
MirroringStatusOnPrimary : synchronized
MirroringStatusOnMirror  : synchronized

DatabaseName             : rtcxds
StateOnPrimary           : Principal
StateOnMirror            : Mirror
MirroringStatusOnPrimary : synchronized
MirroringStatusOnMirror  : synchronized

DatabaseName             : rtcshared
StateOnPrimary           : Principal
StateOnMirror            : Mirror
MirroringStatusOnPrimary : synchronized
MirroringStatusOnMirror  : synchronized

DatabaseName             : lcscdr
StateOnPrimary           : Principal
StateOnMirror            : Mirror
MirroringStatusOnPrimary : synchronized
MirroringStatusOnMirror  : synchronized

DatabaseName             : qoemetrics
StateOnPrimary           : Principal
StateOnMirror            : Mirror
MirroringStatusOnPrimary : synchronized
MirroringStatusOnMirror  : synchronized

DatabaseName             : lcslog
StateOnPrimary           : Mirror
StateOnMirror            : Principal
MirroringStatusOnPrimary : synchronized
MirroringStatusOnMirror  : synchronized

DatabaseName             : rgsconfig
StateOnPrimary           : Principal
StateOnMirror            : Mirror
MirroringStatusOnPrimary : synchronized
MirroringStatusOnMirror  : synchronized

DatabaseName             : rgsdyn
StateOnPrimary           : Mirror
StateOnMirror            : Principal
MirroringStatusOnPrimary : synchronized
MirroringStatusOnMirror  : synchronized

DatabaseName             : cpsdyn
StateOnPrimary           : Mirror
StateOnMirror            : Principal
MirroringStatusOnPrimary : synchronized
MirroringStatusOnMirror  : synchronized

DatabaseName             : xds
StateOnPrimary           : Mirror
StateOnMirror            : Principal
MirroringStatusOnPrimary : synchronized
MirroringStatusOnMirror  : synchronized

DatabaseName             : lis
StateOnPrimary           : Principal
StateOnMirror            : Mirror
MirroringStatusOnPrimary : synchronized
MirroringStatusOnMirror  : synchronized
Note: I refer to this as being ‘out of sync’, which is not to be confused with their synchronisation state…

If I was to run the Invoke command on the User database here, I would end up with the following:

Invoke-CsDatabaseFailover -PoolFqdn pool.domain.com -DatabaseType "User" -NewPrincipal "Primary"

This causes the rtcab to move back to the primary mirror with the other user services:
PS > Invoke-CsDatabaseFailover -PoolFqdn pool.domain.com -DatabaseType "User" -NewPrincipal "Primary"

Confirm
Are you sure you want to perform this action?
Performing operation "Invoke-CsDatabaseFailover" on Target "UserServices".
[Y] Yes  [A] Yes to All  [N] No  [L] No to All  [S] Suspend  [?] Help (default is "Y"): y

DatabaseName                                              FailoverResult
------------                                              --------------
rtcab                                                            Success
rtcxds                SucceededAsNewPrincipalAlreadyOwnsThePrincipalRole
rtcshared             SucceededAsNewPrincipalAlreadyOwnsThePrincipalRole


PS > Get-CsDatabaseMirrorState -PoolFqdn pool.domain.com -DatabaseType User


DatabaseName             : rtcab
StateOnPrimary           : Principal
StateOnMirror            : Mirror
MirroringStatusOnPrimary : synchronized
MirroringStatusOnMirror  : synchronized

DatabaseName             : rtcxds
StateOnPrimary           : Principal
StateOnMirror            : Mirror
MirroringStatusOnPrimary : synchronized
MirroringStatusOnMirror  : synchronized

DatabaseName             : rtcshared
StateOnPrimary           : Principal
StateOnMirror            : Mirror
MirroringStatusOnPrimary : synchronized
MirroringStatusOnMirror  : synchronized

Now all the physical databases within the User Database Type are all in the Principal state.
Alternatively the databases can be failed over as a single database. However, you need to run a more complicated powershell command:

Invoke-CsDatabaseFailover -PoolFqdn pool.domain.com –DatabaseType “User” -NewPrincipal "Primary" -ExcludeDatabaseList "rtcxds", "rtcshared"

Note: There’s an error on technet that includes an additional switch “-ExcludeDatabase” which isn’t actually needed (or available, for that matter).
 
Running the command will look something like this:

PS > Invoke-CsDatabaseFailover -PoolFqdn pool.domain.com -NewPrincipal "Mirror" -DatabaseType "User" -ExcludeDatabaseList "rtcxds", "rtcshared"

Confirm
Are you sure you want to perform this action?
Performing operation "Invoke-CsDatabaseFailover" on Target "UserServices".
[Y] Yes  [A] Yes to All  [N] No  [L] No to All  [S] Suspend  [?] Help (default is "Y"): y

DatabaseName                        FailoverResult
------------                        --------------
rtcab                                      Success

It makes sense that Microsoft designed the commands to force functionally associated databases to be running on the one SQL machine. However, it can make it a bit confusing to administer from a Powershell perspective. Which brings me to the real point of this article…


Lync 2013 Database Mirror Manager Tool


Wouldn’t it be much easier to just have GUI interface that shows you the state of the database? And be able to simply click to choose which ones you wanted to fail over? Well, today is your lucky day. I’ve made another GUI based tool that does just that. It looks like this:


Lync Front End Mirroring
Lync Persistent Chat Mirroring


UPDATE (27/5/2015):

1.01 Enhancements: 
  • Added enhanced handling of error states so the GUI doesn't display the option to change the mirror state of databases that aren't mirrored. I noticed this when doing CU updates and disconnected mirrors giving "DatabaseInaccessibleOrMirroringNotEnabled" errors that need to be handled in a way that makes sense in the GUI.
  • Change the foreground colour of the database name label when the user has selected to change the state. This gives a visual indication of what is going to be changed when the Invoke button is pressed (ie. Any database with a green label will be changed over when the Invoke button is pressed.)

1.02 Update:
  • Added a check box for automatically agreeing to changeover without having to explicitly agree to every database change in the Powershell window.
  • Script now checks for the location of the central management store for Migration scenarios when it still resides on Lync 2010. This previously resulted in an error.
  • Suppressed warnings from Powershell window that would be displayed when getting status of databases that weren't available.
  • Write the commands being run to Powershell window for more feedback to the user.
  • Database names are now listed in Powershell window with mirror state when refresh is done.
  • Script is now signed.
  • Updated the form icon.
  • Removed the dedicated Close button because it's unnecessary.
1.03 Update
  • Added Powershell pre-req checks and Module loading.
  • Updated reporting of database status in PS window
  • Added Up and Down keys in the pool listbox 
  • Updated to work with Skype for Business!

1.04 Update
  • There were reports of issues on some versions of Powershell with version 1.03. ErrorVariable flags have been removed in 1.04 this version to fix these issues.


Download Version 1.04: 


It’s pretty straightforward to use (much more than Powershell anyway!). You simply select the pool from the list, and the databases that have mirroring enabled will display check boxes that show you the current Primary/Mirror status of the databases. If you decide you want to change one, or many, of the states, you simply click on the desired state check box for each database type, and then hit the Invoke button.

Note: You will be prompted in the Powershell window for each database that the tool is changing over. The tool will not make any changes without your knowledge.

So, what if databases within the Database groups get out of sync, like I described earlier in the article? Well, the tool is smart enough to realise this, and will inform you that the underlying physical databases within a 'database type' are out of sync. At this point you can choose to leave them out of sync, or invoke a change-over.

Out of Sync Error


Note: If you want to have your databases out of sync (because you just love defying Microsoft’s best practices), then don't press the invoke button. If you do, it will re-sync the databases back to the value selected in the check box for that database type.

Let me know if you find the tool useful or have any ideas on how you would like it improved.

The Wrap Up


The Evil Queen:"Mirror, mirror upon the wall, Who is the fairest of all?"
SQL Mirror:"O Lady Queen, though fair ye be, Lync Mirroring is the fairest of them all."
The Evil Queen:"Fair enough.”

See y’all next time. Enjoy!


Installing Lync 2013 Cumulative Updates with Mirrored Databases (CU1)

$
0
0

Overview


Update (CU2): With the release of Lync 2013 CU2 (July 2013) the upgrade process has changed from what is documented here. The new process in CU2 does not include the requirement to break the database mirror anymore. You do need to still ensure that the database servers are running on the Primary side before applying the Install-CsDatabase commands though. Please refer to the updated KB article here. There is a nice flow chart detailing the update process for front end servers here too.

There are now additional steps involved when running cumulative updates on Lync 2013 pools that have mirrored SQL databases. So I thought I would go into some detail about this new process and show how my Database Manager Tool can be used as part of this procedure. This post specifically covers the process documented for Lync 2013 CU1 (Feb 2013), however, it's likely the process will be similar for future cumulative updates. So this post should continue to function as a reference in the future, but be sure to always check the process documented for the specific CU you are installing before doing an upgrade.

The high level steps for this process are:
  1. Download and install the updates all of the Lync Servers.
  2. Run the Update Installer on all Lync Servers.
  3. Check that all of the databases are running on the Primary SQL server.
  4. Uninstall (remove) the database mirror for the Application database type.
  5. Install the schema updates on the Primary database.
  6. Recreate the database mirror for the Application Database type. This will recreate the Application databases back on the mirror server.
  7. Check the status of the database to see that they are all running correctly.
  8. (Optional) If your Monitoring backend databases are on a different server, update them now.
  9. Update the Central Management Database schema. (only if the database is on Lync 2013. If the CMD is on a Lync 2010 pool then you don’t do this)
  10. Enable the Mobility Service.
  11. Enable the UCWA service.
Note: the official process is on Technet here, please read it: http://support.microsoft.com/kb/2809243

The Process


Step 1: Download Update

The first step in upgrading Lync is downloading the CU1 Update installer from the Microsoft site: http://www.microsoft.com/en-us/download/details.aspx?id=36820

Step 2: Run the update on all Lync Servers

Run the CU1 Update Installer executable on all of your Lync Servers (one at a time, as the tool will take the services offline when updating them). The Updater will show you that all of your Lync services need updating:


This will take the services offline and upgrade them. After they are upgraded the Update Installer will show them as being the latest version with a green tick:


If you run your Lync Servers in this state (ie. Without updating the database schema) you might notice some strange errors being logged in the Event Viewer, for example:


The above error states that “There was a problem communicating with the Group Pickup backend database” (Event ID 31055). This is because the CU1 release has added the new Group Pickup feature, which requires new schema additions in the Lync SQL databases for storing the data for this feature.

Step 3: Check the current state of the SQL databases

When you’re not using mirrored databases this process is relatively simple, and can be achieved running one or two commands. However, when you’re using database mirroring there is a requirement to remove the mirror for specific databases that need to have the schema updated, and then re-create the mirror databases after the update has been applied to the primary database.

To remove the database mirror you will first need to ensure that all of your databases are running on the Primary SQL server. Using the database Lync 2013 Mirror Manager Tool you can do this as shown:


Note: The Lync 2013 Mirror Manager can be downloaded from here

If you have databases that are showing up in the Secondary column of the tool, then it means that they are running on the secondary SQL server and need to be moved back onto the primary SQL server (if you're running a witness server these database may have changed over to the secondary server without your knowledge). Move the databases back onto the primary simply by ticking all the check boxes in the Primary column and then click the Invokebutton. You will then be prompted in the Powershell window about changing the databases back to the Primary server. Type “y” as a response to these questions. After this is complete the tool will update and the databases should all appear in the Primary column.

Note: In the above example I haven’t checked the status of the Persistent Chat Databases. In the real world you should actually do this at this point. However, for the purposes of this example I haven’t done this to show what effect it has later when running the Database Install commands.

Step 4: Remove the Database Mirror for the 'Application' database

We now need to remove the mirrored database configuration for the 'Application' database type.

Note: In the future the need to remove the database mirror for other database types may become a requirement as well. So if you are coming to this post for a newer CU update, please refer to the specifics of the KB article relating to your specific CU release.

Run the following command:

Uninstall-CsMirrorDatabase -DatabaseType Application -SqlServerFQDN DOMAINSQL001.domain.com -SqlInstanceName Lync2013-DropExistingDatabasesOnMirror -Verbose

Here is an example of the command running:

PS > Uninstall-CsMirrorDatabase -DatabaseType Application -SqlServerFQDN DOMAINSQL001.domain.com -SqlInstanceName Lync2013 -DropExistingDatabasesOnMirror -Verbose
VERBOSE: Creating new log file
"C:\Users\Administrator.DOMAIN\AppData\Local\Temp\2\Uninstall-CsMirrorDatabase-ca7fc931-e778-40f4-bc17-9c7d51040855.xml".

Uninstall Mirrors
Uninstall mirrors required by Lync Server role(s). Note that the cmdlet will try its best to drop the databases on the mirror server, but
this is not guaranteed. After the cmdlet is finished, manually verify that the databases are dropped. If the databases are not dropped, drop
 the databases manually. Are you sure you want to proceed?
[Y] Yes  [A] Yes to All  [N] No  [L] No to All  [S] Suspend  [?] Help (default is "Y"): y
VERBOSE: No changes were made to the Central Management Store.
VERBOSE: Creating new log file
"C:\Users\Administrator.DOMAIN\AppData\Local\Temp\2\Uninstall-CsMirrorDatabase-ca7fc931-e778-40f4-bc17-9c7d51040855.html".
WARNING: Uninstall-CsMirrorDatabase failed.
WARNING: Detailed results can be found at
"C:\Users\Administrator.DOMAIN\AppData\Local\Temp\2\Uninstall-CsMirrorDatabase-ca7fc931-e778-40f4-bc17-9c7d51040855.html".

On the Primary SQL Server:


As can be seen above, the cpsdyn, rgsconfig, and rgsdyn databases (which make up the Application database type) have now had their mirror configuration removed (ie. There is no “Principal, Synchronized” state written next to them now).

An important part of the command that we just ran was the “-DropExistingDatabasesOnMirror” switch, which tells Lync to delete these databases from the mirror server. Unfortunately, this function doesn't seem to always work, and databases can be left on the mirror server. So now we need to check the SQL instance on the Mirror server to see if these were deleted.

On the Mirror SQL Server:


From the screenshot above we can see that on the secondary server, the rgsconfig database has been automatically deleted. The cpsdyn and rgsdyn databases, however, are still there but stuck in “Restoring…” state. These databases will get re-created later when the Mirror is reconfigured between the two SQL servers, so it’s safe to manually delete these databases:


Step 5: Install the new schema updates on the Primary Database

Run the following command to install the Schema updates:

Install-CsDatabase -ConfiguredDatabases -SqlServerFqdn DOMAINSQL001.domain.com -Verbose

NOTE: The error below can be caused by not having enough free disk space on the SQL servers. This is most likely to happen in a lab environment where you’ve only provisioned the minimum disk space for each machine. I had this happen with 15.3GB of disk space free, however, when I expanded the disk to have 29GB free this error went away.

Install-CsDatabase : Command execution failed: Cannot find any suitable disks for database files. You must manually specify database paths.
At line:1 char:1
+ Install-CsDatabase -ConfiguredDatabases -SqlServerFqdn DOMAINSQL001.mylynclab.c ...
+ ~~~~~~~~~~~~~~~~~~~~~~~~~~~~~~~~~~~~~~~~~~~~~~~~~~~~~~~~~~~~~~~~~~~~~~~~~~~~~~~~
    + CategoryInfo          : InvalidOperation: (:) [Install-CsDatabase], DeploymentException
    + FullyQualifiedErrorId : ProcessingFailed,Microsoft.Rtc.Management.Deployment.InstallDatabaseCmdlet

The execution of this command will look like this:

PS C:\Users\Administrator.DOMAIN> Install-CsDatabase -ConfiguredDatabases -SqlServerFqdn DOMAINSQL001.domain.com -Verbose
VERBOSE: Creating new log file
"C:\Users\Administrator.DOMAIN\AppData\Local\Temp\2\Install-CsDatabase-817afad5-d1d5-42dc-a4cf-70589c7bdd09.xml".
VERBOSE: Install databases required by Lync Server role(s).
VERBOSE: Skipping Central Management Database "1-CentralMgmtStore-1". Central Management Databases are installed using the
-CentralManagementDatabase parameter.
****Creating DbSetupInstance for 'Microsoft.Rtc.Common.Data.BlobStore'****
Trying to connect to Sql Server DOMAINSQL001.domain.com\Lync2013. using windows authentication...
Sql version: Major: 11, Minor: 0, Build 2100.
Sql version is acceptable.
Checking state for database rtcxds.
****Creating DbSetupInstance for 'Microsoft.Rtc.Common.Data.RtcSharedDatabase'****
Trying to connect to Sql Server DOMAINSQL001.domain.com\Lync2013. using windows authentication...
Sql version: Major: 11, Minor: 0, Build 2100.
Sql version is acceptable.
Checking state for database rtcshared.
****Creating DbSetupInstance for 'Microsoft.Rtc.Common.Data.AbsDatabase'****
Trying to connect to Sql Server DOMAINSQL001.domain.com\Lync2013. using windows authentication...
Sql version: Major: 11, Minor: 0, Build 2100.
Sql version is acceptable.
Checking state for database rtcab.
****Creating DbSetupInstance for 'Microsoft.Rtc.Common.Data.RgsConfigDatabase'****
Trying to connect to Sql Server DOMAINSQL001.domain.com\Lync2013. using windows authentication...
Sql version: Major: 11, Minor: 0, Build 2100.
Sql version is acceptable.
Checking state for database rgsconfig.
****Creating DbSetupInstance for 'Microsoft.Rtc.Common.Data.RgsDynDatabase'****
Trying to connect to Sql Server DOMAINSQL001.domain.com\Lync2013. using windows authentication...
Sql version: Major: 11, Minor: 0, Build 2100.
Sql version is acceptable.
Checking state for database rgsdyn.
****Creating DbSetupInstance for 'Microsoft.Rtc.Common.Data.CpsDynDatabase'****
Trying to connect to Sql Server DOMAINSQL001.domain.com\Lync2013. using windows authentication...
Sql version: Major: 11, Minor: 0, Build 2100.
Sql version is acceptable.
Checking state for database cpsdyn.
****Creating DbSetupInstance for 'Microsoft.Rtc.Common.Data.ArchivingDatabase'****
Trying to connect to Sql Server DOMAINSQL001.domain.com\Lync2013. using windows authentication...
Sql version: Major: 11, Minor: 0, Build 2100.
Sql version is acceptable.
Checking state for database LcsLog.
****Creating DbSetupInstance for 'Microsoft.Rtc.Common.Data.MonitoringDatabase'****
Trying to connect to Sql Server DOMAINSQL001.domain.com\Lync2013. using windows authentication...
Sql version: Major: 11, Minor: 0, Build 2100.
Sql version is acceptable.
Checking state for database LcsCDR.
****Creating DbSetupInstance for 'Microsoft.Rtc.Common.Data.QoEMetricsDatabase'****
Trying to connect to Sql Server DOMAINSQL001.domain.com\Lync2013. using windows authentication...
Sql version: Major: 11, Minor: 0, Build 2100.
Sql version is acceptable.
Checking state for database QoEMetrics.
****Creating DbSetupInstance for 'Microsoft.Rtc.Common.Data.MgcDatabase'****
Trying to connect to Sql Server DOMAINSQL001.domain.com\Lync2013. using windows authentication...
Sql version: Major: 11, Minor: 0, Build 2100.
Sql version is acceptable.
Checking state for database mgc.
****Creating DbSetupInstance for 'Microsoft.Rtc.Common.Data.MgcCompDatabase'****
Trying to connect to Sql Server DOMAINSQL001.domain.com\Lync2013. using windows authentication...
Sql version: Major: 11, Minor: 0, Build 2100.
Sql version is acceptable.
Checking state for database mgccomp.
VERBOSE: Assigning "BackendStore:BlobStore:LogPath" to C:\CsData
VERBOSE: Assigning "BackendStore:RtcSharedDatabase:LogPath" to C:\CsData
VERBOSE: Assigning "ArchivingStore:ArchivingDatabase:LogPath" to C:\CsData
VERBOSE: Assigning "MonitoringStore:MonitoringDatabase:LogPath" to C:\CsData
VERBOSE: Assigning "MonitoringStore:QoEMetricsDatabase:LogPath" to C:\CsData
VERBOSE: Assigning "ArchivingStore:ArchivingDatabase:DbPath" to C:\CsData
VERBOSE: Assigning "MonitoringStore:MonitoringDatabase:DbPath" to C:\CsData
VERBOSE: Assigning "MonitoringStore:QoEMetricsDatabase:DbPath" to C:\CsData
VERBOSE: Assigning "ABSStore:AbsDatabase:LogPath" to C:\CsData
VERBOSE: Assigning "ApplicationStore:RgsConfigDatabase:LogPath" to C:\CsData
VERBOSE: Assigning "ApplicationStore:RgsDynDatabase:LogPath" to C:\CsData
VERBOSE: Assigning "ApplicationStore:CpsDynDatabase:LogPath" to C:\CsData
VERBOSE: Assigning "PersistentChatStore:MgcDatabase:LogPath" to C:\CsData
VERBOSE: Assigning "PersistentChatComplianceStore:MgcCompDatabase:LogPath" to C:\CsData
VERBOSE: Assigning "BackendStore:BlobStore:DbPath" to C:\CsData
VERBOSE: Assigning "BackendStore:RtcSharedDatabase:DbPath" to C:\CsData
VERBOSE: Assigning "ABSStore:AbsDatabase:DbPath" to C:\CsData
VERBOSE: Assigning "ApplicationStore:RgsConfigDatabase:DbPath" to C:\CsData
VERBOSE: Assigning "ApplicationStore:RgsDynDatabase:DbPath" to C:\CsData
VERBOSE: Assigning "ApplicationStore:CpsDynDatabase:DbPath" to C:\CsData
VERBOSE: Assigning "PersistentChatStore:MgcDatabase:DbPath" to C:\CsData
VERBOSE: Assigning "PersistentChatComplianceStore:MgcCompDatabase:DbPath" to C:\CsData
VERBOSE: Installing "BackendStore" on DOMAINSQL001.domain.com\Lync2013, collocated: False
****Creating DbSetupInstance for 'Microsoft.Rtc.Common.Data.BlobStore'****
Trying to connect to Sql Server DOMAINSQL001.domain.com\Lync2013. using windows authentication...
Sql version: Major: 11, Minor: 0, Build 2100.
Sql version is acceptable.
Checking state for database rtcxds.
Database created by script "BlobStore" already exists and is current.

****Creating DbSetupInstance for 'Microsoft.Rtc.Common.Data.RtcSharedDatabase'****
Trying to connect to Sql Server DOMAINSQL001.domain.com\Lync2013. using windows authentication...
Sql version: Major: 11, Minor: 0, Build 2100.
Sql version is acceptable.
Checking state for database rtcshared.
Database created by script "RtcSharedDatabase" already exists and is current.

VERBOSE: Successfully installed the database. For details, see the following log:
"C:\Users\Administrator.DOMAIN\AppData\Local\Temp\2\Create-BackendStore-DOMAINSQL001.domain.com_Lync2013-[2013_06_05][13_10_24].log"
VERBOSE: Installing "ABSStore" on DOMAINSQL001.domain.com\Lync2013, collocated: False
****Creating DbSetupInstance for 'Microsoft.Rtc.Common.Data.AbsDatabase'****
Trying to connect to Sql Server DOMAINSQL001.domain.com\Lync2013. using windows authentication...
Sql version: Major: 11, Minor: 0, Build 2100.
Sql version is acceptable.
Checking state for database rtcab.
Database created by script "AbsDatabase" already exists and is current.

VERBOSE: Successfully installed the database. For details, see the following log:
"C:\Users\Administrator.DOMAIN\AppData\Local\Temp\2\Create-ABSStore-DOMAINSQL001.domain.com_Lync2013-[2013_06_05][13_10_24].log"
VERBOSE: Installing "ApplicationStore" on DOMAINSQL001.domain.com\Lync2013, collocated: False
****Creating DbSetupInstance for 'Microsoft.Rtc.Common.Data.RgsConfigDatabase'****
Trying to connect to Sql Server DOMAINSQL001.domain.com\Lync2013. using windows authentication...
Sql version: Major: 11, Minor: 0, Build 2100.
Sql version is acceptable.
Checking state for database rgsconfig.
Database created by script "RgsConfigDatabase" already exists and is current.

****Creating DbSetupInstance for 'Microsoft.Rtc.Common.Data.RgsDynDatabase'****
Trying to connect to Sql Server DOMAINSQL001.domain.com\Lync2013. using windows authentication...
Sql version: Major: 11, Minor: 0, Build 2100.
Sql version is acceptable.
Checking state for database rgsdyn.
Database created by script "RgsDynDatabase" already exists and is current.

****Creating DbSetupInstance for 'Microsoft.Rtc.Common.Data.CpsDynDatabase'****
Trying to connect to Sql Server DOMAINSQL001.domain.com\Lync2013. using windows authentication...
Sql version: Major: 11, Minor: 0, Build 2100.
Sql version is acceptable.
Checking state for database cpsdyn.
Creating database cpsdyn from scratch. Data File Path = C:\CsData\ApplicationStore\Lync2013\DbPath, Log File Path= C:\CsData\ApplicationStore\Lync2013\LogPath.
Setting the database cpsdyn to single user mode.
Database cpsdyn set to mode Single.
Setting the database cpsdyn to restricted mode.
Database cpsdyn set to mode Restricted.
WARNING: Setting SQL Server Show Advanced Options to 1
WARNING: Setting SQL Server Recover Interval to 5 mins.
Executing CpsDyn.sql...
Setting owner for database cpsdyn to sa.
Creating login DOMAIN\RTCComponentUniversalServices.
Creating user DOMAIN\RTCComponentUniversalServices.
Creating Schema DOMAIN\RTCComponentUniversalServices.
Creating login DOMAIN\RTCUniversalReadOnlyAdmins.
Creating user DOMAIN\RTCUniversalReadOnlyAdmins.
Creating Schema DOMAIN\RTCUniversalReadOnlyAdmins.
Creating login DOMAIN\RTCUniversalServerAdmins.
Creating user DOMAIN\RTCUniversalServerAdmins.
Creating Schema DOMAIN\RTCUniversalServerAdmins.
Adding account DOMAIN\RTCComponentUniversalServices to role ReadWriteRole.
Adding account DOMAIN\RTCUniversalServerAdmins to role ReadWriteRole.
Adding account DOMAIN\RTCUniversalReadOnlyAdmins to role ReadOnlyRole.
Setting database version: Schema Version 1, Sproc Version 1, Update Version 2.
Setting the database cpsdyn to multi user mode.
Database cpsdyn is set to multi user mode.
VERBOSE: Successfully installed the database. For details, see the following log:
"C:\Users\Administrator.DOMAIN\AppData\Local\Temp\2\Create-ApplicationStore-DOMAINSQL001.domain.com_Lync2013-[2013_06_05][13_10_25].log
"
VERBOSE: Installing "ArchivingStore" on DOMAINSQL001.domain.com\Lync2013, collocated: False
****Creating DbSetupInstance for 'Microsoft.Rtc.Common.Data.ArchivingDatabase'****
Trying to connect to Sql Server DOMAINSQL001.domain.com\Lync2013. using windows authentication...
Sql version: Major: 11, Minor: 0, Build 2100.
Sql version is acceptable.
Checking state for database LcsLog.
Database created by script "ArchivingDatabase" already exists and is current.

VERBOSE: Successfully installed the database. For details, see the following log:
"C:\Users\Administrator.DOMAIN\AppData\Local\Temp\2\Create-ArchivingStore-DOMAINSQL001.domain.com_Lync2013-[2013_06_05][13_10_34].log"
VERBOSE: Installing "MonitoringStore" on DOMAINSQL001.domain.com\Lync2013, collocated: False
****Creating DbSetupInstance for 'Microsoft.Rtc.Common.Data.MonitoringDatabase'****
Trying to connect to Sql Server DOMAINSQL001.domain.com\Lync2013. using windows authentication...
Sql version: Major: 11, Minor: 0, Build 2100.
Sql version is acceptable.
Checking state for database LcsCDR.
Database created by script "MonitoringDatabase" already exists and is current.

****Creating DbSetupInstance for 'Microsoft.Rtc.Common.Data.QoEMetricsDatabase'****
Trying to connect to Sql Server DOMAINSQL001.domain.com\Lync2013. using windows authentication...
Sql version: Major: 11, Minor: 0, Build 2100.
Sql version is acceptable.
Checking state for database QoEMetrics.
Database created by script "QoEMetricsDatabase" already exists and is current.

VERBOSE: Successfully installed the database. For details, see the following log:
"C:\Users\Administrator.DOMAIN\AppData\Local\Temp\2\Create-MonitoringStore-DOMAINSQL001.domain.com_Lync2013-[2013_06_05][13_10_34].log"
VERBOSE: Installing "PersistentChatStore" on DOMAINSQL001.domain.com\Lync2013, collocated: False
****Creating DbSetupInstance for 'Microsoft.Rtc.Common.Data.MgcDatabase'****
Trying to connect to Sql Server DOMAINSQL001.domain.com\Lync2013. using windows authentication...
Sql version: Major: 11, Minor: 0, Build 2100.
Sql version is acceptable.
Checking state for database mgc.
State of database mgc is DbState_NotAccessible.
Database 'mgc' exists but not accessible. It must be repaired manually or dropped and a new one created. if you want to preserve data, you must use this product's backup/e
. Examine the product documentation for instructions.
Install-CsDatabase : An error occurred while creating or updating the database for feature PersistentChatStore. For details, see the log file
'C:\Users\Administrator.DOMAIN\AppData\Local\Temp\2\Create-PersistentChatStore-DOMAINSQL001.domain.com_Lync2013-[2013_06_05][13_10_34].log'
At line:1 char:1
+ Install-CsDatabase -ConfiguredDatabases -SqlServerFqdn DOMAINSQL001.mylynclab.c ...
+ ~~~~~~~~~~~~~~~~~~~~~~~~~~~~~~~~~~~~~~~~~~~~~~~~~~~~~~~~~~~~~~~~~~~~~~~~~~~~~~~~
    + CategoryInfo          : InvalidOperation: (:SourceCollection) [Install-CsDatabase], DbSetupDatabaseInUnusableStateException
    + FullyQualifiedErrorId : InstallDatabaseInternalFailure,Microsoft.Rtc.Management.Deployment.InstallDatabaseCmdlet
VERBOSE: Successfully installed the database. For details, see the following log:
"C:\Users\Administrator.DOMAIN\AppData\Local\Temp\2\Create-PersistentChatStore-DOMAINSQL001.domain.com_Lync2013-[2013_06_05][13_10_34].
log"
VERBOSE: Installing "PersistentChatComplianceStore" on DOMAINSQL001.domain.com\Lync2013, collocated: False
****Creating DbSetupInstance for 'Microsoft.Rtc.Common.Data.MgcCompDatabase'****
Trying to connect to Sql Server DOMAINSQL001.domain.com\Lync2013. using windows authentication...
Sql version: Major: 11, Minor: 0, Build 2100.
Sql version is acceptable.
Checking state for database mgccomp.
State of database mgccomp is DbState_NotAccessible.
Database 'mgccomp' exists but not accessible. It must be repaired manually or dropped and a new one created. if you want to preserve data, you must use this product's back
tion. Examine the product documentation for instructions.
Install-CsDatabase : An error occurred while creating or updating the database for feature PersistentChatComplianceStore. For details, see the log file
'C:\Users\Administrator.DOMAIN\AppData\Local\Temp\2\Create-PersistentChatComplianceStore-DOMAINSQL001.domain.com_Lync2013-[2013_06_05][13_10_34].log'
At line:1 char:1
+ Install-CsDatabase -ConfiguredDatabases -SqlServerFqdn DOMAINSQL001.mylynclab.c ...
+ ~~~~~~~~~~~~~~~~~~~~~~~~~~~~~~~~~~~~~~~~~~~~~~~~~~~~~~~~~~~~~~~~~~~~~~~~~~~~~~~~
    + CategoryInfo          : InvalidOperation: (:SourceCollection) [Install-CsDatabase], DbSetupDatabaseInUnusableStateException
    + FullyQualifiedErrorId : InstallDatabaseInternalFailure,Microsoft.Rtc.Management.Deployment.InstallDatabaseCmdlet
VERBOSE: Successfully installed the database. For details, see the following log:
"C:\Users\Administrator.DOMAIN\AppData\Local\Temp\2\Create-PersistentChatComplianceStore-DOMAINSQL001.domain.com_Lync2013-[2013_06_05][
13_10_34].log"
VERBOSE: No changes were made to the Central Management Store.
VERBOSE: Creating new log file
"C:\Users\Administrator.DOMAIN\AppData\Local\Temp\2\Install-CsDatabase-817afad5-d1d5-42dc-a4cf-70589c7bdd09.html".
WARNING: Install-CsDatabase encountered errors. Consult the log file for a detailed analysis, and ensure all errors (4) and warnings (2) are
 addressed before continuing.
WARNING: Detailed results can be found at
"C:\Users\Administrator.DOMAIN\AppData\Local\Temp\2\Install-CsDatabase-817afad5-d1d5-42dc-a4cf-70589c7bdd09.html".

As you can see in the above output, I had two failures in the upgrade process. These failures were on the ‘mgc’ and the ‘mgccomp’ database, which both happen to be Persistent Chat databases. The reason for this was that I didn’t check if they were running on the Primary SQL instance back in Step 3 (I did this for the example to show what happens when you don’t do this. Really you should have done this check back in Step 3). So now when I check the status of the Persistent Chat databases with the Database Mirror Manager I notice that they are both on the Secondary SQL instance:


To change these back over I just clicked on the Primary check boxes for both of these databases and then click the Invokebutton. Within the Powershell window you will be asked if you want to change the PersistentChat and PersistentChatCompliance databases over to Primary, which you answer “y” to:

Invoking change of PersistentChat database to Primary

Confirm
Are you sure you want to perform this action?
Performing operation "Invoke-CsDatabaseFailover" on Target "PersistentChatService".
[Y] Yes  [A] Yes to All  [N] No  [L] No to All  [S] Suspend  [?] Help (default is "Y"): y

Invoking change of PersistentChatCompliance database to Primary

Confirm
Are you sure you want to perform this action?
Performing operation "Invoke-CsDatabaseFailover" on Target "PersistentChatService".
[Y] Yes  [A] Yes to All  [N] No  [L] No to All  [S] Suspend  [?] Help (default is "Y"): y

---------------------------------------------------

Now the Persistent Chat databases are running back on the Primary SQL. So run the Install-CsDatabase command again to ensure that the Persistent Chat databases are also updated:

PS C:\Users\Administrator.DOMAIN> Install-CsDatabase -ConfiguredDatabases -SqlServerFqdn DOMAINSQL001.domain.com -Verbose
VERBOSE: Creating new log file
"C:\Users\Administrator.DOMAIN\AppData\Local\Temp\2\Install-CsDatabase-01cfc038-b340-4894-91a1-55d3864d7c2c.xml".
VERBOSE: Install databases required by Lync Server role(s).
VERBOSE: Skipping Central Management Database "1-CentralMgmtStore-1". Central Management Databases are installed using the
-CentralManagementDatabase parameter.
****Creating DbSetupInstance for 'Microsoft.Rtc.Common.Data.BlobStore'****
Trying to connect to Sql Server DOMAINSQL001.domain.com\Lync2013. using windows authentication...
Sql version: Major: 11, Minor: 0, Build 2100.
Sql version is acceptable.
Checking state for database rtcxds.
****Creating DbSetupInstance for 'Microsoft.Rtc.Common.Data.RtcSharedDatabase'****
Trying to connect to Sql Server DOMAINSQL001.domain.com\Lync2013. using windows authentication...
Sql version: Major: 11, Minor: 0, Build 2100.
Sql version is acceptable.
Checking state for database rtcshared.
****Creating DbSetupInstance for 'Microsoft.Rtc.Common.Data.AbsDatabase'****
Trying to connect to Sql Server DOMAINSQL001.domain.com\Lync2013. using windows authentication...
Sql version: Major: 11, Minor: 0, Build 2100.
Sql version is acceptable.
Checking state for database rtcab.
****Creating DbSetupInstance for 'Microsoft.Rtc.Common.Data.RgsConfigDatabase'****
Trying to connect to Sql Server DOMAINSQL001.domain.com\Lync2013. using windows authentication...
Sql version: Major: 11, Minor: 0, Build 2100.
Sql version is acceptable.
Checking state for database rgsconfig.
****Creating DbSetupInstance for 'Microsoft.Rtc.Common.Data.RgsDynDatabase'****
Trying to connect to Sql Server DOMAINSQL001.domain.com\Lync2013. using windows authentication...
Sql version: Major: 11, Minor: 0, Build 2100.
Sql version is acceptable.
Checking state for database rgsdyn.
****Creating DbSetupInstance for 'Microsoft.Rtc.Common.Data.CpsDynDatabase'****
Trying to connect to Sql Server DOMAINSQL001.domain.com\Lync2013. using windows authentication...
Sql version: Major: 11, Minor: 0, Build 2100.
Sql version is acceptable.
Checking state for database cpsdyn.
****Creating DbSetupInstance for 'Microsoft.Rtc.Common.Data.ArchivingDatabase'****
Trying to connect to Sql Server DOMAINSQL001.domain.com\Lync2013. using windows authentication...
Sql version: Major: 11, Minor: 0, Build 2100.
Sql version is acceptable.
Checking state for database LcsLog.
****Creating DbSetupInstance for 'Microsoft.Rtc.Common.Data.MonitoringDatabase'****
Trying to connect to Sql Server DOMAINSQL001.domain.com\Lync2013. using windows authentication...
Sql version: Major: 11, Minor: 0, Build 2100.
Sql version is acceptable.
Checking state for database LcsCDR.
****Creating DbSetupInstance for 'Microsoft.Rtc.Common.Data.QoEMetricsDatabase'****
Trying to connect to Sql Server DOMAINSQL001.domain.com\Lync2013. using windows authentication...
Sql version: Major: 11, Minor: 0, Build 2100.
Sql version is acceptable.
Checking state for database QoEMetrics.
****Creating DbSetupInstance for 'Microsoft.Rtc.Common.Data.MgcDatabase'****
Trying to connect to Sql Server DOMAINSQL001.domain.com\Lync2013. using windows authentication...
Sql version: Major: 11, Minor: 0, Build 2100.
Sql version is acceptable.
Checking state for database mgc.
****Creating DbSetupInstance for 'Microsoft.Rtc.Common.Data.MgcCompDatabase'****
Trying to connect to Sql Server DOMAINSQL001.domain.com\Lync2013. using windows authentication...
Sql version: Major: 11, Minor: 0, Build 2100.
Sql version is acceptable.
Checking state for database mgccomp.
VERBOSE: All databases at the specified installation location are already up to date.
VERBOSE: No changes were made to the Central Management Store.
VERBOSE: Creating new log file
"C:\Users\Administrator.DOMAIN\AppData\Local\Temp\2\Install-CsDatabase-01cfc038-b340-4894-91a1-55d3864d7c2c.html".
VERBOSE: "Install-CsDatabase" processing has completed successfully.
VERBOSE: Detailed results can be found at
"C:\Users\Administrator.DOMAIN\AppData\Local\Temp\2\Install-CsDatabase-01cfc038-b340-4894-91a1-55d3864d7c2c.html".
PS C:\Users\Administrator.DOMAIN>

Now our Application database schema has been updated and is ready to run all the new features of CU1.

Step 6: Re-establish the Database Mirror

Run the following command:

Install-CsMirrorDatabase -DatabaseType Application -SqlServerFQDN DOMAINSQL001.domain.com -SqlInstanceName Lync2013 -FileShare \\DOMAINSQL001.domain.com\FileShare-Verbose

Command output example:

PS > Install-CsMirrorDatabase -DatabaseType Application -SqlServerFQDN DOMAINSQL001.domain.com -SqlInstanceName Lync2013 -FileShare "\\DOMAINSQL001.domain.com\Fil
eShare" -Verbose
VERBOSE: Creating new log file
"C:\Users\Administrator.DOMAIN\AppData\Local\Temp\2\Install-CsMirrorDatabase-be00671d-7932-4f68-b657-66a9b3c560e6.xml".

Install Mirror Database
This cmdlet sets up mirroring for databases on primary SQL Server instance on the mirror SQL Server instance. If a witness is specified, it also sets up a witness for databases on the primary SQL Server instance.

 The following databases will be mirrored and configured with a witness if a witness is specified:
    Database Name:rgsconfig
        Data File:C:\CsData\ApplicationStore\Lync2013\DbPath\rgsconfig.mdf
         Log File:C:\CsData\ApplicationStore\Lync2013\LogPath\rgsconfig.ldf
      Primary SQL: DOMAINSQL001.domain.com\Lync2013
          Account: DOMAIN\DOMAINSQL001$
       Mirror SQL: DOMAINSQL002.domain.com\Lync2013
          Account: DOMAIN\DOMAINSQL002$
     Witness SQL : DOMAINSQL003.domain.com\Lync2013
          Account: DOMAIN\DOMAINSQL003$


    Database Name:rgsdyn
        Data File:C:\CsData\ApplicationStore\Lync2013\DbPath\rgsdyn.mdf
         Log File:C:\CsData\ApplicationStore\Lync2013\LogPath\rgsdyn.ldf
      Primary SQL: DOMAINSQL001.domain.com\Lync2013
          Account: DOMAIN\DOMAINSQL001$
       Mirror SQL: DOMAINSQL002.domain.com\Lync2013
          Account: DOMAIN\DOMAINSQL002$
     Witness SQL : DOMAINSQL003.domain.com\Lync2013
          Account: DOMAIN\DOMAINSQL003$


    Database Name:cpsdyn
        Data File:C:\CsData\ApplicationStore\Lync2013\DbPath\cpsdyn.mdf
         Log File:C:\CsData\ApplicationStore\Lync2013\LogPath\cpsdyn.ldf
      Primary SQL: DOMAINSQL001.domain.com\Lync2013
          Account: DOMAIN\DOMAINSQL001$
       Mirror SQL: DOMAINSQL002.domain.com\Lync2013
          Account: DOMAIN\DOMAINSQL002$
     Witness SQL : DOMAINSQL003.domain.com\Lync2013
          Account: DOMAIN\DOMAINSQL003$


 Verify that the following things are taken care of before proceeding:
    Port 5022 is accessible through the firewall if Windows Firewall is enabled in the primary SQL Server
DOMAINSQL001.domain.com\Lync2013.
    Port 5022 is accessible through the firewall if Windows Firewall is enabled in the mirror SQL Server
DOMAINSQL002.domain.com\Lync2013.
    Port 7022 is accessible through the firewall if Windows Firewall is enabled in the witness SQL Server
DOMAINSQL003.domain.com\Lync2013.
    Accounts running the SQL Servers on all primary and mirror SQL servers have read/write permissions to the file share
\\DOMAINSQL001.domain.com\FileShare


    The cmdlet will use WMI provider to find the account information for SQL Server services running on all primary, mirror and witness
servers. Verify that WMI provider is running on all these servers.


    The cmdlet will try to create folders for data and log files for all the mirror servers. Verify that the account running this cmdlet has
 permission to create these folders.
[Y] Yes  [A] Yes to All  [N] No  [L] No to All  [S] Suspend  [?] Help (default is "Y"): y
VERBOSE: Mirroring was configured successfully for database "rgsconfig".
VERBOSE: Witness was configured successfully for database "rgsconfig".
VERBOSE: Mirroring was configured successfully for database "rgsdyn".
VERBOSE: Witness was configured successfully for database "rgsdyn".
VERBOSE: Mirroring was configured successfully for database "cpsdyn".
VERBOSE: Witness was configured successfully for database "cpsdyn".
VERBOSE: Successfully created SQL Server Agent jobs on DOMAINSQL002.domain.com\Lync2013.
VERBOSE: No changes were made to the Central Management Store.
VERBOSE: Creating new log file
"C:\Users\Administrator.DOMAIN\AppData\Local\Temp\2\Install-CsMirrorDatabase-be00671d-7932-4f68-b657-66a9b3c560e6.html".
VERBOSE: "Install-CsMirrorDatabase" processing has completed successfully.
VERBOSE: Detailed results can be found at
"C:\Users\Administrator.DOMAIN\AppData\Local\Temp\2\Install-CsMirrorDatabase-be00671d-7932-4f68-b657-66a9b3c560e6.html".
PS C:\Users\Administrator.DOMAIN>

Note: If you get an RPC error at this point like the example I've provided below, it’s likely caused by ports being blocked on the Windows Firewall of the SQL servers.
PS > Install-CsMirrorDatabase -DatabaseType Application -SqlServerFQDN DOMAINSQL001.domain.com -SqlInstanceName Lync2013 -FileShare "\\DOMAINSQL001.domain.com\FileShare" -Verbose
VERBOSE: Creating new log file
"C:\Users\Administrator.DOMAIN\AppData\Local\Temp\2\Install-CsMirrorDatabase-20abaefd-828b-4920-b221-6d15774ea486.xml".
VERBOSE: Creating new log file
"C:\Users\Administrator.DOMAIN\AppData\Local\Temp\2\Install-CsMirrorDatabase-20abaefd-828b-4920-b221-6d15774ea486.html".
WARNING: Install-CsMirrorDatabase failed.
WARNING: Detailed results can be found at
"C:\Users\Administrator.DOMAIN\AppData\Local\Temp\2\Install-CsMirrorDatabase-20abaefd-828b-4920-b221-6d15774ea486.html".
Install-CsMirrorDatabase : Command execution failed: The RPC server is unavailable. (Exception from HRESULT: 0x800706BA)
At line:1 char:1
+ Install-CsMirrorDatabase -DatabaseType Application -SqlServerFQDN DOMAINSQL001. ...
+ ~~~~~~~~~~~~~~~~~~~~~~~~~~~~~~~~~~~~~~~~~~~~~~~~~~~~~~~~~~~~~~~~~~~~~~~~~~~~~~~~
    + CategoryInfo          : InvalidOperation: (:) [Install-CsMirrorDatabase], COMException
    + FullyQualifiedErrorId : ProcessingFailed,Microsoft.Rtc.Management.Deployment.InstallMirrorDatabaseCmdlet

From the testing that I have done, I’ve found that the Ports that need to be open to avoid these errors are TCP 135, TCP 445 and TCP 49154-49155. This is in addition to the SQL Mirroring signalling ports that also need to be opened: TCP 5022 on the Primary and Secondary servers, and  TCP 7022 on the Witness server (also the regular SQL ports UDP 1434, TCP 1433, and the Dynamic TCP port used when Named SQL database is used).

Step 7: Confirm that the databases are all back up and running

Check the state of the database mirror:

Get-CsDatabaseMirrorState -PoolFqdn melbfepool.domain.com -Verbose

Note: You could also do this check with the Mirror Manager Tool. However, just in case there is some edge case where the mirror has failed to re-establish (with an error I haven’t seen before), it’s probably best to use the command in this circumstance.

PS C:\Users\Administrator.DOMAIN> Get-CsDatabaseMirrorState -PoolFqdn melbfepool.domain.com -Verbose
VERBOSE: Creating new log file
"C:\Users\Administrator.DOMAIN\AppData\Local\Temp\2\Get-CsDatabaseMirrorState-22e57066-60a0-4d5a-a699-3e7e0fcf3894.
xml".
VERBOSE: Primary SQL Server Instance: DOMAINSQL001.domain.com\Lync2013
VERBOSE: Mirror SQL Server Instance: DOMAINSQL002.domain.com\Lync2013


DatabaseName             : rtcab
StateOnPrimary           : Principal
StateOnMirror            : Mirror
MirroringStatusOnPrimary : synchronized
MirroringStatusOnMirror  : synchronized

DatabaseName             : rtcxds
StateOnPrimary           : Principal
StateOnMirror            : Mirror
MirroringStatusOnPrimary : synchronized
MirroringStatusOnMirror  : synchronized

DatabaseName             : rtcshared
StateOnPrimary           : Principal
StateOnMirror            : Mirror
MirroringStatusOnPrimary : synchronized
MirroringStatusOnMirror  : synchronized

VERBOSE: Primary SQL Server Instance: DOMAINSQL001.domain.com\Lync2013
VERBOSE: Mirror SQL Server Instance: DOMAINSQL002.domain.com\Lync2013
DatabaseName             : lcscdr
StateOnPrimary           : Principal
StateOnMirror            : Mirror
MirroringStatusOnPrimary : synchronized
MirroringStatusOnMirror  : synchronized

DatabaseName             : qoemetrics
StateOnPrimary           : Principal
StateOnMirror            : Mirror
MirroringStatusOnPrimary : synchronized
MirroringStatusOnMirror  : synchronized

VERBOSE: Primary SQL Server Instance: DOMAINSQL001.domain.com\Lync2013
VERBOSE: Mirror SQL Server Instance: DOMAINSQL002.domain.com\Lync2013
DatabaseName             : lcslog
StateOnPrimary           : Principal
StateOnMirror            : Mirror
MirroringStatusOnPrimary : synchronized
MirroringStatusOnMirror  : synchronized

VERBOSE: Primary SQL Server Instance: DOMAINSQL001.domain.com\Lync2013
VERBOSE: Mirror SQL Server Instance: DOMAINSQL002.domain.com\Lync2013
DatabaseName             : rgsconfig
StateOnPrimary           : Principal
StateOnMirror            : Mirror
MirroringStatusOnPrimary : synchronized
MirroringStatusOnMirror  : synchronized

DatabaseName             : rgsdyn
StateOnPrimary           : Principal
StateOnMirror            : Mirror
MirroringStatusOnPrimary : synchronized
MirroringStatusOnMirror  : synchronized

DatabaseName             : cpsdyn
StateOnPrimary           : Principal
StateOnMirror            : Mirror
MirroringStatusOnPrimary : synchronized
MirroringStatusOnMirror  : synchronized

VERBOSE: Primary SQL Server Instance: DOMAINSQL001.domain.com\Lync2013
VERBOSE: Mirror SQL Server Instance: DOMAINSQL002.domain.com\Lync2013
DatabaseName             : xds
StateOnPrimary           : Principal
StateOnMirror            : Mirror
MirroringStatusOnPrimary : synchronized
MirroringStatusOnMirror  : synchronized

DatabaseName             : lis
StateOnPrimary           : Principal
StateOnMirror            : Mirror
MirroringStatusOnPrimary : synchronized
MirroringStatusOnMirror  : synchronized

VERBOSE: No changes were made to the Central Management Store.
VERBOSE: Creating new log file
"C:\Users\Administrator.DOMAIN\AppData\Local\Temp\2\Get-CsDatabaseMirrorState-22e57066-60a0-4d5a-a699-3e7e0fcf3894.
html".
VERBOSE: "Get-CsDatabaseMirrorState" processing has completed successfully.
VERBOSE: Detailed results can be found at
"C:\Users\Administrator.DOMAIN\AppData\Local\Temp\2\Get-CsDatabaseMirrorState-22e57066-60a0-4d5a-a699-3e7e0fcf3894.
html".

PS >

From the above output you will see that rgsconfig, rgsdyn, and cpsdyn are back in Principal state on the Primary server.

Step 8 (Optional):If you have your Archiving and Monitoring databases on a different SQL backend than the main Lync databases are stored you need to run the install on it now:

Install-CsDatabase -ConfiguredDatabases -SqlServerFqdn DOMAINARC001.domain.com -Verbose

Step 9: After we have finished updating all the Lync databases we need to now update the CMS database with the following command:

Install-CsDatabase -CentralManagementDatabase –SqlServerFqdn DOMAINSQL001.domain.com-SqlInstanceName Lync2013–Verbose

The output of the command will look something like this:

PS C:\Users\Administrator.DOMAIN> Install-CsDatabase -CentralManagementDatabase -SqlServerFqdn DOMAINSQL001.domain.com -SqlInstanceName Lync2013 -Verbose
VERBOSE: Creating new log file
"C:\Users\Administrator.DOMAIN\AppData\Local\Temp\2\Install-CsDatabase-6b47e723-1091-4669-bb19-c1d673ad5612.xml".
VERBOSE: Install databases required by Lync Server role(s).
****Creating DbSetupInstance for 'Microsoft.Rtc.Common.Data.XdsDatabase'****
Trying to connect to Sql Server DOMAINSQL001.domain.com\Lync2013. using windows authentication...
Sql version: Major: 11, Minor: 0, Build 2100.
Sql version is acceptable.
Checking state for database xds.
VERBOSE: Assigning "CentralMgmtStore:XdsDatabase:LogPath" to C:\CsData
VERBOSE: Assigning "CentralMgmtStore:LisDatabase:LogPath" to C:\CsData
VERBOSE: Assigning "CentralMgmtStore:XdsDatabase:DbPath" to C:\CsData
VERBOSE: Assigning "CentralMgmtStore:LisDatabase:DbPath" to C:\CsData
VERBOSE: Installing "CentralMgmtStore" on DOMAINSQL001.domain.com\Lync2013, collocated: False
****Creating DbSetupInstance for 'Microsoft.Rtc.Common.Data.XdsDatabase'****
Trying to connect to Sql Server DOMAINSQL001.domain.com\Lync2013. using windows authentication...
Sql version: Major: 11, Minor: 0, Build 2100.
Sql version is acceptable.
Checking state for database xds.
State of database xds is DbState_RequiresMinorUpgrade.
Database xds set to mode Restricted.
Dropping all procedures, functions and views from database xds.
Executing Xds.sql...
Adding master role...
Setting database state to active...
Setting owner for database xds to sa.
Creating login DOMAIN\RTCUniversalConfigReplicator.
Creating user DOMAIN\RTCUniversalConfigReplicator.
Creating Schema DOMAIN\RTCUniversalConfigReplicator.
Creating login DOMAIN\RTCUniversalReadOnlyAdmins.
Creating user DOMAIN\RTCUniversalReadOnlyAdmins.
Creating Schema DOMAIN\RTCUniversalReadOnlyAdmins.
Creating login DOMAIN\RTCUniversalServerAdmins.
Creating user DOMAIN\RTCUniversalServerAdmins.
Creating Schema DOMAIN\RTCUniversalServerAdmins.
Adding account DOMAIN\RTCUniversalReadOnlyAdmins to role ConsumerRole.
Adding account DOMAIN\RTCUniversalConfigReplicator to role ReplicatorRole.
Adding account DOMAIN\RTCUniversalServerAdmins to role PublisherRole.
Setting database version: Schema Version 10, Sproc Version 13, Update Version 2.
Setting the database xds to multi user mode.
Database xds is set to multi user mode.
****Creating DbSetupInstance for 'Microsoft.Rtc.Common.Data.LisDatabase'****
Trying to connect to Sql Server DOMAINSQL001.domain.com\Lync2013. using windows authentication...
Sql version: Major: 11, Minor: 0, Build 2100.
Sql version is acceptable.
Checking state for database lis.
Database created by script "LisDatabase" already exists and is current.

VERBOSE: Successfully installed the database. For details, see the following log:
"C:\Users\Administrator.DOMAIN\AppData\Local\Temp\2\Create-CentralMgmtStore-DOMAINSQL001.domain.com_Lync2013-[2013_06_05][17_01_59].log
"
VERBOSE: Creating new log file
"C:\Users\Administrator.DOMAIN\AppData\Local\Temp\2\Install-CsDatabase-6b47e723-1091-4669-bb19-c1d673ad5612.html".
VERBOSE: "Install-CsDatabase" processing has completed successfully.
VERBOSE: Detailed results can be found at
"C:\Users\Administrator.DOMAIN\AppData\Local\Temp\2\Install-CsDatabase-6b47e723-1091-4669-bb19-c1d673ad5612.html".
PS C:\Users\Administrator.DOMAIN>

Step 10: To enable the Mobility service, run the following cmdlet:

Enable-CsTopology

Step 11: To enable the Unified Communications Web API (UCWA), you must run the Bootstrapper.exe tool again on all Lync Server 2013 servers on which the Web Components were installed and updated. The command to run the tool is as follows:

"%ProgramFiles%\Microsoft Lync Server 2013\Deployment\Bootstrapper.exe"

The command executes like this:

C:\Program Files\Common Files\Microsoft Lync Server 2013>"%ProgramFiles%\Microsoft Lync Server 2013\Deployment\Bootstrapper.exe"
Logging status to: C:\Users\Administrator.DOMAIN\AppData\Local\Temp\2\Bootstrap-CsMachine-[2013_06_06][10_17_38].html
Checking prerequisites for bootstrapper...
Checking prerequisite WMIEnabled...prerequisite satisfied.
Checking prerequisite NoBootstrapperOnBranchOfficeAppliance...prerequisite satisfied.
Checking prerequisite SupportedOS...prerequisite satisfied.
Checking prerequisite NoOtherVersionInstalled...prerequisite satisfied.
Host name: DOMAINfe001.domain.com
Disabling unused roles...
Executing PowerShell command: Disable-CSComputer -Confirm:$false -Verbose -Report "C:\Users\Administrator.DOMAIN\AppData\Local\Temp\2\Disable-CSComputer-[2013_06_06][10_17_48].html"
Checking prerequisites for roles...
Checking prerequisite SupportedOS...prerequisite satisfied.
Checking prerequisite SupportedOSNoDC...prerequisite satisfied.
Checking prerequisite SupportedSqlRtcLocal...prerequisite satisfied.
Checking prerequisite WMIEnabled...prerequisite satisfied.
Checking prerequisite NoOtherVersionInstalled...prerequisite satisfied.
Checking prerequisite PowerShell...prerequisite satisfied.
Checking prerequisite WindowsIdentityFoundation...prerequisite satisfied.
Checking prerequisite SupportedServerOS...prerequisite satisfied.
Checking prerequisite NoUnsupportedWinFab...prerequisite satisfied.
Checking prerequisite SupportedSqlLyncLocal...prerequisite satisfied.
Checking prerequisite IIS...prerequisite satisfied.
Checking prerequisite IIS7Features...prerequisite satisfied.
Checking prerequisite ASPNet...prerequisite satisfied.
Checking prerequisite KB2646886Installed...prerequisite satisfied.
Checking prerequisite BranchCacheBlock...prerequisite satisfied.
Checking prerequisite WCF...prerequisite satisfied.
Checking prerequisite WindowsMediaFoundation...prerequisite satisfied.
Checking prerequisite SqlInstanceRtcLocal...prerequisite satisfied.
Checking prerequisite VCredist...prerequisite satisfied.
Checking prerequisite SqlNativeClient...prerequisite satisfied.
Checking prerequisite SqlClrTypes...prerequisite satisfied.
Checking prerequisite SqlSharedManagementObjects...prerequisite satisfied.
Checking prerequisite UcmaRedist...prerequisite satisfied.
Checking prerequisite WinFab...prerequisite satisfied.
Checking prerequisite MicrosoftIdentityExtensions...prerequisite satisfied.
Checking prerequisite SqlInstanceLyncLocal...prerequisite satisfied.
Checking prerequisite RewriteModule...prerequisite satisfied.
Checking prerequisite SpeechPlatformRuntime...prerequisite satisfied.
Checking prerequisite MSSpeech_TTS_ca-ES_Herena...prerequisite satisfied.
Checking prerequisite MSSpeech_TTS_da-DK_Helle...prerequisite satisfied.
Checking prerequisite MSSpeech_TTS_de-DE_Hedda...prerequisite satisfied.
Checking prerequisite MSSpeech_TTS_en-AU_Hayley...prerequisite satisfied.
Checking prerequisite MSSpeech_TTS_en-CA_Heather...prerequisite satisfied.
Checking prerequisite MSSpeech_TTS_en-GB_Hazel...prerequisite satisfied.
Checking prerequisite MSSpeech_TTS_en-IN_Heera...prerequisite satisfied.
Checking prerequisite MSSpeech_TTS_en-US_Helen...prerequisite satisfied.
Checking prerequisite MSSpeech_TTS_es-ES_Helena...prerequisite satisfied.
Checking prerequisite MSSpeech_TTS_es-MX_Hilda...prerequisite satisfied.
Checking prerequisite MSSpeech_TTS_fi-FI_Heidi...prerequisite satisfied.
Checking prerequisite MSSpeech_TTS_fr-CA_Harmonie...prerequisite satisfied.
Checking prerequisite MSSpeech_TTS_fr-FR_Hortense...prerequisite satisfied.
Checking prerequisite MSSpeech_TTS_it-IT_Lucia...prerequisite satisfied.
Checking prerequisite MSSpeech_TTS_ja-JP_Haruka...prerequisite satisfied.
Checking prerequisite MSSpeech_TTS_ko-KR_Heami...prerequisite satisfied.
Checking prerequisite MSSpeech_TTS_nb-NO_Hulda...prerequisite satisfied.
Checking prerequisite MSSpeech_TTS_nl-NL_Hanna...prerequisite satisfied.
Checking prerequisite MSSpeech_TTS_pl-PL_Paulina...prerequisite satisfied.
Checking prerequisite MSSpeech_TTS_pt-BR_Heloisa...prerequisite satisfied.
Checking prerequisite MSSpeech_TTS_pt-PT_Helia...prerequisite satisfied.
Checking prerequisite MSSpeech_TTS_ru-RU_Elena...prerequisite satisfied.
Checking prerequisite MSSpeech_TTS_sv-SE_Hedvig...prerequisite satisfied.
Checking prerequisite MSSpeech_TTS_zh-CN_HuiHui...prerequisite satisfied.
Checking prerequisite MSSpeech_TTS_zh-HK_HunYee...prerequisite satisfied.
Checking prerequisite MSSpeech_TTS_zh-TW_HanHan...prerequisite satisfied.
Checking prerequisite MSSpeech_SR_ca-ES_TELE...prerequisite satisfied.
Checking prerequisite MSSpeech_SR_da-DK_TELE...prerequisite satisfied.
Checking prerequisite MSSpeech_SR_de-DE_TELE...prerequisite satisfied.
Checking prerequisite MSSpeech_SR_en-AU_TELE...prerequisite satisfied.
Checking prerequisite MSSpeech_SR_en-CA_TELE...prerequisite satisfied.
Checking prerequisite MSSpeech_SR_en-GB_TELE...prerequisite satisfied.
Checking prerequisite MSSpeech_SR_en-IN_TELE...prerequisite satisfied.
Checking prerequisite MSSpeech_SR_en-US_TELE...prerequisite satisfied.
Checking prerequisite MSSpeech_SR_es-ES_TELE...prerequisite satisfied.
Checking prerequisite MSSpeech_SR_es-MX_TELE...prerequisite satisfied.
Checking prerequisite MSSpeech_SR_fi-FI_TELE...prerequisite satisfied.
Checking prerequisite MSSpeech_SR_fr-CA_TELE...prerequisite satisfied.
Checking prerequisite MSSpeech_SR_fr-FR_TELE...prerequisite satisfied.
Checking prerequisite MSSpeech_SR_it-IT_TELE...prerequisite satisfied.
Checking prerequisite MSSpeech_SR_ja-JP_TELE...prerequisite satisfied.
Checking prerequisite MSSpeech_SR_ko-KR_TELE...prerequisite satisfied.
Checking prerequisite MSSpeech_SR_nb-NO_TELE...prerequisite satisfied.
Checking prerequisite MSSpeech_SR_nl-NL_TELE...prerequisite satisfied.
Checking prerequisite MSSpeech_SR_pl-PL_TELE...prerequisite satisfied.
Checking prerequisite MSSpeech_SR_pt-BR_TELE...prerequisite satisfied.
Checking prerequisite MSSpeech_SR_pt-PT_TELE...prerequisite satisfied.
Checking prerequisite MSSpeech_SR_ru-RU_TELE...prerequisite satisfied.
Checking prerequisite MSSpeech_SR_sv-SE_TELE...prerequisite satisfied.
Checking prerequisite MSSpeech_SR_zh-CN_TELE...prerequisite satisfied.
Checking prerequisite MSSpeech_SR_zh-HK_TELE...prerequisite satisfied.
Checking prerequisite MSSpeech_SR_zh-TW_TELE...prerequisite satisfied.
Checking prerequisite UcmaWorkflowRuntime...prerequisite satisfied.
Installing any collocated databases...
Executing PowerShell command: Install-CSDatabase -Confirm:$false -Verbose -LocalDatabases -Report "C:\Users\Administrator.DOMAIN\AppData\Local\Temp\2\Install-CSDatabase-[2013_06_06][10_17_54].html"
Enabling new roles...
This step will configure services, apply permissions, create firewall rules, etc.
Executing PowerShell command: Enable-CSComputer -Confirm:$false -Verbose -Report "C:\Users\Administrator.DOMAIN\AppData\Local\Temp\2\Enable-CSComputer-[2013_06_06][10_18_28].html"
Complete.
Log file was: %TEMP%\Bootstrap-CsMachine-[2013_06_06][10_17_38].html


And we’re done!

The Wrap Up


It’s safe to say that updating a Lync server with a Mirrored Database is a bit more involved than doing a single database server. It’s one of those processes that if taken lightly might cause you some grief in the real world. Hopefully this post will help to make your life a little easier.


Lync 2013 Call Pickup Group Manager

$
0
0
In Lync 2013 Cumulative Update 1 (February Update) Microsoft added the new call pickup group feature. Call pickup has been a classic voice feature since the very early days of PBXs. As a result, lots of businesses are still used to being able to answer other people’s calls by dialling special access codes from their phone. So it’s great that Lync finally has this capability to help ease some of the pain points for businesses transitioning from their previous traditional PBX systems to the new world.

Group Call Pickup Operation:

  • Calls coming in to any member of a call pickup group can be answered by dialling a special access code for that group. Note: the person wanting to answer the call will physically need to hear the other person’s phone ringing.
  • Any other user on the system can answer a call to a call pickup group by dialling the call pickup access code associated with that group. This feature does not restrict the call to only be answered by people in the group.
  • If there are multiple calls ringing on phones in the same group, the first call into the group is the call that will be answered when the access code is dialled. The other calls in the group will be queued in the order the calls came into the group after that.
  • Only direct calls to a user’s phone number can be answered with call pickup. (see limitations below for more details)


Call Pickup Groups in Lync 2013 have the following limitations:

  • Users can be assigned to only one call pickup group at a time.
  • Call pickup service uses the call park services running on the Lync front end server. When a call rings on a call pickup group user’s number it will simultaneously be automatically parked on the call park service. If the user picks up the phone the parked call is removed, or if the call pickup number used to answer the call, the user’s phone will stop ringing.
  • Calls into a call pickup group can be answered by any phone within the organisation, as long as the user wanting to pick up the call knows the correct access code to dial for that group.
  • Response group calls ringing on a call pickup group user’s phone cannot be answered via call pickup.
  • Delegate Calls – Calls delegated to another phone cannot be answered with call pickup.
  • Team Calls – Calls to users with team calling configured cannot be answered using a call pickup access code.
  • Simultaneous Ring Calls cannot be picked up with group call pickup.


Unfortunately, configuring call pickup groups has not been very easy to do (till now), due to Microsoft only giving access to configure call pickup groups through the very archaic SEFAUtil from the Lync Resource Kit (ResKit). This tool was originally designed to be used for administratively configuring Call Forwards and Team Calling by running commands from the prompt. SEFAUtil can check which call pickup group a user is in, or set which group a user in, via the command line.

A big problem with SEFAUtil is that it usually takes 3-5 seconds to check the settings for each user, and another 3-5 seconds to change their setting via the command line. In addition to this, you can’t directly query a call pickup group number to see which users are in that particular group. Instead, you have to query each user individually to establish the call pickup groups of which they are a member. If you think about that, for 1000 users it could take you (1000 x 5 seconds) well over an hour just to discover which groups all the users are in. This seems a little excessive to me.   

It’s time for a better way…

Lync 2013 Call Pickup Group Manager


So after many evenings in the lab scripting away, I have created a tool that will hopefully make life (when it comes to call pickup groups, at least), a bit easier. So what does it look like?


Features of Lync 2013 Call Pickup Manager:

  • View all call pickup group configuration (Orbits, Groups and Users) in one simple interface.
  • Call Pickup Group Manager discovers call pickup configuration information directly from the Lync database, to avoid having to poll every user individually using SEFAUtil. This makes configuration discovery super fast!
  • Easy configuration of Call Pickup Orbits.
  • Group-centric configuration of groups. ie. you attach users to a group, rather than groups to a user like the SEFAUtil tool would have you do.
  • Multi-selectable user list boxes for adding or removing multiple users at once.
Update (14/10/2014)

1.01 Update:
  • Pre-Req check will now look under the default reskit location on all available drives (not just C:)
  • If SEFAUTIL gives no response (due to an unknown error in SEFAUTIL) the tool will display an error to the user.
  • Added the Import-Module Lync command in case you run the script from regular Powershell or use the Right Click Run using Powershell method to start the script.
1.02 Update:

1.03 Common Area Phone Update:
  • This version has been updated to handle Common Area Phones. Some people reported errors being displayed by the tool when they had manually set (with SEFAUTIL) Group Call Pickup against Common Area Phones (ie. against the SIP URI of the Common Area Device, eg: sip:fbcb642b-f5bc-477a-a053-373aef4c00f8@domain.com). As of this version Common Area Phones will be included in the user list, and you can add and remove them from Call Pickup Groups.
  • User listboxes are now slightly wider to deal with the long SIP addresses of Common Area Phones.
  • When the tool loads it will display in the Powershell window the SIP Address and Display Name of all common area devices so you can match the (GUID looking) SIP address in the tool to the display name of the device.

1.04 Scalability Update
  • Now supports window resizing.
  • Added Filter on Lync users listbox to cater for deployments that have lots of users.
  • Script is now signed.
1.05 Skype for Business Update (2/9/2015)
  • Now checks that Group number matches a range that exists in one of the Call Pickup Orbits before allowing it to be added to the group list.
  • Up and Down keys in Orbit listbox now update orbit details properly.
  • You can now specify an alternate location of SEFAUTIL.exe in the command line. (Example: .\Lync2013CallPickupManager.1.05 "D:\folder\SEFAUTIL.exe")
  • Now checks the Skype for Business RESKIT location.
  • Put a dividing line between the Orbit creation section and the Group configuration section to try and indicate a divide between the two areas.
  • The Group list box label now displays the group name being listed up so the user understands better what group the user list is associated with.

Download Version 1.05 here:


Prerequisites to use Call Pickup Group Manager


Under the hood, the Call Pickup Manager will use the SEFAUtil for adding and removing users from groups. This was a deliberate choice, as I wanted the tool to be supportable by Microsoft (ie. by avoiding any direct database editing, or hacking of things), and you don’t have to fear any unnecessary database corruption from using the tool.

Resource Kit Download

Download and install a copy of the Lync 2013 ResKit from here:

Make sure you have the ResKit installed on the Front End server you are running the Call Pickup Manger Tool on. I have written prerequisite checks into the tool, so you will get an error in the console window if it's missing.

SEFAUtil Configuration

Once the resource kit has been installed you need to configure Lync so it will trust the SEFAUtil tool. This allows the SEFAUtil to make UCMA calls to the Lync system.

Adding SEFAUtil as a trusted application:

Create a variable containing the site you will be configure SEFAUtil for:

$Site = Get-CsSite –Identity Melbourne

Configure the Trusted Application Pool:

New-CsTrustedApplicationPool –id pool.domain.com–Registrar pool.domain.com-site $Site.SiteId

Configure the Trusted Application:

New-CsTrustedApplication –ApplicationId sefautil–TrustedApplicationPoolFqdn pool.domain.com–Port 7489

Enable the Topology for the pool to start using the Trusted Application:

Enable-CsTopology

Here's the Technet explaination if you need it: http://technet.microsoft.com/en-us/library/jj945659.aspx

Allow Call Park Manager to Connect to Remote Pools


In order for the Lync 2013 Call Pickup Manager to quickly download call pickup settings from your deployment, it needs access to your RTCLOCAL databases for each pool. If you only have one Standard Edition server, then you can run the tool directly on this server and it will be able to access the RTCLOCAL database directly (note: this is also the case for an enterprise edition pool, but you need to run the tool on the first server in the Get-CsPool -> Computers property array, because this will be the database the tool tries to connect to). If you have multiple pools, the Call Pickup Manager will try and connect to each pool to download all the call pickup data for each pool (Branch SBA's also count as a separate pool).


In order for the SQL connection to be made (as shown in the diagram above), inbound connections to the SQL Browser Service and RTCLOCAL database will need to be allowed through the Windows firewall. These rules are not created automatically during Lync Server 2013 Setup like most of the other rules are. So you will need to do this manually, by following the process below:

Opening SQL ports in Windows Firewall

You can add Firewall rules either through the Windows Firewall settings in Control Panel, or by the command line. In this example I will show you how to add the ports using the command line.

Step 1: Add the SQL Named Instance Browser with the following command:

netsh advfirewall firewall add rule name="Lync 2013 Call Pickup Manager - SQL Browser (UDP 1434)" dir=in action=allow protocol=UDP localport=1434 profile=domain

Step 2: Find the Dynamic TCP port used by the Named Instance (RTCLOCAL). Firstly, open the SQL Server Configuration Manager (On a Standard Edition server, this is installed when the local databases are deployed).

  1. Open SQL Server Configuration Manager
  2. (Select) Protocols for RTCLOCAL
  3. (Right Click) TCP/IP -> Select Properties
  4. (Select) IP Address Tab -> IPAll -> TCP Dynamic Ports

As you can see in the example below, for IPAll the TCP Dynamic Port is 49264. This is the Dynamic Port for this Named Instance that needs to be opened in the firewall.


Step 3: Add the Named Instances Dynamic Port via the following command (Substitute the Dynamic Port for your deployment in the highlighted area below):

netsh advfirewall firewall add rule name="Lync 2013 Call Pickup Manager - SQL RTCLOCAL Dynamic Port (TCP-in)" dir=in action=allow protocol=TCP localport=<Insertporthere>profile=domain

Or, if you are not fond of doing manual processes, you could just use the script below for opening the ports automatically on your remote Front End servers:

Download Open SQL Ports For Call Pickup Manager 1.00 Script here:


Run this script on the server you want to open the SQL Browser and RTCLOCAL Dynamic TCP SQL ports on.

The Wrap Up


Once again, we’ve come to the end of another show. I hope you like my new tool and it makes your life a little easier. If you find any bugs or have any issues with it, please report them back to me so I can update the tool. Until next time, remember to answer your phone, and if you don’t, at least remember to get someone else to dial #110 to answer it for you. See ya next time!


Lync Polycom VVX Manager Tool

$
0
0
UPDATE: There is now a new 2.0 version of the Polycom VVX Manager Tool available. See the blog post here for more details.

I’ve recently been doing a lot of work with deployment and management of Polycom VVX phones on Lync. Like always, I’ve found that when rolling out hundreds of any device, there are certain challenges that arise. One of the main challenges is: how do you centrally administer hundreds of devices that are distributed around a large geography, remotely? The short answer to this usually turns out to be: with great difficulty!

One of the first rules of a good centralised management solution is how much information you can get out of a system without having to ask the end user over the phone to tell you something about what they are seeing. A simple example of this might be with a VVX phone, when you get a report from a user that their phone is “broken”. In most cases this is about the level of detail you can expect from an end user, because to them the fact that the system voice policy is blocking them from dialling out is the same as their phone having caught fire and exploding while they were out at lunch… The fact is, they can’t make a call, so the phone is “broken”. As IT professionals though, we know there are a great many nuances as to why the phone may not be working for the end user. So we start stepping through the troubleshooting process… Is the phone plugged in? Is the phone configuration FTP server available? Did it receive the adequate information from DHCP to prompt for PIN sign in? Does the user even have a PIN assigned for them to actually sign in? Is the phone registered with the system? Does the user have the rights to dial the number they were dialling? etc…

So you probably get the picture. There’s a tonne of questions that need to be answered, and the last thing you want to do to answer them is ring the user on their mobile (because their desk phone is "broken") and ask them if they see a little green tick or a little red cross next to the phone icon on the upper left hand side of the screen… followed by a thousand other questions about the smouldering piece of burnt up plastic on their desk.  

So I figured I would try and put together a tool that might make answering these questions a little bit easier:

Lync Polycom VVX Manager


Last Updated ( 1/7/2014 )

1.01 Enhancements:
  • In the 1.00 release there can be cases where there is a VVX registered to the system but the tool reports them as having NO VVX in the ListView. This issue is a caused by the database entry for SipCallId containing junk information instead of the devices IP address. The processing has been changed in 1.01 so now when a VVX is registered it will always show up as YES in the listView. If there was no IP address in the database for the device then the IP will show as "IP NOT IN LYNC DATABASE" within the tool. A work around for this is to manually reboot the VVX, when it re-registers to the system the database field usually gets updated to contain the IP address again.
  • Text layout within the information text box has been changed to make it easier to read.
  • Added port variable for connecting to VVX via web browser when non standard port is used in the VVX configuration. Edit the $script:WebPort = "80" to whatever port your VVXs are using.
1.02 Enhancements:
  • Support added for secondary device discovery method. In previous versions the phone manager would discover the IP address of VVX phones from the Lync Server database. However, sometimes the Lync database did not have the data in it for every registered phone. So in version 1.02 a secondary "IP Range discovery" method has been added to discover phones on LAN segments. Simply type an IP Range (format: "192.168.0.1-192.168.0.20" OR "192.168.0.0/24" OR add multiple with comma separation "192.168.0.0/24,192.168.1.0/24") into the listbox and press the "Discover from IP Range" button. The tool will then "ping" the phones to see if they are at each IP in the range. This method is slower than the Lync database discovery (it can scan a 254 host range in ~60 seconds or less. Note: scanning directly connected subnets is slow because of ARP wait time), so you should only use it if you reciving "IP NOT IN LYNC DATABASE" for the IP Address of users with the default Lync Database discovery method.
  •  Added a new variable for https connections to the VVX web interface (as this will be the default in VVX 5.1 for the web interface when enabled). Change the variable $script:useHTTPS to be $true if you would like all web interface connections to use https instead of http. This will also require that you change the $script:WebPort variable to be "443" as well (or whatever port you set in the configuration file for https).
  • Export VVX phone deployment information. This outputs a CSV file that contains all the Users, IPs, Firmware Version, Serial Numbers, Lync Server, and MAC Address (if available) for all logged in phones. If you select the "More" checkbox you will also get the additional Lync settings for the phone (this is slower).
1.03 Enhancements:
  • Added the ability to send text messages to Polycom VVX phones. An example of this would be to send a message to warn before a system upgrade or a reboot. Messages are displayed on the screen for 30 seconds.

Version 1.03 Text Messaging Settings:

The Polycom VVX phones require special settings in order to receive messages from the Lync Polycom VVX Manager tool. The settings below will need to be added to your configuration files:

<apps.push apps.push.alertSound="1" apps.push.messageType="5" apps.push.serverRootURL="push" apps.push.password="vvxmanager" apps.push.username="vvxmanager"></apps.push>
  • apps.push.messageType: This sets the level of messages that will be displayed for the phone. The VVX Manager always sets the messages as “critical” so they will always be received. The setting “5” means that all levels of messages will be displayed by the phone.
  • apps.push.serverRootURL: This setting needs to be set to "push". This is used as part of the URI for sending messages to the VVX.
  • apps.push.username: The phones use digest authentication for push connections. The username sent by the tool by default is “vvxmanager”.
  • apps.push.password: The phones use digest authentication for push connections. The password sent by the tool by default is “vvxmanager”.
  • apps.push.alertSound: Play a sound when the message is displayed. This is the standard Polycom sound that you heard when a phone reboots. This can help the user to see the message, as it will only be displayed for 30 seconds.

Within the Powershell script you can change the Username and Password used for authentication to something else if you desire. Settings are here:

#Edit these settings if you would like to you customer username and password for messaging.
$script:pushUsername="vvxmanager"
$script:pushPassword="vvxmanager"

Example Message:
System Outage

1.04 Enhancements:
  • Had a report of some issues with case sensitivity with SIP URI's. Removed case sensitivity to correct the issue. (Thanks to Benoit Machiavello for reporting this issue)
  • (Request) Added ability to filter users list to only show users with VVX phones.

1.05 Enhancements:
  • Added the ability to import previously exported CSV files containing user/device information. This can save time scanning IP ranges for devices by only checking (ie. pinging each device to check who is logged in) the IP addresses from the CSV file. If you have a "known good" export (eg. an export that you may have been taken minutes earlier) you can directly import the settings without rescanning each device for changes. Importing without rescan can be a little risky if you're working with an older export, due to IP addresses and user logins of each VVX's possibly changing over time. So it is recommended that you use the rescan option to refresh all the user data within the VVX Phone Manager Tool's database.
  • If a VVX handset that is signed out is discovered, it will be added to the user list under the name “VVXNot@LoggedIn_<index number>”. This allows you to use the tool to access these devices even though they are not logged into Lync. This method only works with the IP Scanning method of discovery, it does not work when discovering from the Lync database.
  • Corrected an issue with the display of users that are logged into multiple phones. The tool will display multiple entries in the user list when user are logged into more than one phone.
  • The tool in previous versions would automatically load the user list and try to discover user information from the Lync database. This could waste time when first opening the tool for users that only wanted to use the IP Discovery method. To save time in these circumstances, from version 1.05, the tool will not automatically try to connect to the Lync server database when first opens. On first boot you can update the user list by clicking the "Discover From Lync Database" or enter an IP range and click the "Discover From IP Range(s)" button.
  • Added information in this post about using the VVX Phone Manager Tool with Version 5.1 VVX firmware. Read this section before updating your production firmware!

Download Version 1.05 here:


IMPORTANT UPDATE: Polycom VVX 5.1 Software Update Changes

Read this section before updating your production firmware!

Version 5.1 of Polycom VVX firmware has some increased security enhancements. This will affect your ability to connect to the web interface of VVX devices when you are running them in an out-of-the-box configuration. However, you can still have access to the web interface of the VVX phones by editing some configuration settings on the devices (usually done via a configuration FTP server).

The following web server settings have been enhanced in version 5.1 VVX firmware:

Web Config Mode
httpd.cfg.enabled
httpd.cfg.secureTunnelEnabled
httpd.cfg.secureTunnelRequired
Disabled
0
0
0
HTTP Only
1
0
0
HTTPS Only
1
1
1
HTTP/HTTPS
1
1
0

Example settings:

HTTP Web access only:
<!-- HTTP Admin Settings -->
<httpd httpd.enabled="1" httpd.cfg.enabled="1" httpd.cfg.port="80" httpd.cfg.secureTunnelEnabled="0" />

HTTPS Web access only:
<!-- HTTPS Admin Settings -->
<httpd httpd.enabled="1" httpd.cfg.enabled="1" httpd.cfg.secureTunnelPort="443" httpd.cfg.secureTunnelEnabled="1" httpd.cfg.secureTunnelRequired="1" />

Both HTTP and HTTPS web access: 
<!—HTTP and HTTPS Admin Settings -->
<httpd httpd.enabled="1" httpd.cfg.enabled="1" httpd.cfg.port="80" httpd.cfg.secureTunnelEnabled="1" httpd.cfg.secureTunnelPort="443" httpd.cfg.secureTunnelRequired="0" />

Note: If you would like to make the Web Admin harder for people to find you can change the port number to something different from the default 80 or 443 settings. Then in the VVX Phone manager you can change the $script:WebPort variable to whatever value you have chosen. If you want to use HTTPS from the tool, set the $script:useHTTPS setting to $true.

In addition to this you need to change the default password on the devices as to avoid errors/warnings popping up on the phone display and web interface (“Default admin password is in use, please contact your administrator”). These can be set here:

<!-- Passwords and Security -->
<device device.auth.localAdminPassword="12345" device.auth.localUserPassword="12345" />

Note: Make these passwords whatever you want them to be, however, they must be different than the default of 456 in order to avoid the warning message being displayed on the phone screen.

After you have changed these settings the web login and phone screen login passwords will be changed. So if your support staff have been trained to enter the default “456” password, don’t forget to tell them that it’s changed.


Features of Lync VVX Phone Manager


1. Find out information about VVX handsets connected to a Lync system (IP Address, the Lync server that the handset is registered to, user policies, PIN status).

2. Remotely reboot VVX handsets using the ‘Reboot’ button. Reboot a selection of handsets by selecting (hold shift/ctrl) multiple users in the list, then press the ‘Reboot’ button. Or reboot all the VVX handsets on a Lync system with the “Reboot All” button.

3.Set the PIN for a user - either a random PIN (if the PIN field is left blank), or specify a PIN number by filling in the field. This can also be done on multiple selected users.

4. Lock and unlock the PIN for a selected user with the ‘Lock PIN’ and ‘Unlock PIN’ buttons. This can also be done on multiple selected users.

5. Test your FTP Configuration server by simply entering the IP address of the FTP server and pressing the “Test FTP” button. The tool will attempt to connect to the FTP server and download information about key files associated with a Polycom configuration server deployment. These include the base configuration file (000000000000.cfg), configuration files in the CONFIG_FILES tag, any MAC address files associated directly with phones, and firmware files (*.sip.ld). The tool will give feedback as to the state of the FTP server.


6. Test PIN and device bootstrapping by entering a PIN number for the selected user and pressing the "Test PIN" button. The tool uses the Test-Bootstrap command in the background to imitate the process of a Lync Optimised Phone connecting to the system. Part of this process is that the Lync server generates a DHCP Inform request from the Lync server and sends it out to discover the Vendor Class Options (Option 43), and SIP server Option (Option 120) which it will then use the results of to generate a PIN authentication with the system. Below is an example of the DHCP message that the server sends out for this test:


This is awesome, but in some ways not a perfect test. It will depend on how you have set up your DHCP architecture throughout your sites as to the result of this process. You may either be using your Lync Server’s inbuilt DHCP server to respond to these INFORM messages, or you might be using a real DHCP server on your phone subnet to respond to these messages.

If you always receive the error “Did not receive any response for the DHCP discovery message.” when testing the PIN number, then it’s likely that there’s no DHCP server capable of responding to INFORM messages in the subnet that your Lync server is on. To get around this you can enable a special DCHP INFORM message responder in the Lync server.

The Lync Server DHCP server configuration lives under the registrar configuration. You can see the setting in Powershell by running this command:

PS > Get-CsRegistrarConfiguration

Identity                        : Global
MinEndpointExpiration           : 300
MaxEndpointExpiration           : 900
DefaultEndpointExpiration       : 600
MaxEndpointsPerUser             : 8
EnableDHCPServer                : True
PoolState                       : Active
BackupStoreUnavailableThreshold : 00:30:00
MaxUserCount                    : 7500
Note: This setting only answers DHCP inform requests with Vendor Class “MS-UC-Client”, and not basic Discover messages used for IP address configuration.

If this setting is set to True, the Lync server will respond to INFORM requests it sees broadcast on the subnet. So if you don’t have a DHCP server on you Lync server subnet (which you may not if your servers are deployed in a data centre) you may have to substitute for this by turning on the DHCP server in the Lync server.

If you do choose to implement this work-around, be sure to understand that the environment the Lync server is in may not be the same as the one the phone is deployed in. You will need to ensure that the phone is getting the correct information for its DHCP INFORM requests as well. So be sure to check your DHCP configuration for the subnets that the phones are deployed on (ie. 001 – UCIdentifier, 002 – URLSchme, 003 - WeServerFqdn, 004 - WebServerPort, 005 - CertProvRelPath, 120 - UCSipServer). If you want to know more about the DHCP options required for Lync phones, have a read of the in-depth Understanding DHCP Option 43 article by Jeff Schertz.


7. Easily connect to the VVX web interface of any user on the system by clicking the “Web Config” Button.

 The Polycom VVX has a web interface which can be quite useful for troubleshooting issues with Lync. It includes a page dedicated to Lync specific settings (Diagnostics->Lync Status), that gives lots of good information:


As you can see in the picture above, there is some very useful information held in the Lync Status page.  So if you’re having some issues with a phone, just find the user in the Lync Polycom VVX Manager Tool and click the “Web Config” button. This will connect you directly to the user’s VVX web interface. You can also configure logging on the phone from the web configuration page, and view/download the logs directly from the browser as well.

Note: When Polycom phones are put into Lync mode, not all of the features in the web interface are relevant. This is because the web interface still has all the Standard SIP mode features (used for other platforms) still in it. So be careful not to assume that changing random settings will have the desired effect.


Prerequisites to use VVX Manager


In order for the “Reboot” and “Reboot All” buttons to actually reboot your phones, you will need to configure a special setting within the configuration files used by your phones. The reboot buttons in the tool use a specially crafted SIP NOTIFY message that tells the phone to re-download its configuration files from the configuration FTP server. This updates most settings in the phone, but not always all of them. To force the phone to do a full reboot, which ensures that all settings are applied you need to add the following settings in your phones configuration files:

<voIpProt voIpProt.SIP.specialEvent.checkSync.alwaysReboot="1" />

Note: If you already have phones deployed, you can add the setting to the configuration file, and press the reboot button on the tool once to make the phones re-download their files (which will also update this setting). From then on you will be able to do full reboots of the phone from the tool.

Another suggestion that may be of use: if you want to be able to remotely tell what the MAC address is of a phone (useful when building phone specific config files) from the VVX Phone Manager tool interface without having to open the web config, add the following setting:

<device sec.tagSerialNo="1">
   <prov device.prov.tagSerialNo="1"/>
</device>

This will result in the MAC address being included in the device string, eg: “VVX Version: PolycomVVX-VVX_500-UA/5.0.0.6874_0004f28038f9”. If you do this, the tool will also check the FTP server for individual MAC address files and tell you which phones have these when the “Test FTP” button is pressed.

Note: See 1.03 release information for Text Messaging requirements.

Allow Call Park Manager to Connect to Remote Pools


In order for the Lync VVX Phone Manager to learn about the phones connected to your deployment, it needs access to your RTCLOCAL databases for each Front End server pool. If you only have one Standard Edition server, then you can run the tool directly on this server and it will be able to access the RTCLOCAL database directly. However, if you have multiple pools, the VVX Phone Manager will try and connect to each pool to download all the registered endpoint data for each pool.


In order for the SQL connection to be made, inbound connections to the SQL Browser Service and RTCLOCAL database will need to be allowed through the Windows firewall. These rules are not created automatically during Lync Server Setup like most of the other rules are. So to open the ports, download the script below and run it on all of your front end servers (including SBA and SBS servers).

Run the script included in the VVX Manager Tool zip file (OpenSQLPortsForVVXManager1.00.ps1) on the server you want to open the SQL Browser and RTCLOCAL Dynamic TCP SQL ports on (ie. all Front End servers and SBAs/SBSs). If you would like to know more about how to manually do this configuration, there’s more information on my Call Pickup Group Manager Tool post.

Note: This is the same process as is used for the Lync 2013 Call Pickup Group Manager tool. So if you have already opened the ports to run that tool, you don’t have to do it again.


Getting Started with a Polycom VVX Deployment


This article was written under the assumption that you already have VVX phones deployed, and you are now looking to manage them. If you need some more help with the initial deployment part of the process, I can point you to some useful resources:

Jeff Schertz' post on the different ways to deploy Polycom phones here in his article entitled Provisioning Polycom SIP Phones. Greig Sheridan also has a nice post on Optimising the Polycom VVX for Lync that you might want to check out.

If you would like to know more about what is supported on Lync with VVX phones and setting up a FTP server to support Polycom Configuration files on Lync, go to the Polycom VVX support page and grab a copy of the lovingly entitled: “Deploying Polycom® UC Software for use with Microsoft® Lync™ Server”.

An important recommendation that I can give you is to always test your configuration files on a real phone before deploying them into the wild, because very subtle errors can cause things not to work as desired.

The Wrap Up


As always, feel free to give feedback regarding bugs and issues you find with the tool, I will endeavour to fix any issues that I can reproduce. Other than that, I hope that you get many hours of enjoyment out of this new tool, and that it saves you many additional hours in the process. As Humphrey Bogart says at the end of Casablanca “Louis, I think this is the beginning of a beautiful friendship.” Fade to black. Roll credits.


Lync Edge Testing Suite (Part 1) – Lync Edge Port Tester Tool

$
0
0
Okay, let's start 2014 with a bang, and turn this thing up to 11. This is the first post in a series that I will be doing about Lync Edge servers. More specifically, this series will be about some tools that I have written to help you with pre-deployment testing and troubleshooting issues with your Edge Server deployments.

For Part 2 of the Lync Edge Suite series go here.

Lync Edge Deployment


Deploying an Edge server within an organisation can often be quite challenging. The process involves topics like public certificates, private and public DNS records, routing, firewall configuration, DMZs, firewalls, NATing, etc… This often means that several people, or even several teams of people, will need to be involved in the process. As a general rule, the more people involved in a process, the more opportunities there are for things to go wrong. This is especially the case when only a small error like typing “_sip._tcp”, instead of “_sip._tls” can mean the difference between things working, and things not working.

When deploying an Edge server it is very important that you check that all the pieces of the puzzle are correctly in place before starting the installation. Otherwise, you will be “Nexting” your way through the deployment wizard towards a nightmare-hell-ride of live production troubleshooting. So it’s always advisable to test that everything is configured correctly on your network before even thinking about opening the topology wizard.

The area that we are going to focus on in this post is the testing of a DMZ’s firewall configuration. Microsoft has done a very good job of documenting the firewall requirements when deploying Lync Edge servers. The Technet pages here go in to quite a bit of detail about the different topologies and their port requirements. The Lync workloads poster is also a good place to look for more information. So, after reading all this information and configuring your firewall, how do you actually test that it is working? HINT: keep reading…

  Lync Edge Port Tester Tool


     Features:
  • One tool for testing both ends of the connection. Run the Lync Edge Port Tester on your Edge server and on an internal and external network machine.
  • Test both UDP and TCP ports are open in both directions.
  • Select a profile from the list (Edge Outside, Edge Inside, Front End, Client Outside, Client Inside) to check all the relevant ports for that connection type.
  • Open all the required firewall ports temporarily with the press of a button.
  • Can be used to test connections to a live Edge (or Front End) server. If you run the tool on a live edge server it will automatically learn which ports are currently in use and only allow you to Listen on unused ports.
  • Can be used on a Consolidated Edge configuration or on an Edge running with a single external IP address (ie. all 443 services running on different ports). The Single External IP check box allows for this configuration.
  • Tool Tips to provide you with contextual help.
  • All in one interface. (Over 100 interface objects! Yep, that was a lot of typing...)


 The Interface:


  1. These drop-down text boxes need to be populated with the IP Addresses used on the inside and outside of the Edge server. The drop down menu for each of these gets populated with IP addresses that exist on the machine. So if you are running the tool on the edge server you can fill these in with the drop down menu selections. If you are running the tool on a machine that isn't the Edge you will have to type these IP addresses in yourself.
  2. These profiles will set the port check boxes to the appropriate settings for testing each scenario. For example, if you are running the tool on the Edge server to test the outside ports, you will select “Edge Outside”.
  3. This is the IP Address of the machine running the “Front End”, “Client Outside” or "Client Inside" profiles, that you are testing your connections to. If you are running the tool on one of these machines you can use the drop down box to select the IP. Or if you are running it on the Edge you will need to type the IP address into the field.
  4. These are the ports/interfaces that you would like the tool to listen on. When you select the appropriate profile, the necessary ports will be automatically selected here. If you would like to test specific ports you can set these check boxes yourself. The naming convention used for these check boxes are <Port number to listen on><Interface to listen on>. The interface naming convention is, AC (Access Edge IP), AV (Audio Video Edge), CON (Conferencing Edge), and IN (Internal Interface of the Edge). The labels on the listening ports will change colour depending on which ports may already be used on the machine. If the machine already has a service listening on the port the label will turn a gray colour (and the check box will be disabled), so you will not be able to open a listener on these ports. The label will turn red if a port is being used by an existing service AND the port is used by the selected profile (this is informational, to allow you to know that you should be able to test connection to this port). 
  5. These are the settings for making outbound connections from the tool. The naming convention for these check boxes are the same as above <Port number to connect to><Interface to connect to>. You should always be able to make outbound connections on these ports, so these port labels don't change colours like the listening port column.
  6. These are Misc Options. “Clear All Boxes” will clear all the Check Boxes to allow you to make your own settings. “Close Listeners” allows you to close all the listeners that have been spawned in different Powershell windows. “Open and Close Firewall” button allows you to automatically open all the required ports within Windows Firewall to use the tool. This is necessary in order to be able to accept inbound connections to listening ports. When you first use the tool on a machine you should open the ports, and when you are finished testing you should press the Close Firewall button to remove the Windows firewall settings.
  7. This is a window that will log information about what the tool is doing.


The 50000 Range


The 50000AV range is special because it can use TCP and UDP for the entire range of ports between 50000 and 59999. It's also special because, although the Edge will listen on a random selection of these ports, the ports themselves will only accept connections when media has been formally set up by client SIP signalling. This is a security measure that was implemented to reduce the attack surface of the external Edge AV interface.

The Lync Edge Port Tester tool will test the first port (50000) and the last port (59999) in this range. This is by design for two reasons, the first is that the Media Relay service on the Edge only listens on a random selection of these ports (run "netstat -a" to check this) and most of the time this random selection doesn't include port 50000 or 59999. This allows these ports to be happily opened by the tool the majority of the time. The second thing is that firewall rules are always set on a range of ports so if we test the first port in the range (50000) and the end port in the range (59999). Testing these two ports is usually enough to allow you to assume that the ports in between these values will also be allowed by same firewall rule (if not, then you have bigger problems with your firewall).

For Lync environments that don’t need to federate to partners with OCS, you only need to open outbound TCP 50000-59999 range, so failures of the inbound connections can usually be ignored (ie. unless OCS federation is required). By default, the "Edge Server Outside" profile (and "Client Outside" profile) will test the 50000 range in both directions for both TCP and UDP. You can simply untick the tests in the inbound direction if you do not want to run tests on these ports.

Note: The purpose of this post is not to teach you how Edge servers work. If you would like to know more about how Edge servers work, Bryan Nyce and Thomas Binder have some good Tech Ed videos about it.


Using the Tool


In order to be able to use the tool you will need to run two copies of the tool in different locations on your network. The diagram below shows how you would test the connections in the internal interface of your Internal Edge interface:

Diagram – Testing Internal Connections

In the diagram there is a copy of the tool running on a server on the internal network that will behave as the front end server (it may actually be the front end server, but doesn’t have to be). This copy of the tool needs to be configured as the “Front End” profile. On the Edge server the tool is also running and it will be configured as being the “Edge Inside” profile. Configure the IP addresses at the top of both tools to match the IP Addresses used on the edge server. Configure the Front End/Client IP address on both tools to be the Front End IP address. Example:


To test the ports in both directions you now do the following:

To test connections from the Edge to the Front End (which as you can see in the diagram is just TCP Port 5061):
  • Press the Listen button on the Front End side tool. The tool will spawn new Powershell windows for each listening port. Note, if you're running this on a live Front End server you will not be able to listen on port 5061 because it's already in use. However, there is a service on the machine already listening on the port, so when you test the connection from the other side the machine service should still respond to the socket connection.
  • Press the Connect button on the Edge Server side. The Edge side tool will now send TCP (and UDP) connections to the tool at the other side as required and report the result. When the listening end receives the connections the spawned Powershell windows will disappear. The connecting side tool will give you feedback as to if the connections were successful or not.

Note: Make sure you have opened the firewall on the listening side of the connection using the "Open Firewall" button. Once you have finished using the tool you should always use the "Close Firewall" button to clean up and close the Windows firewall ports.

To test connections from the Front End to the Edge Server (which, as you can see in the diagram, is ALL the ports):
  • Press the Listen button on the Edge Server side tool. The tool will spawn new Powershell windows for each listening port. Note, if this is a live Edge server you will not be able to listen on ports that are already in use. However, if there is a service on the machine already listening on a port, you will still be able to test the connection to this listening socket.
  • Press the Connect button on the Front End Server side. The Front End tool will now send TCP and UDP connections to the tool at the other side as required. When the other end receives the connections the spawned Powershell windows will disappear.

Diagram – Testing External Connections

In the diagram there is a copy of the tool running on a server on the external network that will behave as an external Client/Federation Partner. This copy of the tool needs to be configured as the “External Client” profile. On the Edge server the tool is also running and it will be configured as being the “Edge Outside” profile. Configure the IP addresses at the top of both tools to match the IP Addresses used on the Edge server. Configure the Front End/Client IP address on both tools to be the IP address of the Outside Client machine. To test the ports in both directions you now do the following:

To test connections from the Outside Client to the Edge Server:
  • Press the Listen button on the Edge Server side tool. The tool will spawn new Powershell windows for each listening port. Note, if this is a live Edge server you will not be able to listen on ports that are already in use. However, if there is a service on the machine already listening on a port, you will still be able to test the connection to this listening socket.
  • Press the Connect button on the Outside Client side. The Outside Client tool will now send TCP and UDP connections to the tool at the other side as required. When the other end receives the connections the spawned Powershell windows will disappear.
To test connections from the Edge to the Outside Client:

Important Note: The outside machine will need to be directly on the internet in order for this to work. Most external connections to the internet are through Network Address Translating routers which will block unsolicited inbound connections. If you do not have a direct internet connection to test to you could configure port forwarding on the NAT router to allow each specific port into the outside client machine)

  • Press the Listen button on the Outside Client side tool. The tool will spawn new Powershell windows for each listening port.
  • Press the Connect button on the Edge Server side. The Edge side tool will now send TCP and UDP connections to the tool at the other side as required. When the other end receives the connections the spawned Powershell windows will disappear.

Tips, Tricks and FAQ

  1. For a NATed Edge configuration you will need to set the Edge IP addresses on the tool running on the outside machine to be the Public IP Addresses for the Edge (ie. the external post NATed IP addresses). On the tool running on the Edge server you need to set the IP Addresses of the Edge server to the private addresses that are actually configured on the interfaces of the Edge server. If you don't do this then all the external tested connections will fail.
  2. The ideal time to use the Lync Edge Port Tester is prior to installing the Edge software. This way you can be sure the network is right before installing the Edge server.
  3. The Lync Edge Port Tester tool can actually be used to test connections to all TCP ports on a live Edge server. Also, it can be used to check UDP 3478 (STUN) on a live Lync Edge server, because it sends and accepts real STUN messages! However, the Edge does not respond to TCP and UDP for 50000 range of ports, as these only get opened when media has been negotiated. So you can only test the 50000 range between servers by using the Edge Port Tester at both ends of the connection (see the section about the 50000 range earlier in the post).

The Wrap Up


    Tell me what you think about your sit-u-a-tion,
    Complication – aggravation,
    Is getting to you,

        - The immortal words of Steven Tyler of Aerosmith in their 1993 hit song “Living on the Edge

Hopefully, this new tool will help you to avoid lyrics such as these in any Lync Edge Server related songs that you may write in the future. If you find any bugs or issues with the tool, please report them back to me and if I can reproduce them I will fix them. Part 1 over-and-out. I will be back with Part 2 in this series shortly!


Lync Edge Testing Suite (Part 2) – Lync DNS Tester and IP Route Editor Tools

$
0
0
I am dedicating this post to the saying “measure twice, cut once”, as this saying is most apt when describing what you should do before deploying your Edge server. In addition to this, I will be bringing you, not one, but two new Powershell tools to help with your Lync Edge server deployments! In this post we are going to cover two areas of Lync Edge Server deployment. The first is Domain Name records and the second is IP Networking.

For Part 1 of the Lync Edge Suite series go here.

Lync DNS Naming


Domain Name records in Lync can be rather confusing, as over the various incarnations of Lync there have been many different clients and server functions that have required a variety of special DNS records to function. Here are two very useful Technet links for a detailed explanation of how internal and external DNS records work with Lync 2013:
  • Lync internal DNS records example Technet
  • Edge Server DNS records on Technet
In summary, there are many different records that have been added for various clients and features for Lync to function. So you should always check that all of your DNS records are configured in production. I've made a Powershell tool that may be useful in checking these records are configured.

Lync DNS Tester Tool


 Features
  • Make DNS requests to the server of your choice. The DNS server setting will specify the DNS server to make the request to. This means you can test your internal records on your internal DNS server, and your external records on a public DNS server.
  • Auto-fill common Lync DNS record names with the “Fill All” button. Tick the “Internal” or “External” checkboxes to select the records you would like to fill. You can even edit the variables at the start of the script to match your standard naming convention.
  • IPv6 support for Fill All. Tick the IPv6 box to fill with Quad-A records.
  • Can add your own A, AAAA, CNAME and SRV records.
  • Save yourself from getting RSI from typing all these nslookup commands manually!

Download Version 1.00(Lync DNS Tester Tool):


External Records

Lync's external DNS records all resolve to either the Edge server(s) or the External Reverse Proxy server for web service connections. The table below shows the records that the Lync DNS Tester Tool will auto fill when the “Fill All” button is pressed and the "External" check box is ticked:

Record Purpose
DNS Name
Host
Fixed / Variable
External Access name
sip.<domain name>
Access Edge IP
Variable
(Topology Builder)
External Audio/Video name
av.<domain name>
AV Edge IP
Variable
(Topology Builder)
External Web Conferencing name
webconf.<domain name>
Web Conf Edge IP
Variable
(Topology Builder)
External Web Services name / Reverse Proxy
lyncwebext.<domain name>
Reverse Proxy
Variable
(Topology Builder)
Dial-in simple name / Reverse Proxy
dialin.<domain name>
Reverse Proxy
Variable
(Topology Builder)
Meet simple name / Reverse Proxy
meet.<domain name>
Reverse Proxy
Variable
(Topology Builder)
External Web Apps Server / Reverse Proxy
waswebext.<domain name>
Reverse Proxy
Variable
(Web Apps Server)
Lync discover record for Mobile and Windows 8 App Store client. Technet
lyncdiscover.<domain name>
Reverse Proxy
Fixed
External SIP record. (not a mandatory record, however, it’s in the client lookup list)
sipexternal.<domain name>
Access Edge IP
Fixed
External SRV record for SIP connection
_sip._tls.<domain name>
Access Edge
Port 443
Fixed
External Federation SRV record for Open Federation
_sipfederationtls._tcp.<domain name>
Access Edge
Port 5061
Fixed
External XMPP Federation SRV record
_xmpp-server._tcp.<domain name>
Access Edge
Port 5269
Fixed

For the DNS names in the table that are marked as Variable, there are variables at the start of the script that can be edited to match the configuration of your environment, for example:

# External DNS Name Variables - Edit these to whatever you are using for your Lync environment
$sip="sip"                  # External Access Edge
$av="av"                    # External AV Edge
$webconf="webconf"          # External Web Conf
$lyncwebext="lyncwebext"    # Lync External Web Services / Reverse Proxy
$dialin="dialin"            # dialin conferencing name
$meet="meet"                # meet conferencing name
$waswebext="waswebext"      # Web Apps server external name


Internal Records

If you tick the “Internal” check box and click the “Fill All” button, the following records will be added to the list box:

Record Purpose
DNS Name
Host
Fixed / Variable
Dial-in simple record internal
dialin.<domain name>
Lync Front End Server or Web Load Balancer
Variable
(Topology Builder)
Meeting simple record internal
meet.<domain name>
Lync Front End Server or Web Load Balancer
Variable
(Topology Builder)
Lync web services external record. Required for internal Mobile clients. Technet
lyncwebext.<domain name>
External Reverse Proxy
Variable
(Topology Builder)
Office Web Apps farm internal name
wasweb.<domain name>
Office Web Apps Server
Variable (Web Apps Server)
Admin console simple name
admin.<domain name>
Front End Server or Web Load Balancer
Variable (Topology Builder)
SIP record. Required for Lync Phone Edition, or automatic logon of clients without DNS SRV records, and for strict domain matching. Not required in all cases.
sip.<domain name>
Lync Front End Server(s)
Fixed
Internal SIP record. (not a mandatory record, however, it’s in the client lookup list)
sipinternal.<domain name>
Lync Front End Server(s)
Fixed
Lync Discover Internal - Mobile and Windows 8 App Store client. Technet
lyncdiscoverinternal.<domain name>
Front End Server or Web Load Balancer
Fixed
SIP internal SRV record
_sipinternaltls._tcp.<domain name>
Front End Server(s)
Port 5061
Fixed


For the DNS names in the Internal table that are marked as Variable, there are variables at the start of the script that can be edited to match the configuration of your environment, for example:

# Internal DNS Name Variables - Edit these to whatever you are using for your Lync environment
$wasweb="wasweb"            # Internal Web Apps Server
$admin="admin"              # Lync administrator web access

Note: The dialin, meet, and waswebext records will be the same for both Internal and External records. The settings for these names are made in the External settings. For a non-split brain DNS scenario you will either need to deploy Pin Point records, or an internal zone for the external domain name.

In addition to the tables above, you must also remember to check that your Lync Edge server(s) hostname/pool name has been added manually to the internal DNS server. These records are not automatically populated in DNS because Edge servers are not a domain joined machines, and will not automatically get added through Active Directory DNS integration. This is also the case with Lync Front End Pool names, so if you have added a new Front End pool to your topology you should always check that the DNS records have been added to the Internal DNS server manually.


Edge Server Networking


Edge server networking is also an important part of an Edge server deployment. An Edge server is a multi-network interface machine, which means that it needs to make decisions on which interface it will route packets out of when making connections to other machines. In nearly all cases (unless you only have limited external subnets connecting to your Edge) you will make your external Edge interface the owner of the default gateway address (0.0.0.0) and you’ll individually specify your internal subnets using static routes.

Example:


Below is a simple example of an Edge environment with an Internal and External interface:

Network
Net Mask
Next Hop
Interface
0.0.0.0 (Default Route)
0.0.0.0
210.10.10.17
210.10.10.18
192.168.5.0
255.255.255.0
192.168.1.1
192.168.1.2
192.168.6.0
255.255.255.0
192.168.1.1
192.168.1.2
192.168.7.0
255.255.255.0
192.168.1.1
192.168.1.2

For the Default route, you simply edit the Default Gateway within the External Interface within the Adapter settings in the Windows Control Panel, for example:


To set the other static routes within the server you usually use Command Line tools. However, rather than having to remember the syntax in the rare occasions that you have to do this, I decided to make a GUI tool to make this process a little easier.

IP Route Editor Tool


 Features
  • List all routes on server.
  • Add persistent routes.
  • Delete persistent routes.
  • Routes are colour coded in order of importance. (Grey = Localhost, Black = Broadcast, Green = Static Routes)
  • Routes can be added with or without specifying Interface value. If the Interface value is not set then the server will automatically associate the route to the interface that is on the same subnet as the Next Hop IP Address.

Simply enter the Network, Net Mask, Next Hop, and Interface (note that it's not necessary to enter the Interface if you'd prefer not to, as the machine can figure this out based on the Next Hop address), and press the Add button. Hopefully this one will be pretty straight forward for you to use!

Update (5/9/2014)

1.01 Update:

  • Updated to now run on Powershell 2.0
  • Script is now signed
1.02 Update (Additional user input validation added):

  • Updated the Regex check on the IP Address fields to better police against people accidentally putting bitmasks (ie. /23) after IP Addresses. This previously would result an incorrect route table entry because the route command would do strange things with this input.
  • In previous versions the network IP Address was not policed to check that it was the actual network address based on the mask supplied (ie. not a host address). The result was the (non-network) host IP being input into the Route command and it not showing up in the Current Route Table. The network mask setting is now ANDed with the subnet mask to ensure that a real network address is being input.
  • In previous versions the Next Hop address was not policed to check that it was on a locally connected network. The result was that the Route command would accept the input even though it was incorrect and add it to the route list. This bad route once entered was also not displayed in the Current Route Table. In this version the Next Hop IP address supplied by the user is first checked to see that it is on a directly connected network before the command Route ADD command is run. An error will also be displayed if the Next Hop is not on a locally connected network.
  • Made the form resizeable.

Download Version 1.02 (IP Route Editor Tool):


The Wrap Up


Well, there you go, two more tools for your Lync Edge deployment kit bag. I hope you enjoy them, and get some use out of them. Like always, if you find any bugs or issues with the tools, please report them back to me and if I can reproduce them I will fix them.


SEFAUTIL and Lync 2013 Call Pickup Group Tool Permissions

$
0
0
I have had some enquiries from people about issues that they have been having with SEFAUtil  (ie. the Call Forwarding and Group Call Pickup tool from the Lync ResKit). Many of these questions have been about getting no response from SEFAUTIL after running a command. This can be for a few reasons, some of which may have to do with permissions, others to do with configuration. So in this post we’re going to go through the requirements and permissions needed for SEFAUtil as well as the permissions needed for running the Lync 2013 Call Pickup Group Manager. Before we go any further, some background; SEFAUTIL was designed to be run on a server that has Lync server components installed on it. As Jens Trier’s blog post on the tool points out, even if you want to run SEFAUTIL on a separate machine, it still needs to have Lync server base components installed. So it makes sense to choose to run the SEFAUtil on an Front End Server.

How can we run SEFAUtil and the Call Pickup Manger on a server and only give a user accessing it minimum permissions? Well, as we all (may or may not) know, the Lync RBAC role permissions (ie. the Active Directory security groups starting with the prefix “Cs”, example “CsAdministrator”) do not apply to someone that is logged directly into a Lync server. These roles only restrict access to users that are either connecting via Lync Control Panel, or via remote Powershell connection via the “OcsPowershell” webservice that runs on the Front End. When you’re logged into the Lync server directly there are some Active Directory permissions that will affect your ability to access the backend SQL database which will stop you from running some commands. These SQL permissions are tied back to the Active Directory security groups that start with the “RTC” prefix. So, in short, these permissions can still affect a user's ability to access some commands/functions when logged directly into a Lync server.

The SEFAUtil tool documentation doesn't contain any details about what rights are required to use it. However, from testing in the lab I have concluded that you need to be logged in as a user with a minimum of “RTCUniversalReadOnlyAdmins” rights for it to work. Example:


In case you were also wondering which other permissions work for SEFAUTIL, here’s a list:

Permission
SEFAUTIL Works?
RTCUniversalReadOnlyAdmins
Yes
RTCUniversalUserAdmins
Yes
RTCHSUniversalServices
Yes
RTCUniversalSBATechnicians
Yes
RTCSBAUniversalServices
Yes
RTCUniversalServerAdmins
No
RTCUniversalServerReadOnlyGroup
No
RTCUniversalGlobalReadOnlyGroup
No
RTCUniversalUserReadOnlyGroup
No
RTCComponentUniversalServices
No
RTCProxyUniversalServices
No
RTCUniversalConfigReplicator
No
RTCUniversalGlobalWriteGroup
No

Note: These results are from lab testing. If you see any different results in the field, let me know.


Lync 2013 Call Pickup Manager Permissions

As I mentioned earlier, the Call Pickup Manager Tool also needs to query SQL in order to get information about users in the database (this allows for quick retrieval of current user settings). It does this by making direct SQL SELECT calls to the RTCLOCAL databases on each Front End server. When you run the tool you may find that you receive an error that looks like this:

Error running SQL on 2013ENTFE004.domain.com : The SELECT permission was denied on the object 'Resource', database 'rtc', schema 'dbo'.

This error is caused by the user not having sufficient rights to make direct SQL SELECT calls on the database. If you were logged in with Domain Admin rights you would not receive this error, as you would have sufficient permissions on the database (however, not everyone can be given Domain Admin permissions!).

To get around this issue we will need to allow permissions for specific users to be able to make SELECT (read only) calls on the “rtc” database. The simplest way to do this is to Grant “select” permissions to the “RTC Local Read Only Administrators” user within SQL for the “rtc” database. The “RTC Local Read Only Administrators” local machine user maps back to the “RTCUniversalReadOnlyAdmins” security group within Active Directory. So any user that you add to the “RTCUniversalReadOnlyAdmins” will have permission to run SQL SELECT commands on the database. This also works well, as SEFAUtil also requires a minimum of “RTCUniversalReadOnlyAdmins” group permissions to work, so it is a good choice for allowing permissions on the database as well.

Granting SQL Permissions on Tables Example


To be as restrictive as possible, we can grant “Select” permissions only on the tables that the Call Pickup Manager tool needs to read in order to work. The two databases that the Call Pickup Manager Tool needs access to are the dbo.Resources and dbo.PublishedStaticInstance tables. The steps below walk you through applying these permissions:

STEP1: Open SQL Management Studio (you will need to have installed this on a machine to access the database).

STEP 2: From the Object explorer, open the “Databases”->”rtc”->”Tables” tree.

STEP 3:  Right Click on the PublicStaticInstance table, and select Properties


STEP 4: On the Permissions page, click on the Search button:


STEP 5: Click on the Browse Button. Then select the “RTC Local Read Only Administrators” user:


STEP 6: Click OK. You should see the User in the object list:


STEP 7: Now the "RTC Local Read Only Administrators" user will appear in the Users and Roles list. Click on it and Grant it “select” permissions:


STEP 8: Do the same process to give select permission on the “resources” table (STEP 1 - STEP 7):


If you would prefer not to do this manually I’ve also prepared a Powershell script that you could use to speed up the process:


1.00 Initial Release:
  • This script will give RTCUniversalReadOnlyAdmins SELECT permissions on all the Lync Front End Servers RTC PublishedStaticInstance and Resource database tables.
  • Run the script from a Lync server with a user account that has sufficient permissions to make changes to the "rtc" SQL database.
  • This script is designed to give the minimum required permissions to the database for a user to use the Call Pickup Group Manager tool.
  • Ensure that you have opened the Firewall ports for the RTCLOCAL database using the "OpenSQLPortsForCallPickupManager1.00.ps1" script before trying to running this permissions script. If you haven't opened the firewall you will get connection errors when you try and run this script.


SEFAUtil Error Debugging

By default, SEFAUtil does not give you any feedback as to why the tool is not working: when it hits an exception it will stop executing with no error message. However, after doing a bit of detective work, I discovered that SEFAUtil actually has an undocumented “verbose” flag that can be used to help debug why SEFAUtil is not working (this is now baked into the Call Pickup Group ManagerTool version 1.02). Below are two examples of common issues that you might see with SEFAUtil not working: 

User Running SEFAUtil Does Not Have Correct Permissions: 

If the user logged into the Lync Server does not have the correct permissions (ie. one of the “RTC” group permissions I talked about earlier) they will get an error reported in the shell window like this one:

PS C:\Program Files\Microsoft Lync Server 2013\ResKit> .\sefautil.exe /server:melbfepool.domain.com holly.hunt@domain.com /verbose

Starting CollabPlatform...
Microsoft.Rtc.Collaboration.ProvisioningFailureException:One or more values in the configured settings are invalid or unusable. Check inner exception and logs for more details. ---> Microsoft.Rtc.Internal.ServerConfiguration.SettingsInitializationException: The settings wrapper failed to initialize.
Unable to find  the Sqld database: Cannot open database "xds" requested by the login. The login failed.
Login failed for user '2013ENT\testadmin'.
   at Microsoft.Rtc.Internal.ServerConfiguration.UCSettings.InitConsumerWithRole
(RoleName role)
   at Microsoft.Rtc.Internal.ServerConfiguration.UCSettings..ctor(String applicationId, SettingsWrapperOptions options)
   at Microsoft.Rtc.Internal.ServerConfiguration.UCSettings.Get(String applicationId, SettingsWrapperOptions options)
   at Microsoft.Rtc.Collaboration.ProvisioningSourceImpl.GetInitialPlatformData()

--- End of inner exception stack trace ---
   at Microsoft.Rtc.Signaling.SipAsyncResult`1.ThrowIfFailed()
   at Microsoft.Rtc.Signaling.Helper.EndAsyncOperation[T](Object owner, IAsyncResult result)
   at SEFAUtil.SefaTool.Execute()
Detected at System.Environment.GetStackTrace(Exception e, Boolean needFileInfo)
   at System.Environment.get_StackTrace()
   at Microsoft.Rtc.Collaboration.ProvisioningFailureException..ctor(String message, Exception innerException, ProvisioningFailureReason failureReason)
   at Microsoft.Rtc.Collaboration.ProvisioningSourceImpl.GetInitialPlatformData()
   at Microsoft.Rtc.Collaboration.ProvisioningSourceGetInitialPlatformDataAsyncResult.ProcessCoreHelper()
   at Microsoft.Rtc.Collaboration.SipCollaborationAsyncResult.ProcessCore()
   at Microsoft.Rtc.Signaling.AsyncWorkitemQueue.ProcessItems()
   at Microsoft.Rtc.Signaling.SerializationQueue`1.ResumeProcessing()
   at Microsoft.Rtc.Signaling.SerializationQueue`1.ResumeProcessingCallback(Object state)
   at Microsoft.Rtc.Signaling.QueueWorkItemState.ExecuteWrappedMethod(WaitCallback method, Object state)
   at System.Threading.ExecutionContext.RunInternal(ExecutionContext executionContext, ContextCallback callback, Object state, Boolean preserveSyncCtx)
   at System.Threading.ExecutionContext.Run(ExecutionContext executionContext, ContextCallback callback, Object state, Boolean preserveSyncCtx)
   at System.Threading.QueueUserWorkItemCallback.System.Threading.IThreadPoolWorkItem.ExecuteWorkItem()
   at System.Threading.ThreadPoolWorkQueue.Dispatch()
FailureReason = 2


SEFAUtil Trusted Application Not Configured Properly:

If the Trusted Application has not been configured correctly in Lync you will get an error like the one below:

PS C:\Program Files\Microsoft Lync Server 2013\ResKit> .\sefautil.exe /server:melbfepool.domain.com holly.hunt@domain.com /verbose

Starting CollabPlatform...
Microsoft.Rtc.Collaboration.ProvisioningFailureException:One or more values in the configured settings are invalid or unusable. Check inner exception and logs for more details. ---> Microsoft.Rtc.Internal.ServerConfiguration.SettingsInitializationException: The settings wrapper failed to initialize.
The ExternalServer service is not installed on the machine.
   at Microsoft.Rtc.Internal.ServerConfiguration.UCSettings.InitConsumerWithRole
(RoleName role)
   at Microsoft.Rtc.Internal.ServerConfiguration.UCSettings..ctor(String applicationId, SettingsWrapperOptions options)
   at Microsoft.Rtc.Internal.ServerConfiguration.UCSettings.Get(String applicationId, SettingsWrapperOptions options)
   at Microsoft.Rtc.Collaboration.ProvisioningSourceImpl.GetInitialPlatformData()

--- End of inner exception stack trace ---
   at Microsoft.Rtc.Signaling.SipAsyncResult`1.ThrowIfFailed()
   at Microsoft.Rtc.Signaling.Helper.EndAsyncOperation[T](Object owner, IAsyncResult result)
   at SEFAUtil.SefaTool.Execute()
Detected at System.Environment.GetStackTrace(Exception e, Boolean needFileInfo)
   at System.Environment.get_StackTrace()
   at Microsoft.Rtc.Collaboration.ProvisioningFailureException..ctor(String message, Exception innerException, ProvisioningFailureReason failureReason)
   at Microsoft.Rtc.Collaboration.ProvisioningSourceImpl.GetInitialPlatformData()
   at Microsoft.Rtc.Collaboration.ProvisioningSourceGetInitialPlatformDataAsyncResult.ProcessCoreHelper()
   at Microsoft.Rtc.Collaboration.SipCollaborationAsyncResult.ProcessCore()
   at Microsoft.Rtc.Signaling.AsyncWorkitemQueue.ProcessItems()
   at Microsoft.Rtc.Signaling.SerializationQueue`1.ResumeProcessing()
   at Microsoft.Rtc.Signaling.SerializationQueue`1.ResumeProcessingCallback(Object state)
   at Microsoft.Rtc.Signaling.QueueWorkItemState.ExecuteWrappedMethod(WaitCallba
ck method, Object state)
   at System.Threading.ExecutionContext.RunInternal(ExecutionContext executionContext, ContextCallback callback, Object state, Boolean preserveSyncCtx)
   at System.Threading.ExecutionContext.Run(ExecutionContext executionContext, ContextCallback callback, Object state, Boolean preserveSyncCtx)
   at System.Threading.QueueUserWorkItemCallback.System.Threading.IThreadPoolWorkItem.ExecuteWorkItem()
   at System.Threading.ThreadPoolWorkQueue.Dispatch()
FailureReason = 2

The Wrap Up


“Permissions, Permissions everywhere, nor any lock to Lync.” - Samuel Taylor Lyncridge 

So anyway, that may have been slightly long winded, however, hopefully it was edu-taining for you all. In a nutshell you just need to put the user in the “RTCUniversalReadOnlyAdmins” security group, and add the SELECT permissions on the database. After that, you should be about to access SEFAUtil and the Lync Call Pickup Group Manager. 


Microsoft Lync Wireshark Plugin

$
0
0
In this post I have the pleasure of talking about a project that I’ve been working on for a while, as well as one of my all-time favourite networking tools - Wireshark! For those that don’t know, Wireshark (originally named Ethereal) is a packet sniffer program that decodes hundreds of networking protocols for your viewing pleasure. I’ve been using Wireshark for about 10 years now, and am extremely appreciative of all of the people that have worked to build and maintain the product over the years. The other amazing thing about Wireshark is that it’s free software and works across all the major OS platforms. So if you haven’t used it before, I suggest you use this as an opportunity to download it and give it a try.

As an IT professional working on Lync, what can Wireshark do for you? Well, it can do quite a few things: I personally use it all the time for troubleshooting connection issues, networking problems, certificate negotiation, and other protocol issues. When I started using Wireshark with Lync I found that some protocols are not decoded properly by Wireshark, which made me sad. For example, STUN (Simple Traversal Utilities for NAT) is a protocol used extensively with Lync is only partially decoded by Wireshark. 

Example:


So why can’t Wireshark decode these STUN messages properly? The answer to this is that Microsoft has made additions to the base IETF standards which are not recognised by Wireshark. The good news is that Microsoft documented these extensions and released them to the world. Some examples of these documents can be found here:

Microsoft Protocol Documentation:      

These documents that are provided by Microsoft extend the base level standards that were originally written by the Internet Engineering Task Force (IETF). Here are some examples of these specifications:

IETF Protocol Documentation:


Lync Wireshark Plugin

Armed with the information available in the Microsoft’s Office Protocol documents, RFCs, and a healthy dose of reverse engineering, I was able to put together a plugin for Wireshark that made packet captures taken on an Edge server readable. Below is an example of a packet capture taken on an Edge server:


So without further ado, I give you The Lync Wireshark Plugin:

1.00 Initial Release:
  • This Wireshark plugin is designed to dissect Lync AV Edge and Internal Edge AV traffic. Captures can be taken on the Edge server (Capturing AV Edge External traffic, and Internal Interface traffic), or it can also be used on the client side for decoding STUN and RTP/RTCP traffic.
  • This Wireshark plugin dissects STUN/TURN traffic on Microsoft Lync Edge port 3478 (STUN, RTCP, RTP)
  • This Wireshark plugin dissects traffic on Microsoft Lync Edge port 443 (STUN, RTCP, RTP)
  • This Wireshark plugin dissects dynamically assigned RTP and RTCP traffic by using ports allocated in STUN requests.
  • Dissector can be turned on/off within Wireshark Preferences. (Edit->Preferences->Protocols->LYNC_DECODER)
  • Port numbers can be changed within Wireshark Preferences. (Edit->Preferences->Protocols->LYNC_DECODER)
  • If you enter “lync_decoder” in the Filter bar, only the traffic that is being decoded by the Lync Plugin will be displayed.
  • To be used with the latest release of Wireshark (however, the plugin should work with higher than Wireshark 1.0)


Note: The Lync Wireshark Plugin by default will take over the dissection of UDP port 3478 and TCP port 443. You can turn these off in the plugin settings found under Edit->Preferences…->Protocols->LYNC_DECODER.


Feedback

It’s a complex balancing act decoding multiple protocols that are multiplexed on the same port numbers. So there may be cases where you run into something I haven’t seen before that may cause an error in the decode. If you have an issue with the Plugin not decoding something correctly, or LUA errors with your captures, please email me (mylynclab <at> gmail <dot> com) an example of the capture (ie. a Wireshark pcap file) and tell me the packet number where you had the error. I will endeavour to maintain the plugin and correct issues that people might find. 

Known Issues:
  • Wireshark has a bug in the TFTP dissector that causes it to try and decode some STUN packets as TFTP, which results is a “[Malformed Packet: TFTP]” error. You will only see this if you have the Plugin setting “Show original Wireshark Dissection Tree” enabled. This is a Wireshark bug.
  • The plugin currently doesn't decode X-Address data for IPv6 packets. I don't have a capture of this to test on at the moment. If someone would like to supply one I can add the functionality. 


Installation of Plugin

Installing the plugin could not be simpler. You simply take the plugin file (LyncDissector.lua) and put it in the following directory:

"C:\Program Files\Wireshark\plugins\<wireshark version number>\"

After this, whenever you open Wireshark, this plugin will also be used to decode protocols.

Example:


Plugin Settings

The plugin has some variables that can be set to change what is getting decoded. The settings are accessed through Edit->Preferences…->Protocols->LYNC_DECODER. By default all decoding is enabled (ie. UDP port 3578, TCP port 443, and dynamically assigned RTP ports).


Plugin Settings:

Setting
Purpose
Decode UDP Port (Default 3478)
Port 3478 is the standard port used for STUN protocol on the Lync Edge and Lync Front End servers.
Decode TCP Internal Port (Default 443)
Port 443 is the standard port used by Internal Edge services. The Access Edge port gets sent STUN messaging on this port. Use this setting to enable or disable the plugin from decoding traffic on this port.

Note: Port 443 is usually used for HTTP TLS connections, so you may choose to turn off this plugin for port 443 to allow you to use the original Wireshark dissectors for decoding TLS traffic (ie. decoding certificate negotiations) on port 443.
Decode TCP External Port (Default 443)
Port 443 is the standard port used by Internal Edge services. This will always be 443, however, it’s a variable for if something changes in the future. Use this setting to enable or disable the plugin from decoding traffic on this port.

Note: Port 443 is usually used for HTTP TLS connections, so you may choose to turn off this plugin for port 443 to allow you to use the original Wireshark dissectors for decoding TLS traffic (ie. decoding certificate negotiations) on port 443.
Decode 1024-59999 Dynamic Ports
The 1024-50000 dynamic ports are the ports used by Servers and Clients for RTP connections. By turning this setting on, the Plugin will look in STUN messages for RTP ports that are being negotiated during session establishment and add these ports to the decode.
UDP Port (Default 3478)
This port in theory should always be 3478. However, if you would like to change this port number you can.
TCP Internal Port (Default 443)

The TCP decode ports have been broken into separate Internal and External settings. This is for when you are capturing on an Edge server that has a different port than 443 configured for the External AV edge. By default internal and external AV (TCP STUN, RTP, RTCP) traffic will be on port 443.   
TCP External AV Port (Default 443)
Show original Wireshark Dissection Tree (Default False)
When you are running the Lync Wireshark Plugin it will override the original Wireshark decode for the ports that have been selected above.

If you would like to also see how Wireshark would decode the packets, you can tick this box and the original default Wireshark decode will be displayed in the tree item above the plugin decode.

Warning: The default Wireshark dissectors break on some Lync STUN packets, displaying a TFTP decode error. So if you enable showing the original Wireshark dissector, some packets will not get decoded properly because of this error.

More Details on how Lync Edge protocols work

There was a great blog post written back in the 2010 about OCS that talks in some depth about how the STUN and TURN protocols are used by Lync. So if you would like more of an overview of the protocols have a read of this post.


Alternative Software

Microsoft also has their version of Wireshark that they call Network Monitor. They also have a Parser pack for Lync that will decode STUN and RTP messages. Here is where you can get Network Monitor and the Lync parser pack:


Note: Network Monitor does not decode TCP (443) STUN/RTP messages and limited STUN attributes.

The Wrap Up

In this post we have travelled to tech town via the Metro (which recently had it’s name changed to something that I can never seem to remember). The outlook from the windows of the train carriage were amazing, with vistas as far as the eye could see. When we passed through the gates of the city we were given the bill by the conductor which, as it turns out, was free for onedriveonly. The word around town was that there was a publisher that excelled at Lyncprojects. We tried to gain access to him and see if he would sharepoint his wisdom with us. After much looking, we finally found him and he cryptically told us that the infoPath to enlightenment was perhaps closer than we knew, and that we already had the powerpoint to realise this if we looked deep enough within ourselves. The trip allowed us to plug back in to our natural surroundings and be at onenote with nature. I hope you had as much fun as I did... Oh dear, it seems I have “Jumped the Wireshark” with the puns on this wrap up… J


Lync Snom Configuration Manager

$
0
0
Note: Also see my Lync Snom Phone Manager Post for more Snom related fun.

Are you tired of having to maintain a separate configuration server for your third party Lync compatible SIP phones? Well you’ve come to the right place… At Lync Conf this year Snom officially released a feature (it had actually been available for quite some time) that allows you to push configuration settings directly from a Lync Front End server to Snom Lync UC Edition phones. This saves you the effort of setting and managing a separate server containing configuration files. This is an enormous step forward as it will not only reduce your workload but it will also reduce the number points of failure in your Lync deployment.

The way Snom has made the Lync based configuration settings work is by leveraging settings in Lync Client Policy called CsClientPolicyEntries, which was originally introduced in Lync 2010 for sending special configurable settings to Lync clients. An example of this in use is for pushing the photo URL setting back to Lync 2013 clients.

If you’re interested in knowing more about how the Powershell settings work behind the scenes, Matt Landis has a post here about it. The short version of this story is that any setting in the phone that you can see in the configuration file can be pushed to a phone using Client Policy settings. All you need to do is take the name of the Snom config setting and pre-append “snom_” to the start of it and then add this setting to a Client Policy Entry within Lync.

If you’re not so interested in learning all the Powershell behind this, then try using this new tool that I have made…

Lync Snom Config Manager


Version 1.0
  • Create or Delete Client Policies.
  • View all PolicyEntry settings for each Client Policy within a Lync environment.
  • Add, Edit, Delete, and Delete All, CsClientPolicy PolicyEntry settings.
  • Click the "?" button to go directly to the Snom Wiki page for the selected setting or if no setting is selected go to the base Wiki page.
  • The script is code signed! (thanks to Digicert)
  • Export settings from a policy to file.
  • Import settings into the Snom Config Manager tool. This is useful for copying settings between policies, or just saving copies of settings. Note: You can also import Snom configuration files, however, this is not recommended (see the "What about...?" section for more details). 
  • Importing configuration files can be done by merging with current policy settings, or replacing any existing policies settings.

Download Version 1.0


Import Mode Details


When you have pressed the “Import Config” button the contents of the file that you select to import will be displayed in the list view. At this stage you are in "Import Mode", meaning that all the settings from the file have not been applied to a policy yet (to let you know you're in "Import Mode" the settings will be displayed in red). This gives you the opportunity to view the settings and Add/Delete settings before you write the settings to a Client Policy setting in Lync (at which time they will become live in the system).

Import Mode Example


Once you have edited the settings as you would like in the Client Policy, you then select the policy that you would like to apply the settings to from the import drop down box and press the “Upload Config” button. Once you have done this, the setting will be written to the policy within Lync. If you select the “Cancel Upload” button the upload will be aborted. The "Merge" radio button will give you the option to retain all the current settings in the Lync policy and add the imported settings to the existing settings (it will also replace any existing settings that have the same setting name as the one being imported). The "Replace" radio button will first remove all settings from the selected Client Policy and then import the new settings in the place of the old settings.  If the “Import Blanks” check box is unticked then any blank settings (usually if importing an actual Snom config file) in the config file will be ignored and not imported (Note: you cannot enter blank settings into a Client Policy, so you will need to give these settings values before completing the import process).


Example Configuration Settings


Below are some examples of settings that you might want to use:

Set the HTTP Server User and Password
Take back control of your Snom devices! You may have noticed that when you use PIN Auth on a Snom device it will set the Extension number as the Web Admin user name, and the PIN number as the Web Admin password. I personally find it a bit weird that the user should have access to the configuration of the phone and the Administrator doesn’t. So use the following settings to Push out your own Administrator Username and Password for the web interface:

Web Username:
Name: snom_http_user 
Value:  snommanager

Web Password:
Name: snom_http_pass  
Value: snommanager


Set the Admin Mode Password
In order to get to get to many of the configuration settings in the phone you need to set the phone to Administrator Mode. This mode has its own password setting, and if it is not changed from the default setting of “0000” there will be a message displayed on the phone screen (Admin mode password not set). This password should also be set for security reasons:

Admin Mode Password:
Name: snom_admin_mode_password
Value:snommanager

Admin Mode Password Confirm:
Name: snom_admin_mode_password_confirm
Value:snommanager

Turn off the Security Warning
If you really want to leave this setting as the default “0000” you can suppress the phone displaying the error with the following setting:

Name: snom_ignore_security_warning
Value:on

Change Language Settings
If you have users within your organisation with different language requirements, you can create separate Client Policies and push them different language settings:

Name: snom_language
Value: English

Note: Be careful with language settings as some use special characters, eg. “Español”. See the settings WIKI here.

Snom Hotline
Do you have a snom phone that you want to automatically call a specific person when it’s taken off hook? Well, try this setting:

Name: snom_action_offhook_url
Value: https://127.0.0.1/command.htm?number=john.woods@mylynclab.com

Turn off keyboard lock
Keyboard lock can be a blessing and a curse. Security is good, but too much can be annoying. If there are some phones that you don’t want Lync settings to control the keyboard lock for, then switch them off with this setting:

Name: snom_server_enforced_kb_lock 
Value: off

Timezone
If you have your Snom phones deployed in different timezones you can push them the correct timezone for their location with this setting:

Name: snom_timezone
Value: AUS+10

These are just a handful of examples of settings that you can push to the phones. If you want know more, read the Wiki and try out the settings in the lab until you get your required blend of settings for your deployment.


Important Considerations for Policy Deployment


When you are deploying Client Policy settings for Snom phones you must ensure that any policy entry that you add also gets included in all other Client Policies in the system (I call this symmetrical policy deployment). The reason for this is that when a policy entry setting is pushed to a phone, the phone will retain the client policy settings in its memory even when it is moved to another policy, or has had another user sign into it!

Symmetrical Policy Deployment Example


To highlight the issue, this is an example of a non-symmetrical policy deployment. In this deployment there is an off hook action that has been in deployed in the “Snom Hot Line Policy” policy that has not been deployed in the “Snom Basic Policy” policy:

A Bad Policy Deployment:

Lync Policy: "Snom Hot Line Policy"
snom_action_offhook_url!: https://127.0.0.1/command.htm?number=john.woods@mylynclab.com
snom_admin_mode_password!: snommanager
snom_admin_mode_password_confirm!: snommanager
snom_http_pass!: snommanager
snom_http_user!: snommanager

Lync Policy: "Snom Basic Policy”
snom_admin_mode_password!: snommanager
snom_admin_mode_password_confirm!: snommanager
snom_http_pass!: snommanager
snom_http_user!: snommanager

If we have a user that starts off being deployed in the “Snom Hot Line Policy” policy that then gets moved to the "Snom Basic Policy”, the off hook action will be retained. This is not at all what you would want in a real world deployment, however, there are ways around this. One way is to reset the phone’s configuration before moving it to the new policy, which can be quite a bit of hassle. The other way is to ensure that all of your policies contain an off hook action setting that will return the setting back to its original state. Below is an example of this:

A Good Policy Deployment:

Policy: "Snom Hot Line Policy"
action_offhook_url!: https://127.0.0.1/command.htm?number=john.woods@mylynclab.com
admin_mode_password!: snommanager
admin_mode_password_confirm!: snommanager
http_pass!: snommanager
http_user!: snommanager

Policy: "Snom Basic Policy”
action_offhook_url!: <SPACE CHARACTER>   //Reset to default - Simulating a blank setting
admin_mode_password!: snommanager
admin_mode_password_confirm!: snommanager
http_pass!: snommanager
http_user!: snommanager

Note: For settings that have a String type you can use a <SPACE CHARACTER> to set the setting back to blank. This works because the phone appears to trim all white spaces from the setting before applying it to memory. This does not work for Boolean (True/False) type settings, as the phone will set anything that it not explicitly “yes” (including space characters) as being “no”. So be sure that for Boolean settings you explicitly either set “yes” or “no” for the setting (if you need to know the default value for a setting look it up on the Snom Wiki).

What about…?


Below are some Snom Client Policy Questions that I wanted to know the answers to, and as a result I tested. These might also be of use to you:

1. What are all of these configuration settings?

Snom has a wiki that contains a list of all the settings. Clicking on the "?" button will take you to the wiki page for the selected setting.

2. Are settings case sensitive?

No. For example, “Deutsch” or “deutsch” can be used.

3. Are settings special character sensitive?

Yes. For example Espanol  and Español are not the same, the phone will not parse an regular “n” to be a “ñ”.

4. Should I just export the whole config out of a Snom phone and import it into Lync?

No. Whilst the Lync Snom Configuration Manager tool will allow you to import a whole configuration file that you have exported from the phone, you should only import the settings that you specifically want to control. There are two main reasons for this: Snom config files are full of blank settings (which cannot be imported and will lead to non-symmetrical settings between policies), and you don't want to import settings that might be used for PIN login.

5. How do you make specific settings in the phone go back to default value?

Client Policy Entry settings within Lync can’t be blank (Lync will give you an error if you try to use an empty value for Client Policy Entries). This poses an issue, because Snom phones use blank config settings to indicate that a setting should set to the default value.

Settings for values that are strings, like a URL for example, can be removed by replacing them with a <SPACE Character>. When you set a space character in Client Policy, the phone will trim the leading and trailing blank space characters and apply it to the configuration. This will result in a space character being turned into a blank setting.  However, if the setting is a Boolean (ie. yes/no) value and you set it to a <SPACE Character>, it will not set the setting to the default value. It instead interprets anything that is not the word “on” as being “not on” (ie. off).

Example: If you set snom_show_clock which has a default value of ON to <space character> it will make the setting OFF and the clock will not be displayed.

The result of this is that you need to be explicit when making settings using Lync Client Policy Entry settings. If you want a setting to be the default setting, you will need to look at the snom web site, determine what the default setting is, and then explicitly set that in Lync (ie. don’t try and enter blank settings).

Note: I have raised this with Snom and they are working on a solution for blank settings, hopefully we’ll see it soon.

6. What happens if you move a user from one policy to another?

The expectation here might be that the phone would default all of its values and apply the new policy to a fresh configuration. However, this is not reality… What actually happens is that the phone will retain all of its settings from the previous policy and then apply the new policy settings over the top of the old ones.

Example: If you had a phone in a Policy that had a hotline configured in it, and then moved it to a policy that had nothing set for the hotline setting, the phone would continue to function like a hotline phone.

Where this might also catch you out is when you have users with different Client Policies hot desking on the same phone hardware. When the settings get written to the phone they will be retained for the next user that logs into the phone as well!! So look out for this…

In practice this means that all of your policies need to contain settings for every other setting that you have in another policy. So if you have a hotline configured in one policy, you need to have the hotline setting configured to “nothing” (<SPACE Character>) in all other policies. This is kind of annoying… however, something you need to be prepared for!

The only other option here is to reset the configuration in the phone before moving it to the new policy. This can be done using the Lync Snom Phone Manager tool (coming soon!) and pressing the “Reset” button. This option is very open to human error though, because you may move a user to a new policy and forget to reset their configuration. I don’t recommend this as a practical deployment option though.

7. How long does it take for a setting to push to the phone?

The answer to this is that it’s variable. It appears to depend on where the phone is in its registration cycle. A registration period can be quite long, so it can take many hours for the settings to be pushed to the phone. It is recommended to reboot the phone to know that the settings have applied.

8. Will settings be applied without rebooting the phone?

The answer to this seems to be that it depends on what the setting is. For example if you move a user from a policy set for English to one set for Spanish, the setting does not take effect on the phone interface until you reboot. However, if the policy you are moving to has an offhook policy (for example) this does get implemented by the phone. So to guarantee that the settings have taken effect it is best to reboot the phone. (You can also get the phone to re-register by pressing  Menu key, 3, 2, 1. Or use my Lync Phone Manager Tool to remotely reboot phones)

The Wrap Up


Now, kick back, relax, and feel your blood pressure lowering whilst you manage your Snom configuration in style from the comfort of your slightly smelly office cubicle. If you have any issues with the tool, let me know.  Next post will be another tool for remotely managing Snom phones… J


Lync Snom Phone Manager

$
0
0
Note: Also see my Lync Snom Configuration Manager Post for more Snom related fun.

In a previous blog post I released a tool for managing Polycom VVX phones that was well received by the Lync community. So I thought that it was only fitting that I go back to the drawing board and engineer a new tool for managing Snom phones. The tool's front end works in a very similar way to the VVX manager tool with some minor tweaks and differences, however, the backend has been completely overhauled to work with Snom devices (which turned out to be a lot of work). Rightio, let's skip the chit chat and get down to the brass tacks…

Lync Snom Phone Manager


Version 1.0:

  • The Lync Snom Manager has the ability to query the Lync Monitoring database (if you have one deployed) and find all the IP Addresses of Snom phones connected to your Lync server. It will then scan all the IP Addresses of Snom phones supplied by the Monitoring database using a fast multi-threaded discovery method to connect to and learn about all the Snom devices on the system.
  • If you do not have a Lync Monitoring Database you can simply type an IP Range (format: "192.168.0.1-192.168.0.20" OR "192.168.0.0/24" OR add multiple with comma separation "192.168.0.0/24,192.168.1.0/24") into the listbox and press the "Discover from IP Range" button. The tool will then scan the phones using a fast multi-threaded discovery method to see if they are at each IP address in the range.
  • If a Snom handset that is not logged in as a user is discovered, it will be added to the user list under the name “SnomNot@LoggedIn_<index number>”. This allows you to use the tool to access these devices even though they are not logged into Lync.
  • Find out information about Snom handsets connected to a Lync system (IP Address, the Lync server that the handset is registered to, user policies, PIN status).
  • Remotely reboot Snom handsets using the "Reboot" button. Reboot a selection of handsets by selecting (hold shift/ctrl) multiple users in the list, then press the ‘Reboot’ button. Or reboot all the Snom handsets on a Lync system with the “Reboot All” button.
  • Remotely set a Snom phone's configuration back to factory default settings by pressing the "Reset" button. To be safe. you will be warned before this function is actually completed.
  • Set the PIN for a user - either a random PIN (if the PIN field is left blank), or specify a PIN number by filling in the field. This can also be done on multiple selected users.
  • Lock and unlock the PIN for a selected user with the "Lock PIN" and "Unlock PIN" buttons. This can also be done for multiple selected users.
  • Easily connect to the Snom phone web interface of any user on the system by clicking the “Web Config” Button.
  • Test PIN and device bootstrapping by entering a PIN number for the selected user and pressing the "Test PIN" button.
  • Export your Snom phone deployment information. This outputs a CSV file that contains all the Users, IPs, Firmware Version, Serial Numbers, Lync Server, and MAC Address (if available) for all logged in phones. If you select the "More" checkbox you will also get the additional Lync settings for the phone (this is slower).
  • Import previously exported phone data. This allows you to import previously exported phone data, which can save you time “Pinging” IP address ranges looking for phones. The “Rescan” option will make the Snom Phone Manager tool connect to each device in the imported list and update its information. This is to help try and avoid importing stale data with incorrect IP Addresses in it. If you trust that your phone IP Addresses have not changed from when you previously exported the data, you can untick the “Rescan” option, and all settings will be imported directly from the file (much faster but less safe).
  • Variable for https connections to the Snom web interface. Change the variable $script:useHTTPS to be $true if you would like all web interface connections to use https instead of http. This will also require that you change the $script:WebPort variable to be "443" as well (or whatever port you set in the configuration file for https). These settings can also be added in a settings file if you don't want to edit the script.
  • Remotely view what is showing on the screen of the phone by pressing the “Show Screen” button. This will load another window that will show you what is on the screen of the phone, and will refresh approximately every second. This feature can be useful for remotely troubleshooting issues with users' phones. Example:


Version 1.01 Update:

  • Added support for common area phones. The Display Name is also shown as part of the User Information section in order to make Common Area Phone identification easier.
  • Added window resizing capability.


Download Version 1.01:


System Configuration Requirements


Lync Configuration


In order to use the Snom Phone Manager, you will need to make sure that the phones have some settings configured in them. Fortunately you can use my Snom Configuration manager Tool to push these settings to the phones (rather than individually configuring each phone, or using a separate config server). The following settings need to be configured in your Lync server Client Policy PolicyEntry settings:

Web Username:
Name: snom_http_user 
Value:  snommanager

Web Password:
Name: snom_http_pass  
Value: snommanager

Authentication Type – The tool uses Basic Authentication over HTTPS
Name: snom_http_scheme
Value: off

In order to get to get to many of the configuration settings in the phone you need to set the phone to Administrator Mode. This mode has its own password setting, and if it is not changed from the default setting of “0000” there will be a message displayed on the phone screen (Admin mode password not set). This password should also be set for security reasons:

Admin Mode Password:
Name: snom_admin_mode_password
Value:snommanager

Admin Mode Password Confirm:
Name: snom_admin_mode_password_confirm
Value:snommanager

Using Lync Configuration Manger to make these settings:


Script File Variables


There are two methods for changing these variables in the script file:

Method 1: Preserve Code Signing Method

The script file has been signed so it can be used on sites that have restrictive script execution policies in Powershell. This means though that if any element of the script is edited, the signing becomes invalid and you will not be able to run the script. So to get around this issue I have made the script be able to take variable input from an external file. :)

To an external settings file, simply create a file  (or edit the file I supplied in the zip file with the tool)  named "LyncSnomPhoneManagerSettings.cfg" in the same directory as your Snom Phone Manager script is in. The file must be in the following format:

SnomHTTPUsername=snommanager
SnomHTTPPassword=snommanager
SnomAdminModePassword=snommanager
WebPort=443
useHTTPS=true
IPRanges=192.168.0.1/24,192.168.1.1/24


When the script runs it will look for the settings file and parse it into the appropriate variables.

Method 2: The "Who cares about code signing" method

In the script file you will need to set the following settings to match whatever you have configured in your Snom phones:

#Edit these settings if you would like to use a custom username and password for your Snom devices.
$script:SnomHTTPUsername="snommanager"
$script:SnomHTTPPassword="snommanager"
$script:SnomAdminModePassword="snommanager"


Monitoring Database Discovery Permissions


In order to discover phones from the Monitoring database (this is not required for the IP range discovery method), the user logged into the server will need to be a Domain Admin or have “Select” privileges granted on the LscCDR database's Registration table for a security group they are a member of (eg. CSAdministrator). For more details on how to grant these privileges, please refer to the manual process in my article about Group Call Pickup permissions here. Note: the database and table being edited in this case are different than the ones documented in the article, but the process is the same.


The Wrap Up


It’s as simple as that! So now you have a solution for managing your Snom phones' configuration via Lync Client Policy as well as a tool for accessing and managing individual endpoints. What more could you ask for?? Actually, don’t answer that… I’m sure there are plenty more things you would like… I’m working on it ;) 


Power Syslog Server

$
0
0
“My Kingdom for a free and simple syslog server!” – Anonymous System Administrator

So I don’t know about you, but I can’t remember how many times I have got to the point of having to troubleshoot an issue with a Sonus gateway and suddenly remembering I need a Syslog server to get logging out of the box. At this point I usually go and ask Google politely “Google, can you please point me in the direction of a free, and simple, syslog server that I can run without installing a bunch of malware and other rubbish on this nice customer’s server?” At this point Google usually responds “No, I cannot. However, here is a syslog server that requires you install SQL, IIS, and fifteen other dependent services as well as being crippled unless you pay $14.99 per month to a Russian guy name Vlad via this popup window that displays in the middle of the screen every 5 minutes. Also, here’s a Yahoo browser search bar for your trouble.”

This is not an ideal situation… So as usual, I just decided to build it myself. In doing this I sat down and thought about the things I wanted in a simple syslog server, and came up with this list:
  • It needs to have no installation process, and leave no trace once removed from a server, as it will be run on customers' servers in a lot of cases.
  • It needs to have a display where I can see the messages coming in in real time.
  • The messages being displayed must be able to be paused and reviewed, so I can check if a specific event has happened yet.
  • The messages window must be able to be cleared so that I can start fresh when trying to troubleshoot a fault.
  • The syslog server needs to be able to log to file. Ideally the files should be able to be opened in Sonus LX tool so that further message debugging can be done easily.
  • The syslog server needs to be able to roll the log files once they get to a specific size (so they can be emailed, etc).
  • The syslog server should only keep a specific number of these log files so that the server’s hard disk does not get filled with log files.
  • Both the display and log files should be able to be filtered to display only information that I want to see. For example, only show lines with a specific phone number in them, or only show me SIP messages. These filters should be independent so that you can view the filtered information on screen whilst more detailed information is getting logged to file for further review and troubleshooting later.

Based on these requirements I figured it would be very cool to write the server in Powershell, as this allows for absolutely no installation and can be run on any Windows machine you are likely to run into. How hard could it be?

<Insert training montage>

SMASH CUT:
EXT. TRAINING MONTAGE - THE STAIRS AT THE FRONT OF THE PHILADELPHIA MUSEUM OF ART- DAY
A man in a sweaty hoody runs to the top of a large set of stairs carrying a tablet based productivity device that he is furiously typing on. A large group of the town’s population is also running after him in a large pack for no apparent reason. Upon reaching the top of the steps he punches the air and launches the tablet into the sky. The tablet hits the concrete and smashes into a million pieces. He falls to the ground and screams towards the sky.

MAN
Nooooooo! I should have backed up to the cloud, the cloud I tells ya.


Okay okay, let’s cut to the chase. I did it, and now you too can syslog with me into the sunset.


Power Syslog Server


Features:
  • Zero installation.
  • Signed Powershell Script.
  • Real time log display (Approximately 1000 lines).
  • Copy the displayed text with the Copy Text button. This is useful for more in depth analysis in your favourite notepad software.
  • Rolling log files based on file size and number of files to keep.
  • Clear display and Pause display functions.
  • Filter real-time display logging with regular expression.
  • Filter logging to file with regular expression.
  • Log files can be opened in Sonus LX tool for further debugging.
  • Open firewall for Syslog Server port with the click of a button. If you are not seeing any syslog output in the Power Syslog Server display log then try pressing the Open Firewall button.
  • Server listening port can be changed by creating a config file (PowerSyslogServerSettings.cfg) in the same directory as the script. The config file needs to have text in it in the following format "SysLogPort=514". This allows you to maintain the integrity of the code signing by not directly editing the script file.

Download 1.0


How to configure a Sonus Gateway for Syslog Output


Sonus makes some of the most popular Lync Gateways on the market, so I have chosen to use them as an example of how to set up a device to output syslog. Power Syslog Server will work with any other UDP based syslog client as well though, so feel free to use it with other devices too.

Remote Log Servers:

Setup your device to output syslog to the server you are running Power Syslog Server on.  


Global Log Level: If your subsystems are set to “Default” logging level then this setting will be applied to them. This is also the level it will log for all services that are not specified in Subsystems. You will usually set this to a low value like “Error” or “Warning” to avoid log flooding.
Log Destination: The server with the Power Syslog Server running on it.
Port: 514                 
Protocol: UDP
Log Facility: local0
Enabled: Yes

Important Note: When you're finished debugging remember to Disable the syslog output. Otherwise the device will continue to output syslog data over the network, which can be a significant amount of unnecessary overhead for your device, network and server. 

Subsystems:

Then enable the Subsystems as required:


Subsystem: Set the specific Subsystem that you would like to have logged to the syslog output. For troubleshooting call flows and SIP messaging the “SIP Stack Service”, “Common Call Control” (for ISDN translation tables), “Call Routing Service” (for SIP translation tables), and "ISDN Protocol" (for E1 integrations) are useful subsystems to configure here.
Log Level: Set the required Log Level.
Log Destination:The Remote Log Server we created in the first step.


Debugging Log Files in LX Tool


Once you have captured your syslog files using the Power Syslog Server on the server on site you may want to do further call flow debugging using the Sonus LX tool (which can offer you decoded call flows for both SIP and ISDN calls providing your syslog contrains "ISDN Protocol" DEBUG and "SIP Stack Service" DEBUG logging).

To import the file into the LX tool, simply take one of the log files that the Power Syslog Server created and drag it into the LX tool window (or use File->Open). When you do this the LX tool will break the syslog file down into the individual call flows that were captured in the log. Here is an example:

Sonus LX Tool

By double clicking on a call in the "Calls" tab at the bottom of the screen you can get further details on each call flow (including ISDN decoding!):

Sonus LX Tool - Call Flow

Note: The LX Tool is a tool orginally created by NET (which was subsequently aquired by Sonus). To get a copy of the software go to the Sonus Salesforce portal and select "Software Downloads" then select "LX" from the Products list. If you don't have access to the Portal, speak to your Sonus representative to get a copy of the software.


Example Display/Log Filters


Power Syslog Server includes a cool feature that allows you to filter (using regular expressions) what lines of syslog get displayed on the screen and logged to file. The reason for allowing for having a separate Display Filter and Log Filter is to help you when troubleshooting in real time. By this I mean that you can configure a very specific Display Filter to allow you to see only the messages you want to see for a specific issue and a more general Log File Filter so you can capture more detailed logs to review later in order to pinpoint the exact cause of the issue. Below are some examples of how you can use these filters when troubleshooting issues:

Show Only SIP Messaging

When you are running SIP Stack Service logging at a DEBUG level the Sonus gateway will output all of the SIP messaging that is traversing it. This can be very useful when you need to know what error messages are being sent by the Carrier SIP network or Lync when a call fails.

Example Filter (without quote marks):“sip:”

Example Output:
192.168.0.20 <135>[2014-09-16 00:57:02,709]  287 0002

OPTIONS sip:ux1000lab.mylynclab.com SIP/2.0
FROM: <sip:2013ENTFE003.mylynclab.com:5068;transport=Tcp;ms-opaque=152721d992435f69>;epid=B3F80C5FC7;tag=fb568a1fab
TO: <sip:ux1000lab.mylynclab.com>
CSEQ: 9993 OPTIONS
CALL-ID: 87a0bbd93e7f4e33a2c87ff8bbccd3d7
MAX-FORWARDS: 70
VIA: SIP/2.0/TCP 192.168.0.96:51823;branch=z9hG4bK96df5daa
CONTACT: <sip:2013ENTFE003.mylynclab.com:5068;transport=Tcp;maddr=192.168.0.96>
CONTENT-LENGTH: 0
USER-AGENT: RTCC/5.0.0.0 MediationServer


192.168.0.20 <135>[2014-09-16 00:57:02,718]  322 0001

SIP/2.0 200 OK
Allow: INVITE, ACK, CANCEL, BYE, UPDATE, NOTIFY, OPTIONS, REFER, REGISTER
Call-ID: 87a0bbd93e7f4e33a2c87ff8bbccd3d7
Content-Length: 0
CSeq: 9993 OPTIONS
From:  <sip:2013ENTFE003.mylynclab.com:5068;transport=Tcp;ms-opaque=152721d992435f69>;epid=B3F80C5FC7;tag=fb568a1fab
Server: SONUS SBC1000 3.0.2v270 Sonus SBC
Supported: replaces,update,100rel
To:  <sip:ux1000lab.mylynclab.com>;tag=aedb006-3ef64
Via: SIP/2.0/TCP 192.168.0.96:51823;branch=z9hG4bK96df5daa


192.168.0.20 <135>[2014-09-16 00:57:04,827]  393 0003

OPTIONS sip:siptrunk.aapt.com.au:5060 SIP/2.0
Allow: INVITE, ACK, CANCEL, BYE, UPDATE, NOTIFY, OPTIONS, REFER, REGISTER
Call-ID: call-71280200-0000-0010-1101-0@10.237.176.6
Content-Length: 0
CSeq: 132654 OPTIONS
From:  <sip:Anonymous@10.237.176.6:5060>;tag=aedb006-1
Max-Forwards: 70
Supported: replaces,update,100rel
To:  <sip:Anonymous@siptrunk.aapt.com.au:5060>
User-Agent: SONUS SBC1000 3.0.2v270 Sonus SBC
Via: SIP/2.0/UDP 10.237.176.6:5060;branch=z9hG4bK-UX-0aed-b006-40c88


Show Output Relating to Transformation and Route Rules

This can be extremely useful for troubleshooting what transformation rules a call is using and what routing rule it has chosen.

Example Filter (without quote marks):“regex match|transformation|route request”

Note: You need to be logging at DEBUG level for “Common Call Control” (for ISDN translation tables) and the “Call Routing Service” (for SIP translation tables) for this to work.

Example Output:
192.168.0.20 <134>[2014-09-16 00:51:13,126] 1160 0097 com.sonus.sbc.route INFO (callrouter.cpp:2193) - Handling route request.
192.168.0.20 <135>[2014-09-16 00:51:13,127] 1163 0094 com.sonus.sbc.route DEBUG (translation.cpp:1332) - Performing OPTIONAL transformation using entry Testing Calling Party Rule (13.1(4)).
192.168.0.20 <135>[2014-09-16 00:51:13,127] 1164 0093 com.sonus.sbc.route DEBUG (translation.cpp:649) - Failed regex match of "tfCallingSubNumber" field for "^(9999113\d{2})$" (updated "^(9999113\d{2})$") with input of ""
192.168.0.20 <135>[2014-09-16 00:51:13,127] 1165 0092 com.sonus.sbc.route DEBUG (translation.cpp:1332) - Performing OPTIONAL transformation using entry 4 digit to E.164 (13.2(1)).
192.168.0.20 <135>[2014-09-16 00:51:13,127] 1166 0091 com.sonus.sbc.route DEBUG (translation.cpp:653) - Successful regex match of "tfCalledNumber" field for "^(45\d{2})$" (updated "^(45\d{2})$") with input of "4501"
192.168.0.20 <135>[2014-09-16 00:51:13,127] 1168 008f com.sonus.sbc.route DEBUG (translation.cpp:1332) - Performing OPTIONAL transformation using entry Full National to Lync (13.3(2)).
192.168.0.20 <135>[2014-09-16 00:51:13,127] 1169 008e com.sonus.sbc.route DEBUG (translation.cpp:649) - Failed regex match of "tfCalledNumber" field for "^0(3958245\d{2})$" (updated "^0(3958245\d{2})$") with input of "+61395824501"
192.168.0.20 <135>[2014-09-16 00:51:13,127] 1170 008d com.sonus.sbc.route DEBUG (translation.cpp:1332) - Performing OPTIONAL transformation using entry Local to Lync (13.4(3)).
192.168.0.20 <135>[2014-09-16 00:51:13,127] 1171 008c com.sonus.sbc.route DEBUG (translation.cpp:649) - Failed regex match of "tfCalledNumber" field for "^(958245\d{2})$" (updated "^(958245\d{2})$") with input of "+61395824501"
192.168.0.20 <134>[2014-09-16 00:51:13,127] 1172 008b com.sonus.sbc.route INFO (callrouter.cpp:2396) - Successful route request with entry Analog to Lync (5.1(3))


Show Only Syslog Lines Related to a Specific Phone Number

This can be useful if you know a users telephone number and you only want to see messages that relate to them.

Example Filter (without quote marks):“+61399995555”


The Wrap Up


So there you have it, another tool for the kit bag. I hope you like it and find it useful, I know it’s already got me out of a few close calls. If you find any bugs or have any feature requests feel free to drop me a line.


When Poodles Attack - Poodle Checker Tool

$
0
0

It’s not too often you get to be excited about a security threat. However, the POODLE security threat seems to put a smile on my face every time I see it written somewhere… Poodles are just so innocent and ridiculous looking to take seriously as a major threat. So in a bid to take this security issue more seriously, I have built a Powershell tool for remotely checking servers for having either SSL 2.0 or SSL 3.0 enabled on them.


More Detail on the POODLE threat


Here are some links that explain the POODLE threat in a little more detail:


POODLE Checker Tool


  • The tool will try and connect using SSL 2.0 and SSL 3.0 to any server FQDN/IP and port (multiple ports can be entered with a comma separating them) you enter.
  • Press the Test button and it will check all the ports in the ports text box. The tool will report in the Powershell window which ports have SSL 2.0 and SSL 3.0 running on them.
  • The tool will also visually display the results…
  • Script is signed.

Update 1.01
  • Added additional checking of TLS (1.0, 1.1, 1.2) protocols so you can better understand all the TLS connection options available on the server before deciding to disable SSL. 
Update 1.02 (16/2/2015)
  • Added the ability to handle multiple comma separated IP Addresses/DNS Names.
  • Added Cancel button to stop testing.
  • Disabled text boxes during testing phase.
  • Textboxes now stretch when resized.

      Download Version 1.02:


      Standard SSL Port Numbers


      SSL can technically run on any port that you configure and application to use. However, the well-known port numbers for applications that use SSL (as defined by IANA, and IETF) are listed below:

      Protocol
      Port
      Description
      nsiiops
      261
      IIOP Name Service over TLS/SSL
      https
      443
      http protocol over TLS/SSL
      ddm-ssl
      448
      DDM-SSL
      smtps
      465
      smtp protocol over TLS/SSL
      nntps
      563
      nntp protocol over TLS/SSL
      sshell
      614
      SSLshell
      ldaps
      636
      ldap protocol over TLS/SSL
      ftps-data
      989
      ftp protocol, data, over TLS/SSL
      ftps
      990
      ftp, control, over TLS/SSL
      telnets
      992
      telnet protocol over TLS/SSL
      imaps
      993
      imap4 protocol over TLS/SSL
      ircs
      994
      irc protocol over TLS/SSL
      pop3s
      995
      pop3 protocol over TLS/SSL

      Note: A listing of all IANA port assignments can currently be found at: http://www.iana.org/assignments/service-names-port-numbers/service-names-port-numbers.txt

      I have made the tool load all of these ports into the port text field by default.

      Note: The documented attack vector for POODLE is described for HTTPS connections, and not necessarily for these other protocols. The tool checks all of these protocols to check if your server is still accepting SSL2/3 connections in order to determine if it's globally enabled (in Windows the registry key effects SSL across most applications). Also, additional attack vectors may be found for other protocols, so if your applications can support newer versions of TLS it is probably wise to turn these older versions of SSL anyway.

      The Wrap Up


      There you have it, short and sweet! I hope the tool is useful to you and helps you take security issues more seriously J

      Let me know if you find any bugs or have any issues.


      Sonus SBC 5k/SWe CDR Decoder

      $
      0
      0
      I was on a training course recently learning about the SBC5000/SWe series SBCs from Sonus as these are now supported with Microsoft Lync 2013! This range of SBCs are completely different from the SBC1000/2000 range that you may be used to in your previous Lync deployments. The reason for this difference is that the SBC1000/2000 range were originally designed around a completely different code base by the NET company which was later acquired by Sonus. 

      The SBC5000 was  originally designed for large carrier deployments, however, a newer virtualised version of the SBC5000 called the SWe (Software Edition) starts to make these systems much more affordable and interesting for enterprise sized customers. During the training course we were introduced to an online tool that Sonus has for parsing individual Call Detail Records (CDR) to show you what each field in the record represents. This may not sound like much until you see the size of a SBC5000’s CDR record… Behold!


      STOP,PRGSBC51,0x000174D700000001,3955074504,GMT,10/22/2014,01:11:19.7,0,4,37,10/22/2014,01:11:40.8,3,2076,16,VoIP,IP-TO-IP,DEFAULT,,,6731234507,,0,,0,,0,,RL7,1,PRGSBC51:TG07,192.168.229.118,192.168.228.237,TG07,,192.168.229.117:1024/10.128.176.185:5062,,192.168.229.117:1026/192.168.228.237:5048,213416,1036,176476,1025,0,,,0x00800000,,,,,2,"SIP,009258DD-F957-E411-8C61-342F2AB2DB43@10.128.176.185,<sip:PhonerLite@10.128.176.185>;tag=3367902045,<sip:6731234507@192.168.229.118>;tag=gK0c816f95,0,,,,sip:6731234507@192.168.229.118,,,,sip:PhonerLite@10.128.176.185:5060,sip:6731234507@192.168.229.118:5060,,,,1,BYE,,0,0,,0,0,,,,,,,,1,0,0,0,,,,,,,,0,,",12,12,0,5,,,0x0a,6731234507,1,1,,1,0,0,0,TG07,"SIP,786432_119514912@192.168.229.118,<sip:PhonerLite@192.168.229.118:5060>;tag=gK0c0170af,<sip:+16731234507@192.168.228.237:5060;user=phone>;tag=4fbfd5e7e6e006f0,0,,,,sip:+16731234507@192.168.228.237:5060;user=phone,,,,sip:PhonerLite@192.168.229.118:5060,sip:+16731234507@192.168.228.237:5060;transport=udp,,,,,BYE,16,0,0,,0,0,,,,,,,,1,0,0,0,,,,,,,,0,,",,110,,,1,1,,,2,P:2:1,P:2:1,10,0x000C0000,,,0,,,,,,0,,,,1,,,,,,,6,,,,,,1,1,1,1,,0,,,1,7,0,2076,1,,,,,192.168.229.118,10.128.176.185,2,16,8,,,,,,,,,0,,,TANDEM,,,10,211150,1025,178192,1036,0,0,0,35,20,,,,,,,13,1,,,,,,,,,,,,,,,,,,,,,0,9,,,,,,,,,,,,,,,"3,39,0,42",0,,,,,,,,,,,,,,,,,,,,,,,,,,,,,,,"01,audio,1,G711S,192.168.229.117:1024,10.128.176.185:5062,0:0:0:0,56,G711S,192.168.229.117:1026,192.168.228.237:5048,0:0:0:0,124","01,audio,1,1036,1025,213416,176476,0,0,1025,1036,211150,178192,0,0",0,,,

      From this mess you might see how finding field 134 might take some time… So Sonus’ online tool is a very handy thing. The CDR records also contain a great deal of useful information about a call (kind of like Lync Monitoring Database records) such as Codecs Used, if transcoding took place, SBC routes used, reason for disconnection, etc. These records can be extremely useful when troubleshooting issues with the system.

      Sonus Online CDR Decoder

      I was thinking, though, that you don’t always have access to the internet when you’re working on a customer site, and often you might want to look through a whole file worth of records (instead of cutting and pasting individual records into the online tool). So I decided that it was time once again to get cracking on a Powershell tool for browsing SBC5000 CDR files … and after eleven thousand lines of parsing code I bring you:

      Sonus SBC 5k/SWe CDR Decoder


      Version 1.0:
      • Import SBC5000 or SWe CDR files (ACT files).
      • Left hand list view will display all of the records that are in the file.
      • Right hand list view displays all of the fields in the selected records.
      • Subfields (ie. fields that contain multiple pieces of information in them) are individually broken out and displayed in grey colour.
      • Fields are decoded where possible with the decoded value of the field shown in brackets next to the field entry.

      Version 1.01 (5/12/2014):
      • Added some more enumerations.
      • Fixed a few small parser bugs.
      • Added a show as text button.

      Download Version 1.01:


      How to access SBC5000/SWe CDR files


      CDR files are also called account files, and they can be easily downloaded from the system via Platform Manager. Simply access Platform Manager (ie. management interface IP on port 444) and go to the Logs -> Event Logs section and select ACT as the log type you wish to access. Then download the file with the Download button:


      Then open the Sonus SBC 5k/SWe CDR Decoder tool in Powershell and select the “Browse…“ button, select the ACT file, and click the “Load” button to import the contents of the file. Now you’ll be able to browse the records in the left hand listview and each record you open will be displayed in the right hand listview.


      The Wrap Up


      At this stage there may not be many deployments of the Sonus SBC5000 or SWe in Lync deployments around the world. However, I can see the SWe being a highly flexible and tenantable virtualised SIP Trunk SBC in the future. So even if this tool doesn’t seem immediately useful it may someday become handy for troubleshooting your future SWe deployments!


      Photos (Part 1) - Lync / Skype for Business Photo Editor

      $
      0
      0
      Happy New Year! Hang on, it’s February… Time seems to have got away on me since I started this holiday project that turned out to be more complex than I had initially expected. What was originally going to be a simple photo resizer tool for Active Directory, Exchange and Lync/Skype for Business, turned into more of a complete photo editor including face recognition based cropping, image filtering and processing, written entirely in custom Powershell code… What can I say, sometimes I can’t help myself…

      So let’s begin by discussing the problem: Lync and Skype for Business clients are used for communicating, and the best experience for this is when you are able to easily see the people that you’re communicating with. So within the Lync and Skype for Business client UI there are many places where photos of users are shown. This is great because it makes the software much more personal and approachable to users... and ever since Bill Gates' mug shot silhouette was replaced as being the default missing photo image from Lync 2010 (yes, is really was, see below!) to the generic Lync 2013 oval head silhouette, a photoless client tends to look a bit boring.

      Image Reference

      So for the best user experience we really should be using profile photos for users in Lync and Skype for Business… but what does that mean for us Lync Administrators? Well, usually it means that you are going to get given thousands of random image files, in god knows what format, and at who knows what quality, that you will be expected to magic into the system and have displayed for all to see. So let us put our magicians' hats on and I will help you with Part 1 of this trick… Turning a mess of image files into something that will work when imported into Active Directory and/or Exchange for display within Lync or Skype for Business…

      Lync / Skype for Business Photo Editor


      You will know by now, if you’ve ever read my blog, that a custom written Powershell tool will always provide the solution to our problems! I give you the Lync / Skype for Business Photo Editor Tool!


      Features:
      • Zero installation.
      • Signed Powershell Script.
      • Bulk conversion of a folder full of images files.
      • Custom coded image processing!
      • Manual editing and cropping of individual files. Simply Drag and Drop an image into the Picture Box area and then start selecting the crop box size and position you would like your output files to be based on. Set filter options and preview their effects on the image using the “Preview Filter” button. The size of the image crop box is shown under the scaling tools to allow you to know if you are cropping to a size smaller than image you are wanting to output (to avoid accidently upwards rescaling of the images).
      • Accepts input files in the following formats: ".jpg", ".jpeg", ".gif", ".png", ".bmp" and ".tif”. All files get converted to “.jpg” format so they can be easily imported into Exchange/AD.
      • Smart Crop / Centre Crop modes – By ticking this box (default) my Smart Cropping algorithm will be used to discover the subject's face and crop appropriately. The Margin setting is used in conjunction with Smart Crop to determine how loose or tight the framing will be around the subject. If unticked, a simple Centre Crop Method will be used. See the Smart Crop section for more details.
      • Filters! Since Instagram became such a big hit, filters have become a must-have for all successful software projects. So why should this one be any different? Photo filters include: Colourise (Blue, Red, Green, Yellow, Orange, Pink, Purple), Contrast (Reduce Contrast, Light Contrast Boost, Medium Contrast Boost, Mega Contrast Boost, Ultra Contrast Boost), Brightness (Reduce Brightness, Light Brightness Boost, Medium Brightness Boost, Mega Brightness Boost, Ultra Contrast Boost), Effects (Old Film, Vignette, Light Leak, Vintage, and Slide Show).
      • Output sizes. By default the tool will output 96x96 and 648x648 sized photos. These can be turned on or off using the checkboxes in the “Image Output Settings” area of the GUI. There is also the option to create custom sized photos by ticking the custom checkbox and selecting the pixel width/height of the photos to be outputted. It is generally recommended that 96x96 files are used for uploading to Active Directory and the 648 x 648 images are uploaded to Exchange 2013.
      • Quality Control – The quality of the jpg images that the tool will output can be changed by reducing the Quality setting between 1-100. I suggest that you never actually reduce this in the process of creating the files that you are importing via Exchange, as the quality will be further reduced by Exchange as part of the import process.

      Requirements:

      • The script is supported on Powershell Version 3.0 and above. So if you're running Windows 7 you will need to make sure you've upgraded your Powershell version to at least Version 3.0.
      • Drag and Drop only works when the filesystem and Powershell session have the same security level. So if you're running Powershell with Administrator privledges (ie. Run as Administrator) the Drag and Drop function will not work. To fix this just run the Powershell with regular privileges and it should be okay.

      1.01 Update (23/4/2015):

      • Added policing of the folder name to accept ending with a "\" or ending without a "\".
      • Changed the output file name to use space ("") instead of a minus ("-") character between the name and the image size ("648x648") to work with new Photo Importer Tool.


      Features - Smart Crop


      One of the main problems with Exchange / AD / Lync images are that they must be square in shape, and digital cameras don’t usually take square photos (they are usually taken in a 4:3 or 3:2 ratio).  So as a result, after taking a photo it inevitably must be cropped before it can be used by Exchange or Active Directory as a Lync / Skype for Business photo. The way that Exchange handles this is to do (what I call) a Centre Crop on the image. This is where you crop to a square that is the width and height of the short side of the photo and then centre the square in the middle of the long edge of the photo (see the Centre Crop example image below). This works well when the image has been composed with the subject's face right in the centre of the frame. However, what if the person taking the photo decided to also include a large portion of the subject’s body in the frame? Or it’s one of the user’s favourite photos of them at the beach with the majority of frame consisting of landscape? Or what if, god forbid, the photographer decided to use their arts degree and frame the subject using the Golden Ratio or the Rule of Thirds… In these cases you can end up with a weird looking image if Centre Cropping is used.

      Centre Crop Example

      I realised all of this after starting this project and tried to think of a better way… like, what if I was to detect where the subject's face was within the image and then crop around it? That sounds like fun! So I started reading about facial recognition techniques and software. What I learnt was that there is no existing core Dot Net libraries that I could leverage in Powershell that would supply me with facial recognition. So I looked more broadly and discovered that there are a couple of open source projects that had Dot Net ports and could be used if imported and compiled into a Dot Net application… but I wanted this to be a pure Powershell implementation and not some bulky application! So I then dug deeper and started reading academic papers about different face and skin recognition methods that exist. After doing much prototyping and testing with these skin recognition concepts, I created my own skin thresholding algorithm in Powershell that was quite fast (something learned whilst doing this was that Powershell is slow at doing many mathematical operations, and especially slow when it comes to recasting variable types and object creation).

      The end result of this absurd amount of work was an unassuming checkbox in the Bulk Import section of the tool’s GUI called “Smart Crop”. Smart Crop is used in two places in the tool, the first is when Bulk converting images from a folder.  The tool will try and locate using my skin recognition algorithm where the majority of skin is on the screen and then try to appropriately frame the around this location. The (3:2 ratio) photo below shows an example of what a better alignment for a centre cropped image would look like as a result of recognising where the face is in the image.

      Face Aligned Centre Crop

      As you can see in the above photo, the image gets cropped around the more important part of image rather than the centre of the image as seen in the earlier Centre Crop example.
      So it’s pretty useful to be able to align a full width crop around the subject's face like this, however, Lync photos end up being reduced to very small sizes in most cases (96 x 96 pixels). So it would also be nice to be able to crop even tighter to the subject's face so that you can see it more clearly in your contacts list in Lync / Skype for Business. Below is an example of a better crop to use in Lync:  

      Ideal Smart Crop for Lync

      In order make the photo more usable with Lync/Skype for Business, I have tried to tune the algorithm to give a tight crop around the face of the subject in the photo. A pitfall of doing a tight crop like this, however, is that the cropping square should not be less than the size of the image that is being outputted (ie. the crop square being 200 x 200 in size and the output size being 648 x 648 in size). If this happens then the quality of the output photo will be significantly reduced due to the image being blown up. For this reason you should always try and use source images that are quite a bit larger than the largest size image you are trying to output. The tool has been designed to understand this issue and will always attempt to crop to at least the size of the output image file. This in some cases will result in a looser crop that you might expect around the subject's face, however, it is designed to maintain the quality of the output file.  

      The “Margin” setting in the tool can also be used to tighten or loosen the Smart Crop frame around the subject's face. This setting ranges between 1-50, with a default of 25. The lower the value, the tighter the crop will be around the subject.

      From the testing I've done so far I have found my Smart Crop detection algorithm works in the majority of cases (note: it does not work on greyscale images). However, it can have problems if there are background components in the image that fall into the same Luma and Chroma ranges as skin does. In these cases you can manually crop the individual files that were not detected accurately. In the end though I hope it saves you a bunch of time and effort!


      Features - Filters


      Photo filters are all the rage at the moment with every social media app in the world jumping on the bandwagon. However, the idea of filters in this application is not just a gimmick: it offers you the ability to do colour, brightness, and contrast correction to photos in order to give them more pop so they look their best when displayed in Lync/Skype for Business. When you are supplied photos by an organisation, it’s fairly likely that they were taken in a room somewhere with bad or at least uninspired lighting. As a result, all of the images can look washed out and flat.

      Below is an example of a washed out image of a technology company CEO you may recognise. As you may be able to see, the photo on the left does not look very vibrant and comes across as quite bland (especially when reduced to 96 x 96 pixels in size). However, after applying a contrast and brightness boost filter to the image (as can be seen in the picture on the right) it looks much more dynamic.


      The Lync / Skype for Business Photo Editor Tool gives you the option to Colourise, Contrast Reduce/Boost, and Brightness Reduce/Boost with various levels of intensity, and these settings can be chained to give you 175 different combinations to use!

      In addition to the more subtle image quality and dynamics filtering capabilities I decided that I too couldn’t resist the challenge of implementing some grungy Instagram style filters. So if you have been using Instagram too much and feel the need to make your images look a little more vintage, try the Effects filters drop down box. Here’s some examples of my custom effects filters:


      Will these filters ever be used for a Lync or Skype for Business deployment? Maybe not, but I had fun figuring out how to write the image processing code to generate them J


      The Wrap Up


      Well there you have it: my holiday project has finally made to a public release. You may have also noticed that this post is only Part 1 of a series. Indeed it is! Because now that you have a tool to easily create image files for Exchange and Active Directory, you will likely also need a tool for easily uploading those files to these systems. So Part 2 of this series will supply you with just such a tool… So keep an eye out for that one. Cheers, and enjoy!


      The Case of the Lync 2013 Edge Server Centralised Logging Ports

      $
      0
      0
      If you have ever done any port testing on a Lync 2013 Edge server you may have noticed that the external interface of the Edge server had ports in the 50001-50003 range open and listening for TCP connections. Usually this is not the case in the 50000-59999 media range because these ports are only opened for short periods of time when media ports have been allocated by the Edge server for active calls. The Media Relay Service on the Edge was designed this way for security purposes, so that the 50000 range could be opened on external firewalls without posing a significant security threat. So what are the undocumented 50001-50003 ports facing externally? Well, they are actually the Centralised Logging Service and they appear to be facing externally for no reason other than they are bound to port 0.0.0.0. The netstat command show this:

      ClsAgent.exe Ports


      The netstat output shown above shows that the ClsAgent.exe service is listening on the 50001, 50002 and 50003 ports on the IP Address “0.0.0.0”. This means that the service has not bound to any specific interface and as a result will listen on all interfaces. I image this is a design issue with the CLSAgent because it was originally designed to run on internal Lync servers that only had one interface and so binding to a specific port wasn’t a requirement at the time of designing the software. I’m happy to be told different by someone at Microsoft though…

      As mentioned earlier, the CLS port range falls into the TCP 50000-59999 range, which is also legitimately used for Edge Media Relay service. So it is included on the list of external port ranges that may be open on the external firewall. I say may be opened because this range of TCP ports does not need to be opened inbound (as per the guidance from Microsoft) unless you are federating to OCS 2007, or in the more complex scenario when you are using NATing with DNSLB on the external edge and your firewalls do not support hairpinning (ie. traffic coming from one Edge server’s NATed external public IP address back in to another Edge servers NATed External Public IP address) of media between multiple edge servers in the same pool. Another legitimate reason for this is when you want an optimised media path that does not require tunnelling via port 443/3478 to get to the required 50000 range media port. These scenarios were explained in a great amount of depth by Bryan Nyce and Thomas Binder at Lync Conference 2014. I suggest you watch these videos several times if you don’t understand what I’m talking about here.

      'So what percentage of companies actually open the 50000 range of ports to the internet?' I hear you asking… Well, I also wondered this, so I decided that I might do some research and find out. I tested approximately 250 Edge servers of some of the largest organisations in the world and found that approximately a quarter of them have the 50000 range open (with CLS ports showing). So quite a large number of organisations currently have this issue.

      The actual security implications of having these ports open on the Internet is not fully known at this stage. The existing ClsController.exe application and CsCls Powershell commands supplied with Lync do not allow the user to connect to servers outside of the Lync pools within their installation. So it's certainly not the case that you can use them to randomly connect to other organisations' Edge servers and start logging service. It's my understanding that Microsoft is aware of this issue and have not yet done anything to change the behaviour, so they obviously have deemed it low risk. In my opinion though, the reduction of attack surface is always a good idea for internet facing services. So my recommendation is to block these ports because they serve no practical function externally.


      A Work Around


      I have written a Powershell script that will block the CLS service ports on selected interfaces of your Edge server. This will function as a work around until Microsoft decides to formally change this behaviour in the product.

      When you run the script it will display a list of IP Addresses on the server that you can choose to block the CLS service on. You simply need to enter the number of the interfaces in the list that you would like to block access to the CLS ports on. The script will then automatically create a new firewall rule to block TCP ports 50001-50003 inbound on the selected IP Address to the CLSAgent service on the machine. Follow this process for all externally facing Edge IP Addresses (ie. Access Edge, AV Edge and Conferencing Edge IP Addresses).

      BlockCLSExternalEdgePorts1.00

      The rules that are added can be seen in the Advanced settings of Windows Firewall in the system Control Panel:


      Once you have done this for all of your Internet facing Edge IP Addresses you can rest easy: your Edge is now as safe as you previously thought it was…


      Note: Run Powershell as Administrator when running the script.

      The Wrap Up


      Security is important and we all need to try to understand what we are asking when we tell the firewall team to open internet facing firewall ports. Whether you are deploying a new Edge server or already have an Edge server out in the wild, then I suggest you implement my firewall work around. Enjoy and see you next time. Ciao!


      Photos (Part 2) - Exchange / Active Directory/ Office 365 Photo Importer

      $
      0
      0

      With Part 1 of this series I introduced you to a tool that will allow you to convert photos into a format suitable for importing into Active Directory, Exchange, or Exchange Online. These photos are used across the whole Office product line, including Lync/Skype for Business, Exchange, Sharepoint, Office 365, etc. After creating these images, the next step is to import them into either Active Directory and/or Exchange 2013. The final outcome is having glorious photos appear in your Office applications!

      Look! Pretty Photos!

      So once again, to try and save everyone a lot of pain, I've made a tool that will hopefully make importing these images a breeze.


      Exchange / AD / O365 Photo Importer

      The aim of this tool is to be simple and flexible as possible to take the pain out of importing photos in any scenario.


      • View previously uploaded Exchange HD images, Active Directory images, and Office 365 Exchange Online HD images.
      • Import Exchange HD images, Active Directory images, and Office 365 Exchange Online HD images.
      • Remove images from Active Directory or Exchange HD photo for any user.
      • Downscale previously imported Exchange HD images to 96x96 sized images in Active Directory by pressing the “Use Existing HD” button. This replaces the 64x64 image that Exchange auto-uploads to AD when you do a HD image import. This button can be handy if you no longer have the source image on hand and want to quickly upgrade the resolution of your AD photos.
      • Automatic detection of On Premises or Office 365. The system type that is detected when the tool boots and the system type will be shown in the top right hand side of the interface. Note: The system type will affect the naming convention used for the user names in the tool. On Premises will use the SAMAccountName and Office 365 will use the Alias/Username of the user.
      • Automatic resizing of images to 96x96 before they are being imported into Active Directory. This stops you from uploading unnecessarily large images into Active Directory. (ie. if you open a 4MB picture into the tool and try to import it into AD, the tool will convert the image to 96x96 before uploading it)
      • The View Web Image button will open a browser connection to the 648x648 sized version of the image. This can be useful if you want to download a copy of the HD image as a backup.


      Requirements:
      • The script is supported on Powershell Version 3.0 and above. So if you're running Windows 7 you will need to make sure you've upgraded your Powershell version to at least Version 3.0.
      • Drag and Drop only works when the filesystem and Powershell session have the same security level. So if you're running Powershell with Administrator privledges (ie. Run as Administrator), whilst you are logged into the machine as a different username, the Drag and Drop function will not work. To fix this just run the Powershell with the privileges of the user you logged in as (as long as you have the correct AD and Exchange permissions) and it will work.
      • In order to set Exchange HD photos for On Premises or O365 the user that is running the Powershell session will need to have permissions to run the Set-UserPhoto command. The build in RBAC roles that support this command include Organization Manager, Recipient Management and Help Desk. To set Active Directory photos the user will need permissions to run the Set-AdUser command.

      Version 1.01 Update (15/5/2015)

      • Corrected issue with the tool on Powershell version 4. Removed "-ErrorVariable" flag from script because it was causing "language mode" errors on Powershell Version 4 with Remote Powershell connections.
      Version 1.02 Update (1/7/2015)

      • Changed the command check messages to yellow instead of red and made the messages clearer so it doesn't appear as much like a fatal error. These are just information messages and not necessarily errors that will affect functionality.


      Overview


      The tool is designed to gracefully fall back to support whatever level of Powershell commands that are available to it. So if you were to run it on a machine that only has access to Active Directory commands it would only allow you to import Active Directory photos, and so on. Ideally you should have access to both Active Directory and Exchange commands for an on premise deployment. For Office 365 you will need to remotely connect to Exchange Online (see the next section for details of how to do this).

      There are a few things that you should understand about how the Powershell import commands work before using the tool. The Exchange import command (Set-UserPhoto) supports the importing of any sized file JPG file into the system. If the file is not square in shape then Exchange will do a “centre crop” (as explained in my previous post) on the image and convert it to 648x648 in size then import it into the user’s mailbox. At the same time as doing this Exchange will also import a 64x64 sized image into Active Directory.

      The Active Directory import command (Set-ADUser -identity $name -Replace @{thumbnailPhoto=$photoBytes}) does not support the same fancy cropping and resizing capability as the Exchange command does. Instead it will import the raw bytes that it is presented into the thumbnailPhoto attribute in the Active Directory database. The thumbnailPhoto attribute will accept images of up to 100KB in size. However, it’s not recommended to import files that are that big into Active Directory as it can add a great deal of size to the database which can result in much larger amounts of replication traffic between Domain Controllers. If you import an image into Active Directory and there isn't currently a HD image in exchange, then the AD image will also be displayed by the Get-UserPhoto command in exchange as well.


      Tool Operation


      Now that you have an overview of how the commands work we can go into some depth about how the tool works. The tool displays three images, the left most image (Input Image) is a preview of the image that you are going to import into the system. You can select this image by either dragging and dropping the image from your PC (see requirements section for more details of this), or by selecting the browse button under the Import Image section. The middle photo is the current Active Directory photofor the user highlighted in the Select User dropdown box. The rightmost photo is the current Exchange HD photo for the user highlighted in the Select User dropdown box. If the user does not have images in either of these locations then a generic missing photo image will be displayed by the tool. If the tool has not been able to access the necessary commands to get to the photo a “Not Accessible” message will be displayed. If the user does not have a Mailbox a "No Mailbox" image will be displayed.

      When using the tool you may choose to import a single user photo or you might want to import a folder full of images. The tool will allow you to do both by selecting the Import Folder or Import Image checkboxes respectively. When the tool opens a file it will automatically select the import option appropriate for the image size. If the photo is 96x96 or smaller, then the Active Directory import check box (Replace 96x96) will be selected. However, if the image is larger than 96x96 then the Active Directory (Replace 96x96) and Exchange (Replace 648x648) import checkboxes will both be selected. In the case that both of the checkboxes are selected the tool will first import the image into Exchange (which will automatically import a 64x64 image into Active Directory) and then the tool will resize and import a 96x96 version of the image into Active Directory (ie. over the top of the smaller 64x64 image). 

      When you select to import a folder you have the choice of seeing each image as it is imported and selecting whether you want to import the image or not. This by default is the operation of the tool, however, you may wish to import all of the photos without confirming each file. This is done by unticking the Confirm Import checkbox. When importing folders, the files within the folder need to start with a name that matches the user name in Select User dropdown box (which is the user's SAMAccountName from Active Directory for On Premises, or the Alias/Username from Office 365). The tool will allow you to have extra information in the file name, however, additional information must be separated from the user's name by a space character (space is used because it can’t be used in a SAMAccount name or Alias/Usernames in Office 365). For example, you may have a file named “John.Smith 648x648.jpg” which the tool will import for a user with the SAMAccount name of “John.Smith”. However, you cannot have the name “John.Smith648x648.jpg” because it doesn't have a space character between the name and additional test which means it isn't an exact match for the John.Smith user in the dropdown box. The important point to take from this is that you need to be precise in the naming of your images for a Bulk import. In summary:

      On Premisis File Naming: SAMAccountName
      Office 365 File Naming: Alias/Username

      Note: Image file names must begin with the user's name following the convention above and must be divided from any other text in the file name by a space character.

      The file naming for a bulk import is your most important job! After doing this you can kick back and let the tool do its work.

      Importing Photos into Office 365


      The tool has been designed to support importing HD photos into Exchange Online. However, the commands used to connect to Office 365 via Powershell may be slightly different than what you usually use. So Office 365 admins - pay careful attention to this section!

      Create an O365 session:

      $Session = New-PSSession -ConfigurationName Microsoft.Exchange -ConnectionUri https://outlook.office365.com/powershell-liveid/?proxymethod=rps -Credential $cred -Authentication Basic -AllowRedirection

      Note: You must include the “?proxymethod=rps” part of the URI in order to import images into Exchange Online. If you don’t do this, the import will fail with a (413) Request Entity Too Large error.

      Enter O365 credentials:


      Import the session into Powershell:

      Import-PSSession $Session

      After you have done this, you can run the script in the same Powershell window and import photos.


      Limits of Office 365


      There does appear to be a maximum image file size that you can upload to O365. However, it seems to be more of a practical size limit rather than an enforced one. I have uploaded images up to about 6MB in size before, however this is a very slow process and you can run into random errors during the process. It can also take a long time (5-10 minutes) to import very large images directly into the Exchange Online server. When the photo has been uploaded the Exchange server will resize the image before saving it to the user’s mailbox. For the aforementioned reasons I would recommend reducing the size of this photo before trying to upload to Exchange Online. My suggestion is that you use my Image Creator Tool to reduce the size of your photos to 648x648 before you try to upload them.

      I have found that Office 365 doesn't like you uploading photos for the same user multiple times in a row (ie. a bulk import with many photos for the same user name). If you do this you will get errors back from O365. However, if you are bulk uploading to different users it seems to work fine. If you start experiencing random errors when trying to upload or get images from Office 365 try disconnecting the current session and open a fresh Powershell session.

      On occasion when uploading an image to O365 the upload process will work successfully (no errors in the PS window), however, the image will not be available to be viewed immediately after a successful upload. Majority of the time this is not the case but occasionally it will take about 10 seconds before the photo can be viewed. In this time the tool will display the generic no photo silhouette picture. If this happens, be patient and refresh the user photo by reselecting the user from the 'Select User' drop down box. 


      The Wrap Up


      Well, that’s photos in the bag! You should now be able to convert and create images as well as import them into an On Premises system or an Office 365 tenant. Hopefully this makes your life much easier. Let me know if you have feedback and enjoy!


      Viewing all 63 articles
      Browse latest View live